How to Block iCloud Private Relay
Disabling iCloud Private Relay on macOS may be good idea if it conflicts with an existing VPN or network auditing requirements.
What Is iCloud Private Relay?
Apple’s iCloud Private Relay is a new privacy feature available on macOS 12+ and iOS 15+. When enabled, iCloud Private relay allows users to browse websites without the websites’ operators being able to see the device’s IP address or precise geographic location. Additionally, network operators like an ISP will be unable to collect any information about the end-user’s browsing history (typically accomplished by recording DNS requests).
See Apple’s official documentation for more information about how iCloud Relay works.
Is iCloud Private Relay a VPN replacement?
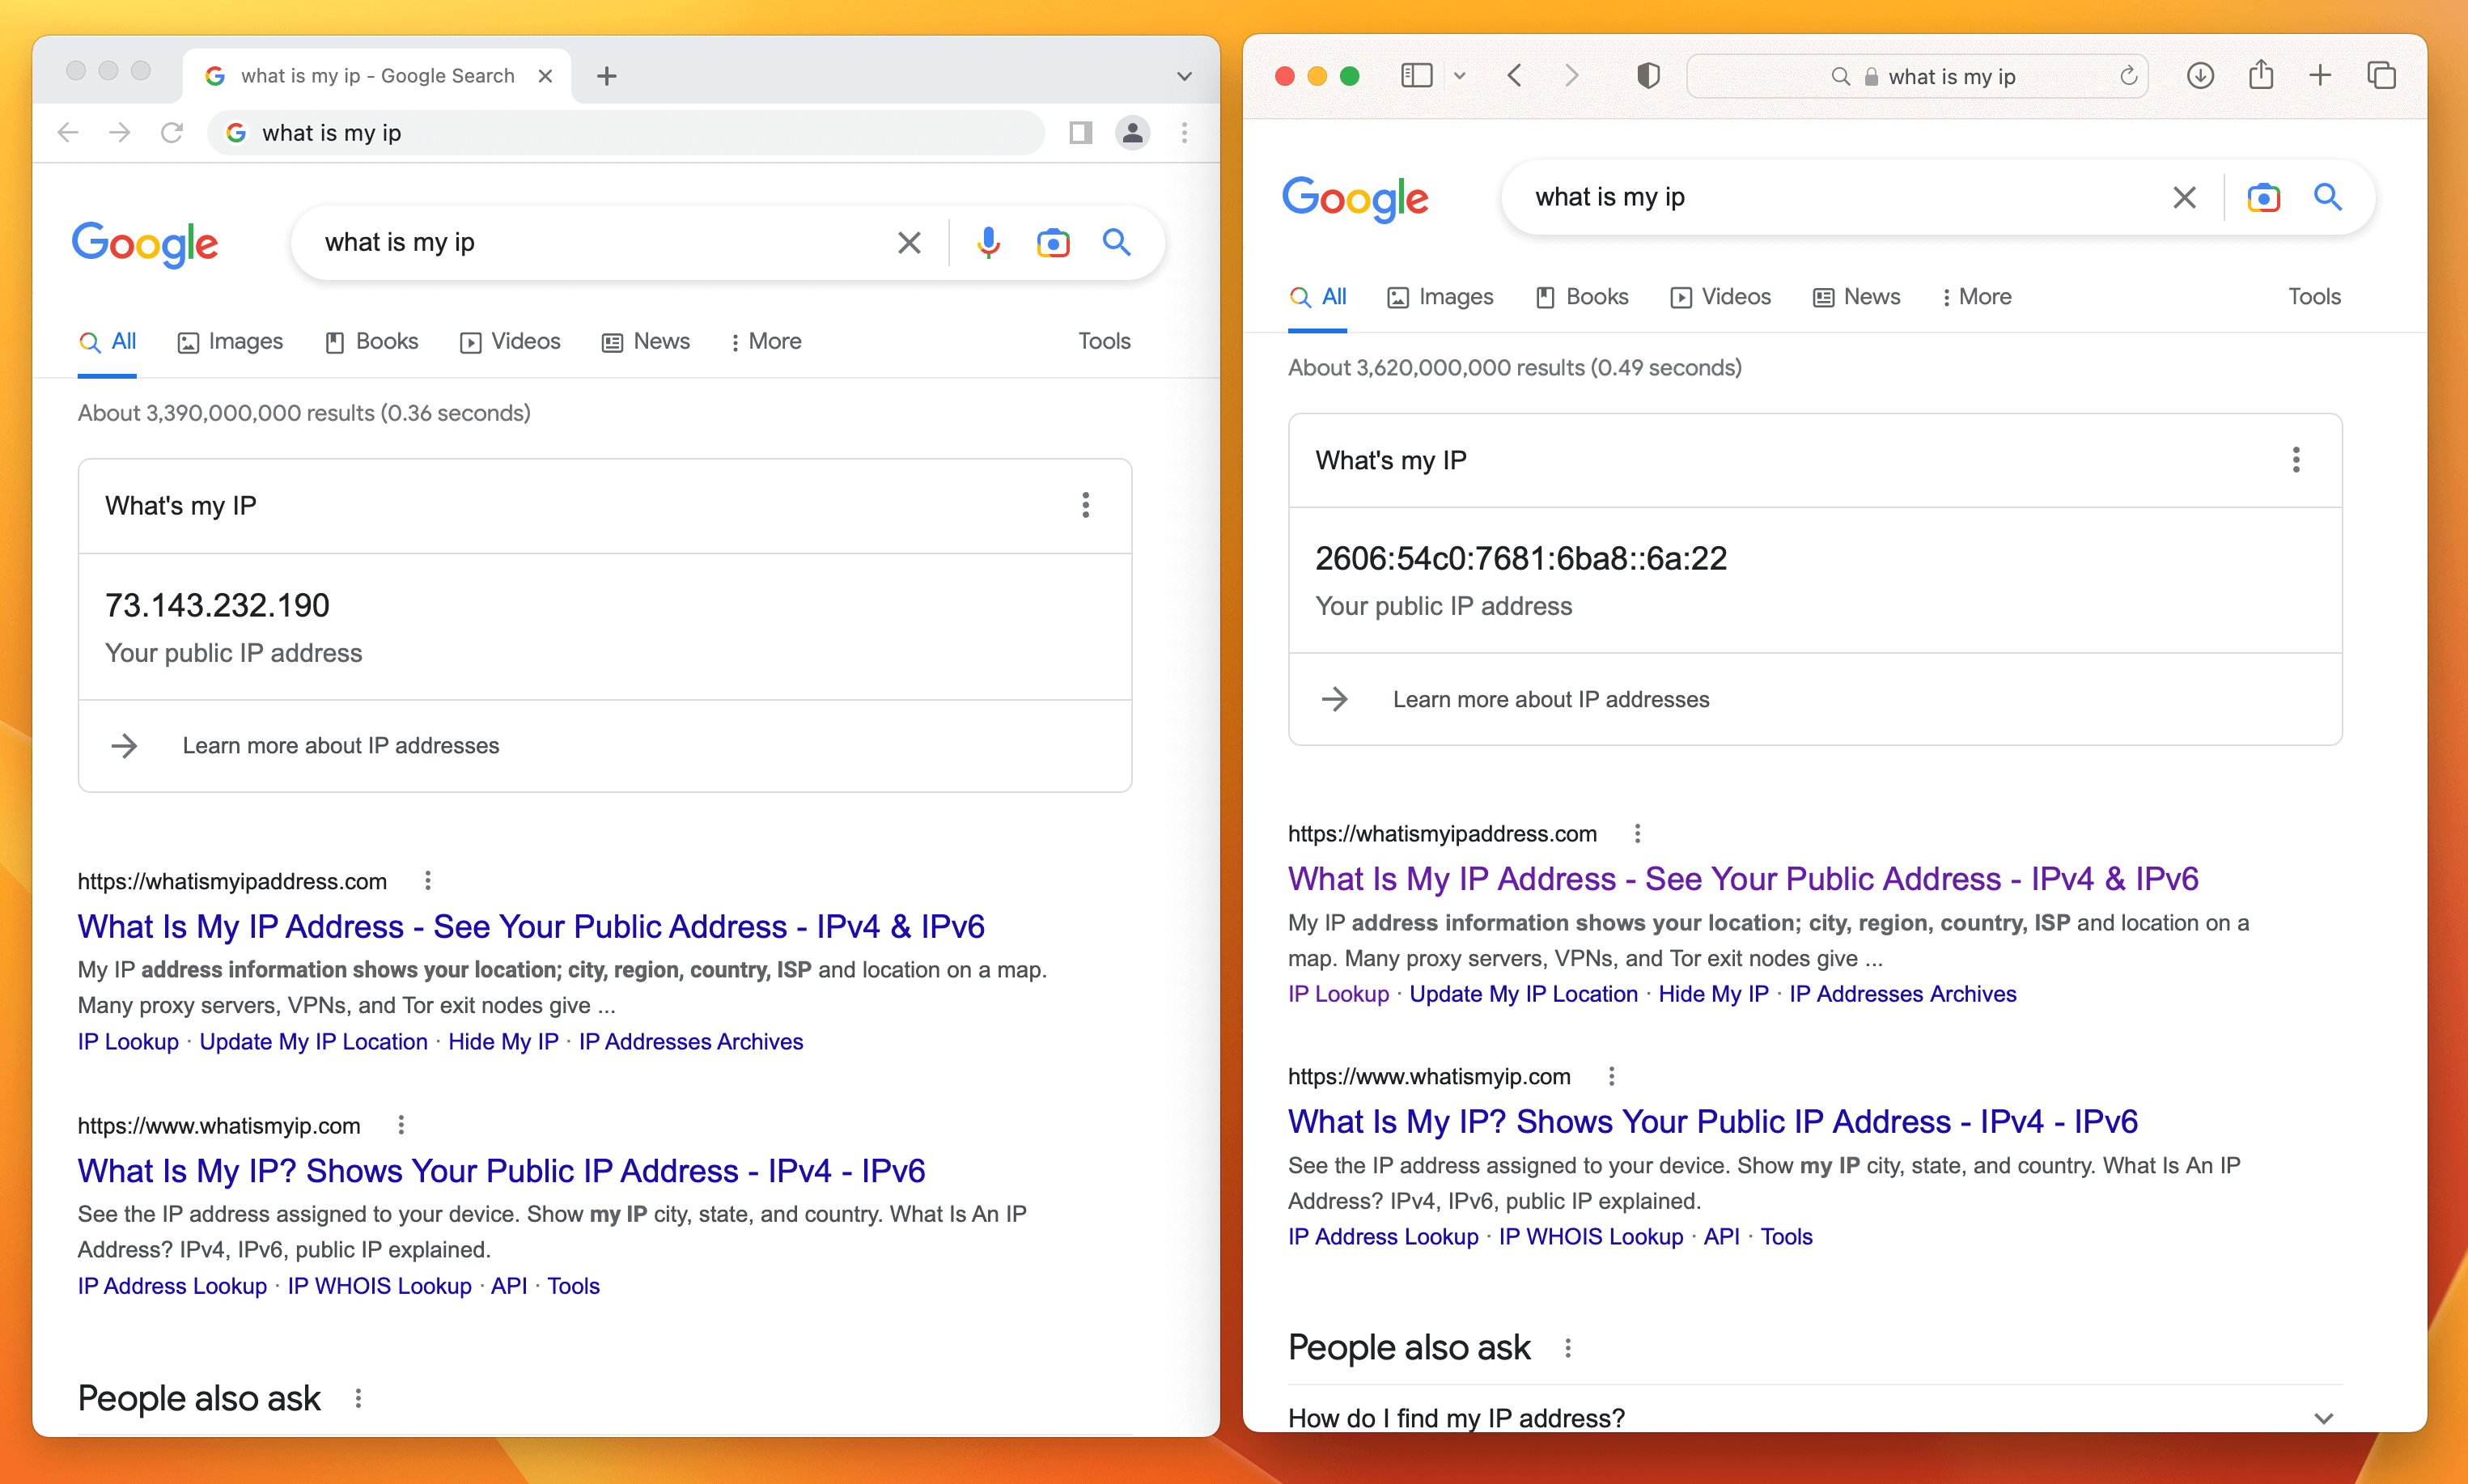
No. Unlike a VPN, iCloud Private Relay only works with specific apps that support it. For example, on macOS, even with iCloud Private Relay enabled, Google Chrome still sends your actual IP address.
In contrast, a VPN operates at the network layer, and when configured correctly, will funnel all traffic through the private network before it is sent to the intended final destination (regardless of the app being used on the device).
Should End-Users Turn Off iCloud Private Relay?
iCloud Private Relay is a privacy win for most users, but it comes with important trade-offs that may disproportionately impact certain users and organizations. Let’s go through a few of those tradeoffs.
Private Relay Disrupts Certain Network Audit Logging Strategies
Certain industries have strict network audit logging requirements. When iCloud Private Relay is used, DNS requests and other traffic originating from Safari will be fully encrypted and inscrutable to traditional network monitoring solutions.
Private Relay Disrupts Socket Filtering with a Default Route
Certain apps (for example AdGuard), work by using macOS’ built-in socket filtering APIs to filter undesired network traffic. If this API is used in conjunction with a “default route” rule, Private Relay simply will not turn on.
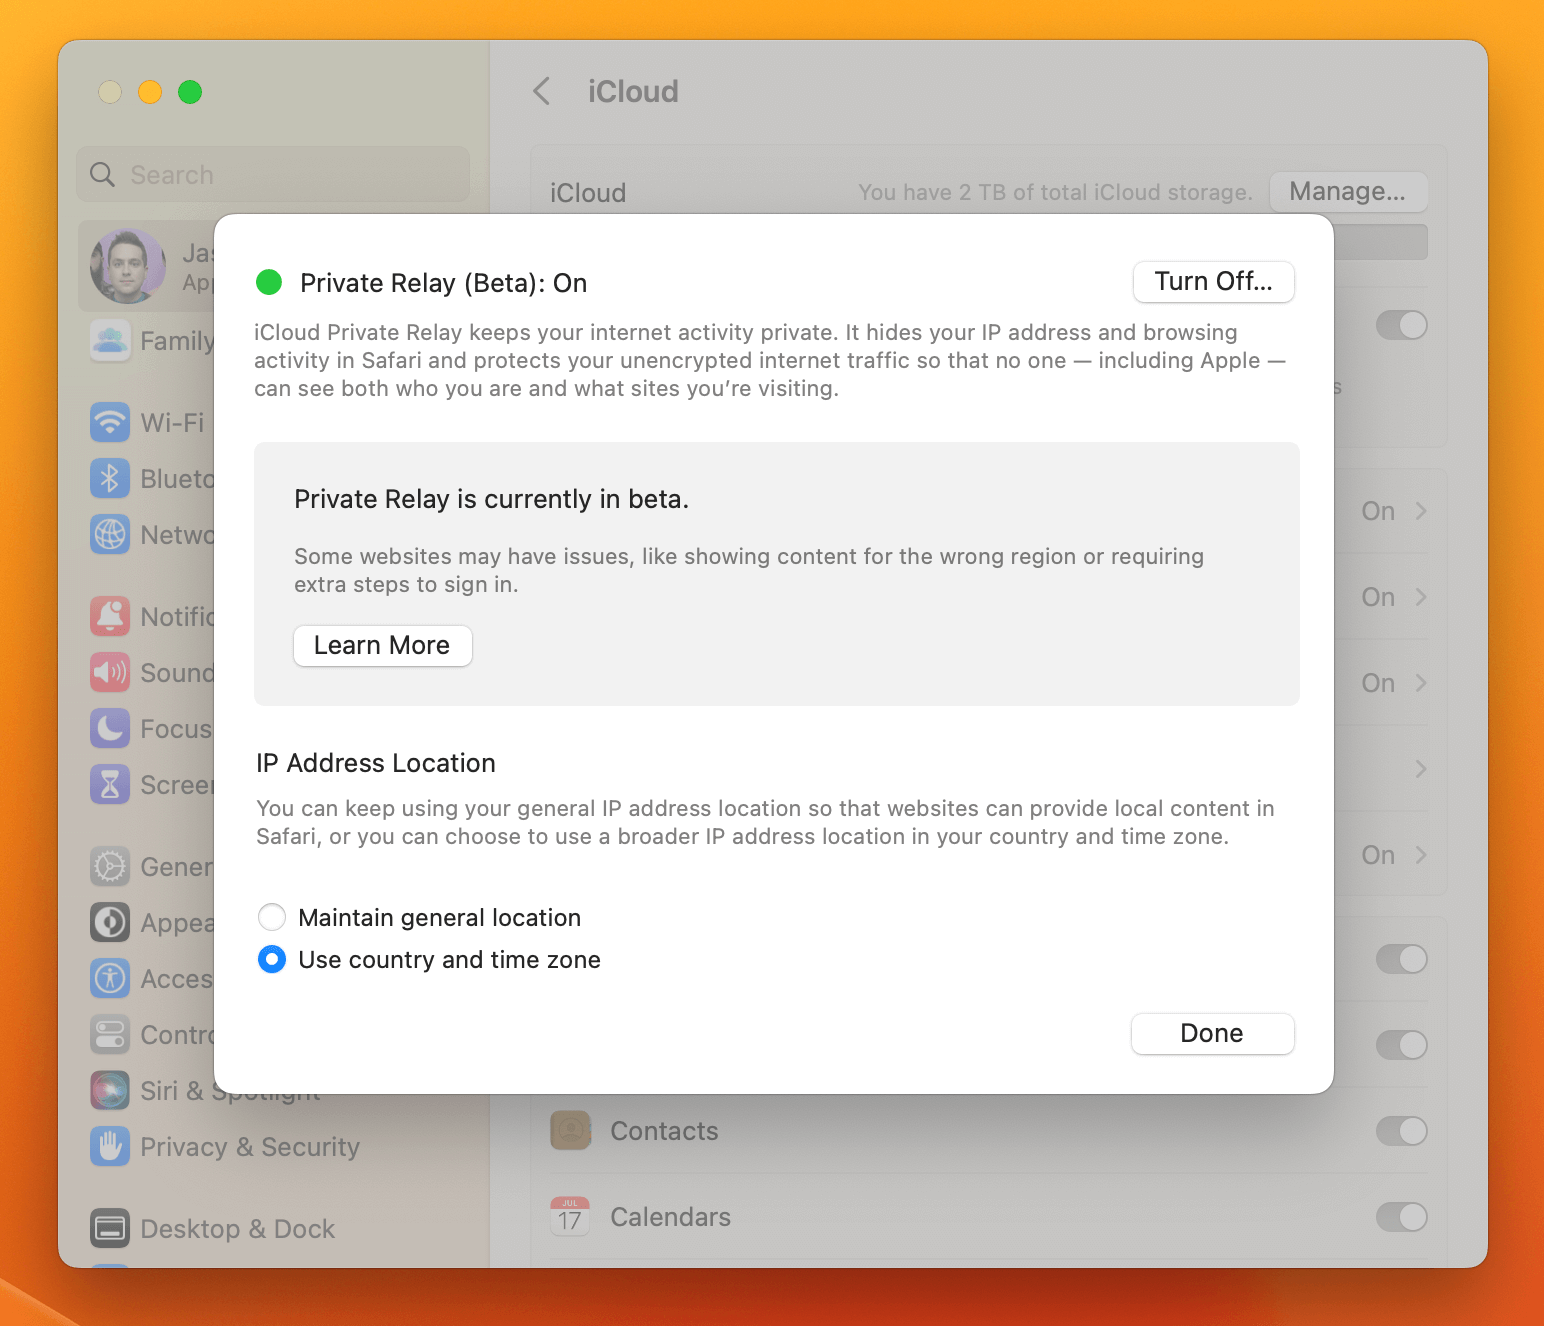
Private Relay May Cause Your Connection To Be Untrusted
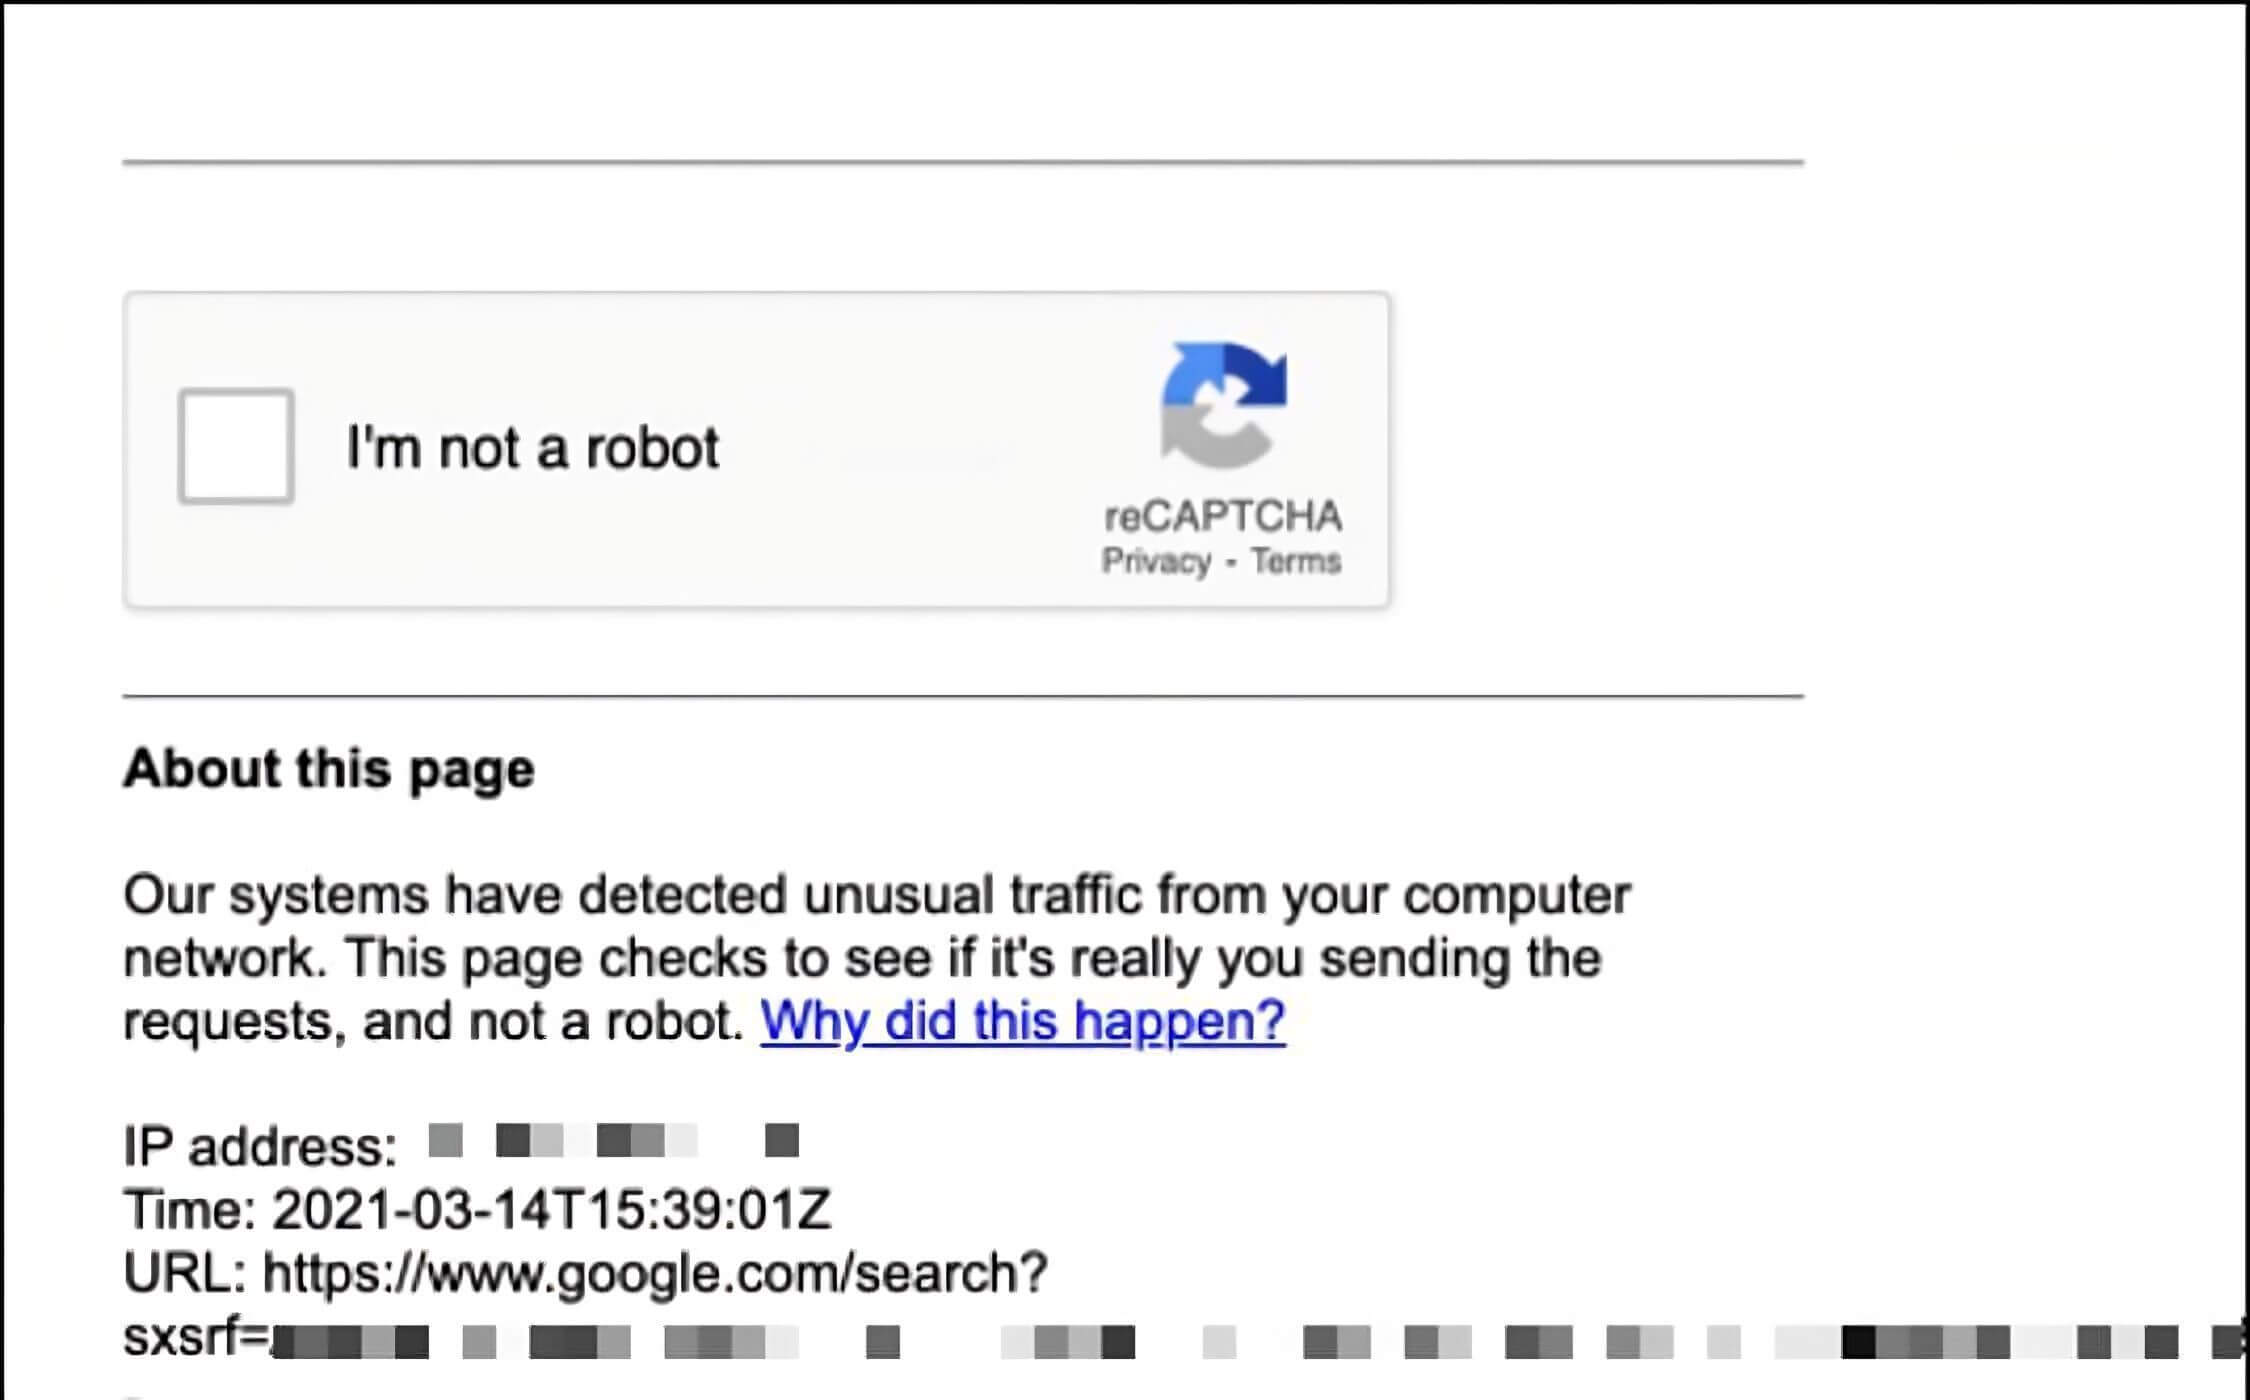
Despite Apple urging network operators that they should fully trust connections originating from iCloud Private Relay, many users report that once turned on they often have to prove on websites that they are not a bot. This often means additional CAPTCHA-style prompting, being locked out entirely from making purchases, and other hard-to-understand errors.
As the service matures, and network operators and IP reputation services become more familiar with it, the hope is that these difficulties become more rare. Until that day, however, you can expect that users may contact the help desk more when iCloud Relay is turned on.
How to Programmatically Determine the iCloud Private Relay State
On macOS, the System Settings app stores the state of the iCloud Private Relay
Service in a binary plist for each user at: ~/Library/Preferences/com.apple.networkserviceproxy.plist
The key data in this plist is Base64 encoded, but using a handy script written by Joel Bruner you can pull the status programmatically.
#!/bin/bash
: <<-LICENSE_BLOCK
iCloud Private Relay Status Checker - (https://github.com/brunerd)
Copyright (c) 2022 Joel Bruner (https://github.com/brunerd)
Licensed under the MIT License

Permission is hereby granted, free of charge, to any person obtaining a copy of this software and associated documentation files (the "Software"), to deal in the Software without restriction, including without limitation the rights to use, copy, modify, merge, publish, distribute, sublicense, and/or sell copies of the Software, and to permit persons to whom the Software is furnished to do so, subject to the following conditions:
The above copyright notice and this permission notice shall be included in all copies or substantial portions of the Software.
THE SOFTWARE IS PROVIDED "AS IS", WITHOUT WARRANTY OF ANY KIND, EXPRESS OR IMPLIED, INCLUDING BUT NOT LIMITED TO THE WARRANTIES OF MERCHANTABILITY, FITNESS FOR A PARTICULAR PURPOSE AND NONINFRINGEMENT. IN NO EVENT SHALL THE AUTHORS OR COPYRIGHT HOLDERS BE LIABLE FOR ANY CLAIM, DAMAGES OR OTHER LIABILITY, WHETHER IN AN ACTION OF CONTRACT, TORT OR OTHERWISE, ARISING FROM, OUT OF OR IN CONNECTION WITH THE SOFTWARE OR THE USE OR OTHER DEALINGS IN THE SOFTWARE.
LICENSE_BLOCK

#############
# FUNCTIONS #
#############

#include this self-contained function in your script
function iCloudPrivateRelay(){

    #only for Moneterey and up, 11 and under need not apply
    [ "$(sw_vers -productVersion | cut -d. -f1)" -le 11 ] && return 1

    #parent pref domain
    domain="com.apple.networkserviceproxy"
    #key that contains base64 encoded Plist within parent domain
    key="NSPServiceStatusManagerInfo"

    #child key within base64 embedded plist
    childKey="PrivacyProxyServiceStatus"

    #get the top level data from the main domain
    parentData=$(launchctl asuser "$(stat -f %u /dev/console)" sudo -u "$(stat -f %Su /dev/console)" defaults export "${domain}" -)

    #if domain does not exist, fail
    [ -z "${parentData}" ] && return 1

    #export the base64 encoded data within the key as PlistBuddy CF style for grepping (it resists JSON extraction)
    childData=$(/usr/libexec/PlistBuddy -c "print :" /dev/stdin 2>/dev/null <<< "$(plutil -extract "${key}" xml1 -o - /dev/stdin <<< "${parentData}" | xmllint --xpath "string(//data)" - | base64 --decode | plutil -convert xml1 - -o -)")

    #if child key does not exist, fail
    [ -z "${childData}" ] && return 1

    #match the status string, then get the value using awk (quicker than complex walk, this is sufficient), sometimes written in multiple places
    keyStatusCF=$(awk -F '= ' '/'${childKey}' =/{print $2}' <<< "${childData}" | uniq)

    #if we have differing results that don't uniq down to one line, throw an error
    [ $(wc -l <<< "${keyStatusCF}") -gt 1 ] && return 2

    #if true/1 it is on, 0/off (value is integer btw not boolean)
    [ "${keyStatusCF}" = "1" ] && return 0 || return 1
}

########
# MAIN #
########

#example - one line calling with && and ||
#iCloudPrivateRelay && echo "iCloud Private Relay is: ON" || echo "iCloud Private Relay is: OFF"

#example - multi-line if/else calling
if iCloudPrivateRelay; then
    echo "iCloud Private Relay is: ON"
else
    echo "iCloud Private Relay is: OFF"
fi
How to Block iCloud Private Relay
If you would like to Block iCloud Private Relay in your organization, there are three methods you can use.
Block iCloud Private Relay Via The Network
The fastest and most effective way to block iCloud Private Relay is on your network itself. To do this, simply block DNS resolution on the following domains:
mask.icloud.com
mask-h2.icloud.com
For more information please see Apple’s Documentation: Prepare your network for iCloud Private Relay.
Block iCloud Private Relay Via MDM
If you use an MDM product like Apple Business Essentials, you can disable the iCloud Private Relay using the following profile payload (source)
<?xml version="1.0" encoding="UTF-8"?>
<!DOCTYPE plist PUBLIC "-//Apple//DTD PLIST 1.0//EN" "http://www.apple.com/DTDs/PropertyList-1.0.dtd">
<plist version="1.0">
  <dict>
    <key>PayloadContent</key>
    <array>
      <dict>
        <key>PayloadDisplayName</key>
        <string>Restrictions</string>
        <key>PayloadIdentifier</key>
        <string>com.apple.applicationaccess.E8C72ECD-7122-4C66-853F-3F3467D1AEF5</string>
        <key>PayloadType</key>
        <string>com.apple.applicationaccess</string>
        <key>PayloadUUID</key>
        <string>1953B7E6-DB5C-4FDA-A579-2EE05978F4B6</string>
        <key>PayloadVersion</key>
        <integer>1</integer>
        <key>allowCloudPrivateRelay</key>
        <false />
      </dict>
    </array>
    <key>PayloadDescription</key>
    <string>Disables the iCloud Private Relay feature.</string>
    <key>PayloadDisplayName</key>
    <string>Disable iCloud Private Relay</string>
    <key>PayloadIdentifier</key>
    <string>E31B0811-3164-49CE-BAA9-67075398DE85</string>
    <key>PayloadOrganization</key>
    <string>Company Name</string>
    <key>PayloadScope</key>
    <string>System</string>
    <key>PayloadType</key>
    <string>Configuration</string>
    <key>PayloadUUID</key>
    <string>ECEB2ECA-B16F-41F8-9909-7DD36FA1609C</string>
    <key>PayloadVersion</key>
    <integer>1</integer>
  </dict>
</plist>
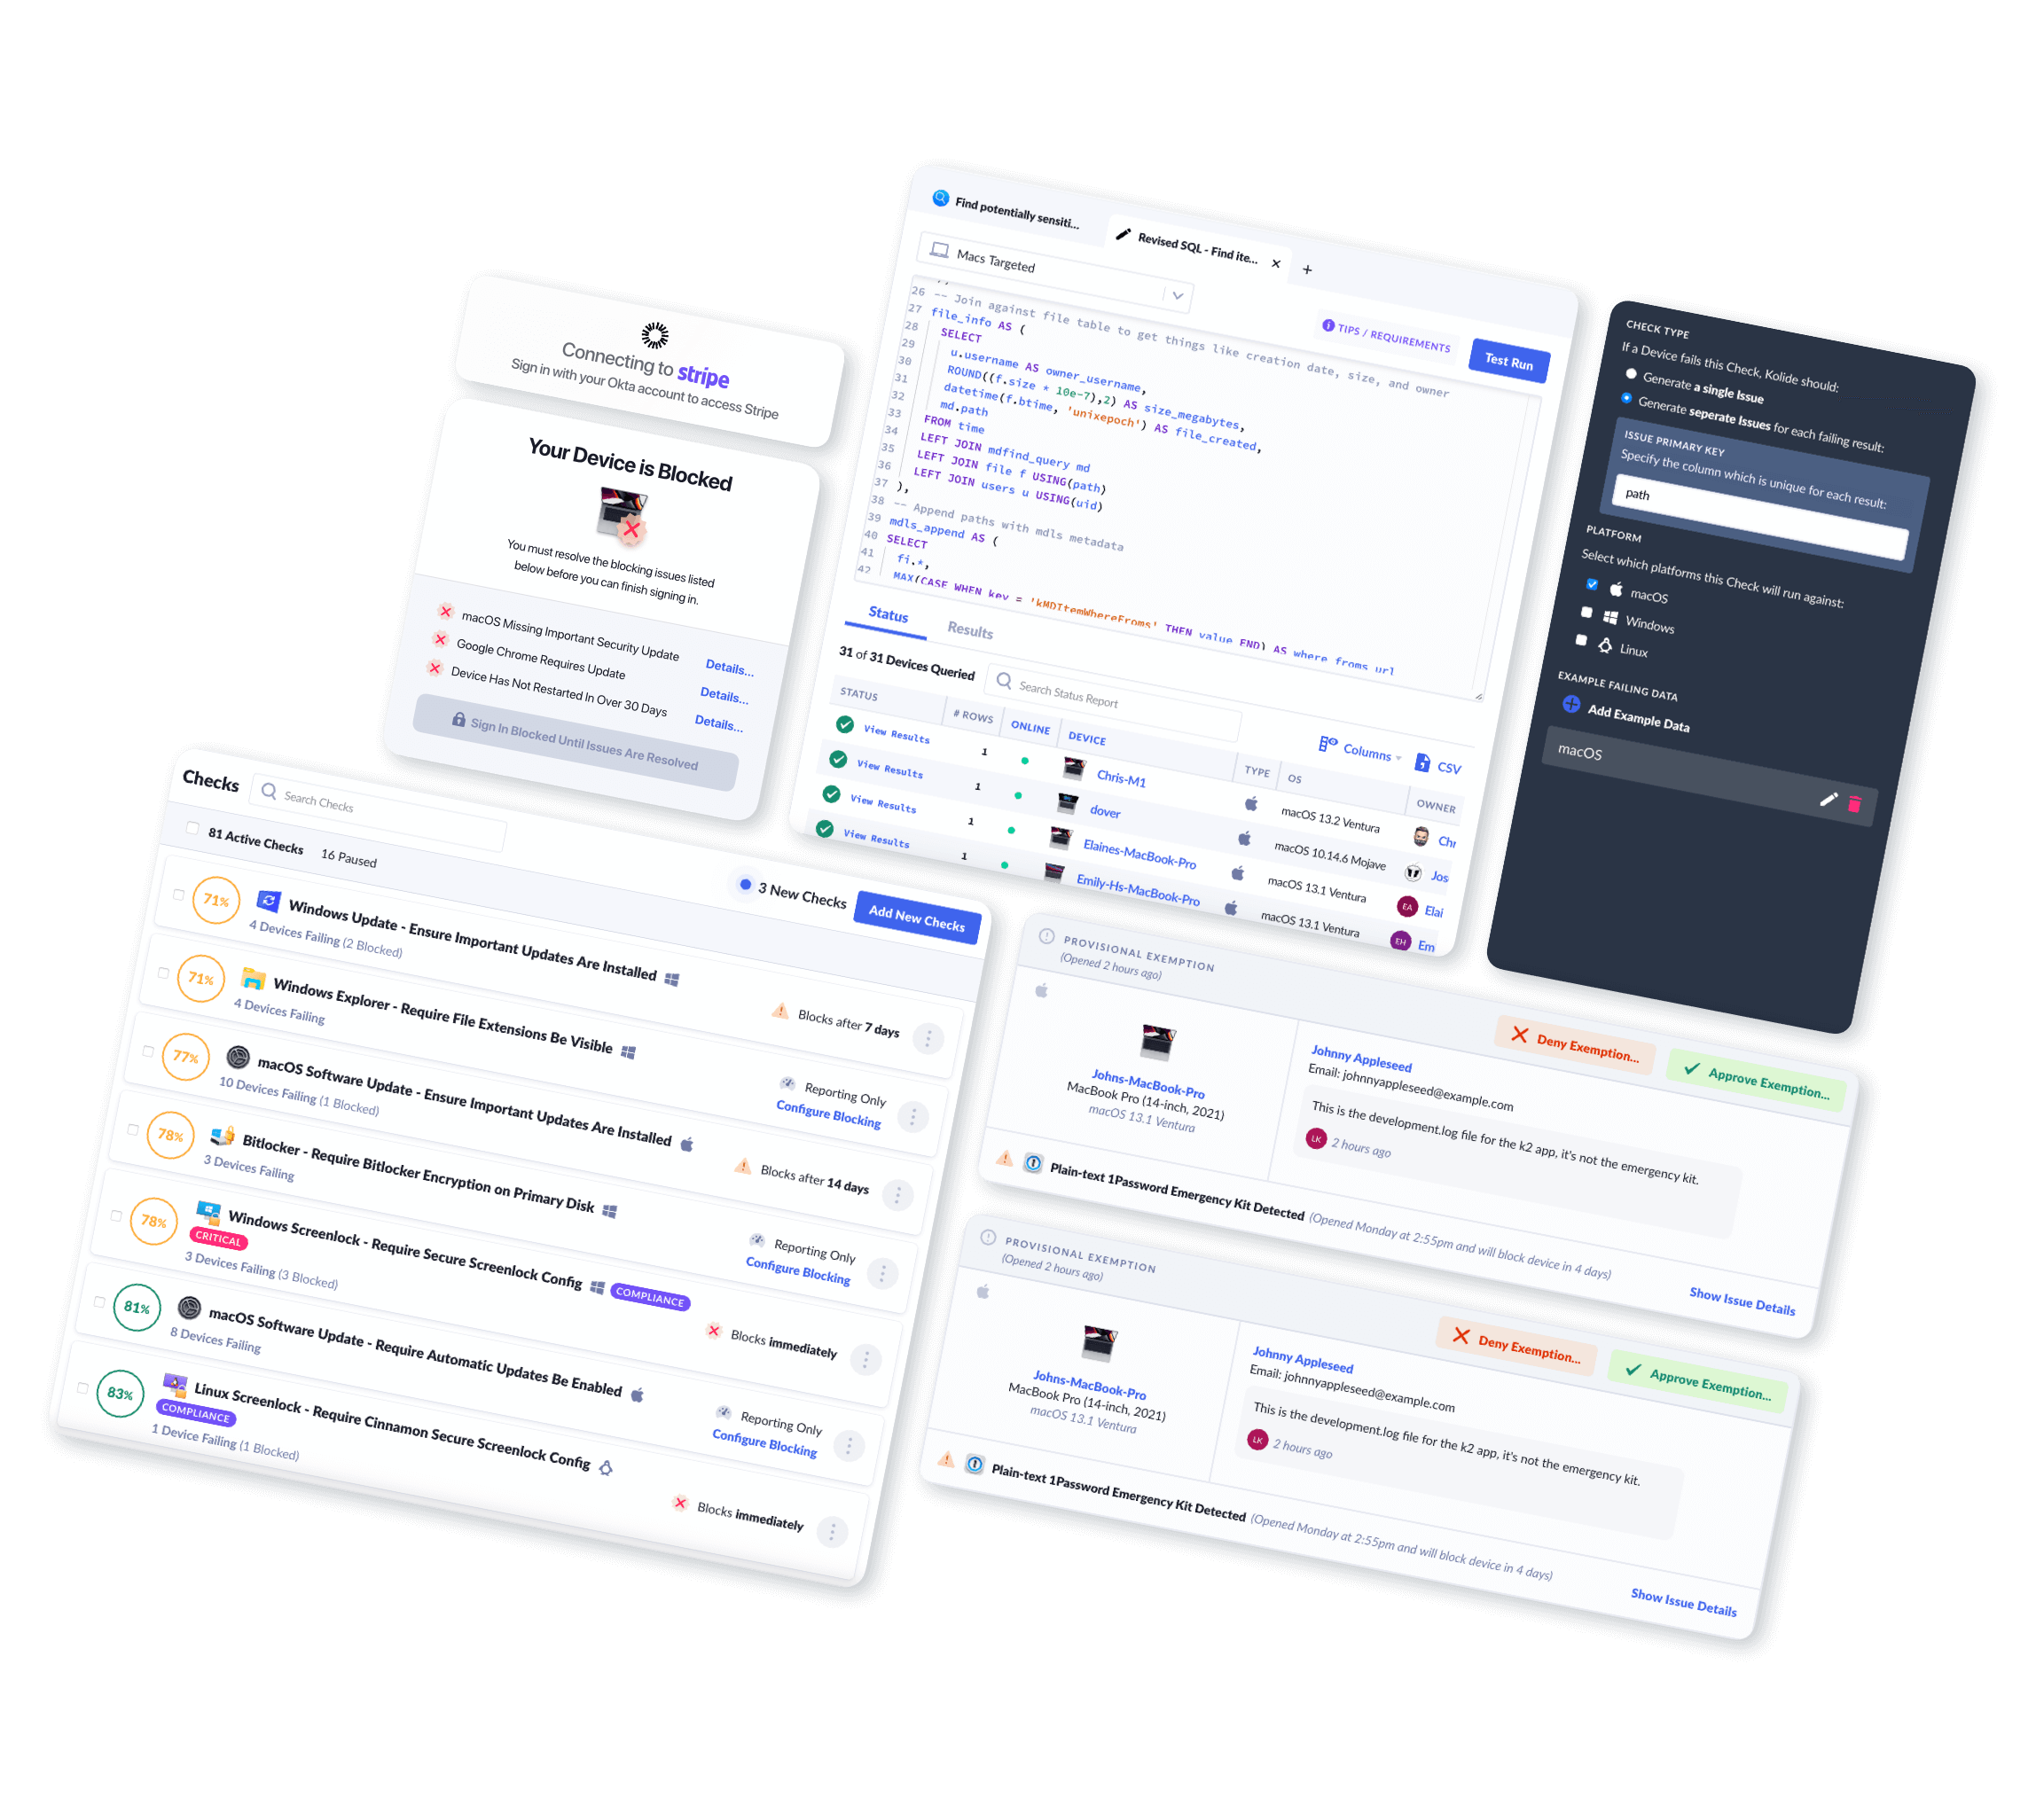
Message End-Users Directly With Kolide
Kolide allows you to detect if iCloud Private Relay is enabled and send messages to end-users asking them to disable it. This allows end-users to understand exactly why iCloud Private Relay cannot be used in your organization in clear terms without them drawing their own conclusions. Further, it trains end-users on how to disable this feature with step-by-step instructions.
How Does Kolide’s Detection Work?
Like the script mentioned above, Kolide is able to read the state of iCloud
Private Relay by reading the configuration for each user located at
~/Library/Preferences/com.apple.networkserviceproxy.plist. Kolide’s
endpoint agent uses a component called osquery to gather facts about
Macs, Windows PCs, and Linux Devices. While normally osquery’s native plist
table could be used to provide this detection, at the time of this writing,
it is not possible due to the binary-encoded data in the plist in
question. To resolve this limitation, Kolide extends osquery’s plist reading
functionality with its own table called kolide_plist which can read binary
encoded plists and can more efficiently query plists with multi-level nesting.
Using this capability, Kolide’s iCloud Private Relay Check first verifies that
the macOS version includes this feature (returning a status of INAPPLICABLE otherwise)
and that the Mac has any associated iCloud accounts. From there, it detects the state
of iCloud Private Relay (including states where it’s currently enabled but
not functioning correctly due to a conflict with an existing Network Extension).
Additional Reading
Check out these additional resources for more information about iCloud Private Relay:
[Article] Prepare Your Network or Web Server for iCloud Private Relay - Apple Developer Support
[Blog Post] iCloud Private Relay: information for Cloudflare customers - Cloudflare
How Does Kolide Remediate This Problem?
Automatically remediating this issue isn't necessarily the best way to go. Instead, consider following the Honest Security approach by blocking devices from authenticating to SaaS apps until they've fixed the problem.
Kolide's Okta Integration does exactly that. Onece integrated in your sign-in flow, Kolide will automatically associate devices with your users' Okta identities. From there, it can block any device that exhibits this problem and then provide the user, step-by-step instructions on how to fix it. Once fixed, Kolide immediately unblocks their device. Watch a demo to find out more.