

Setting Up Extended Device Compliance
This walkthrough will help you get started with Extended Device Compliance, as well as test it within a smaller group before rolling it out to your organization.
Before You Begin
Before you can set up Extended Device Compliance, you’ll need:
- 1Password Business
- 1Password Device Trust Core or 1Password Device Trust Connect. Contact Kolide support to upgrade.
- The 1Password browser extension:
- Chrome
8.10.80.23or later - Firefox
8.11.4or later - Safari
8.11.4or later
- Chrome
- A Chrome-based web browser (for example Google Chrome, Chromium, Microsoft Edge, Brave, or Arc), Firefox, or Safari
If you haven’t set up Kolide yet
If you haven’t already, you’ll need to sign in to 1Password.com and create your Kolide tenant:
- Sign in to your account on 1Password.com.
- Select 1Password Admin Console in the top-left corner.
- Choose Kolide. This creates your Kolide tenant.
- Extended Device Compliance currently works with Chrome-based web browsers, Firefox, and Safari.
- The Check to require the 1Password browser extension is currently only available on macOS devices, and only verifies the presence of the 1Password extension on the device’s default browser. Motivated end users could work around Extended Device Compliance by using a browser other than their default browser, or, if they use other device types, by disabling the 1Password browser extension.
- Extended Device Compliance is currently only available to 1Password Business accounts in the 1Password.com region
- You can’t enforce specific Kolide Checks on an app-by-app basis. Any Checks you enable a Blocking strategy for, will be applied to all configured apps.
Step 1: Create a Test Group
Before you roll it out to your entire team, you can test Extended Device Compliance with a limited number of people by only applying Extended Device Compliance to select 1Password groups. You’ll choose the 1Password groups you want to experience Extended Device Compliance, then turn on Extended Device Compliance for web apps you want to use for testing.
To select groups of people you want to test Extended Device Compliance:
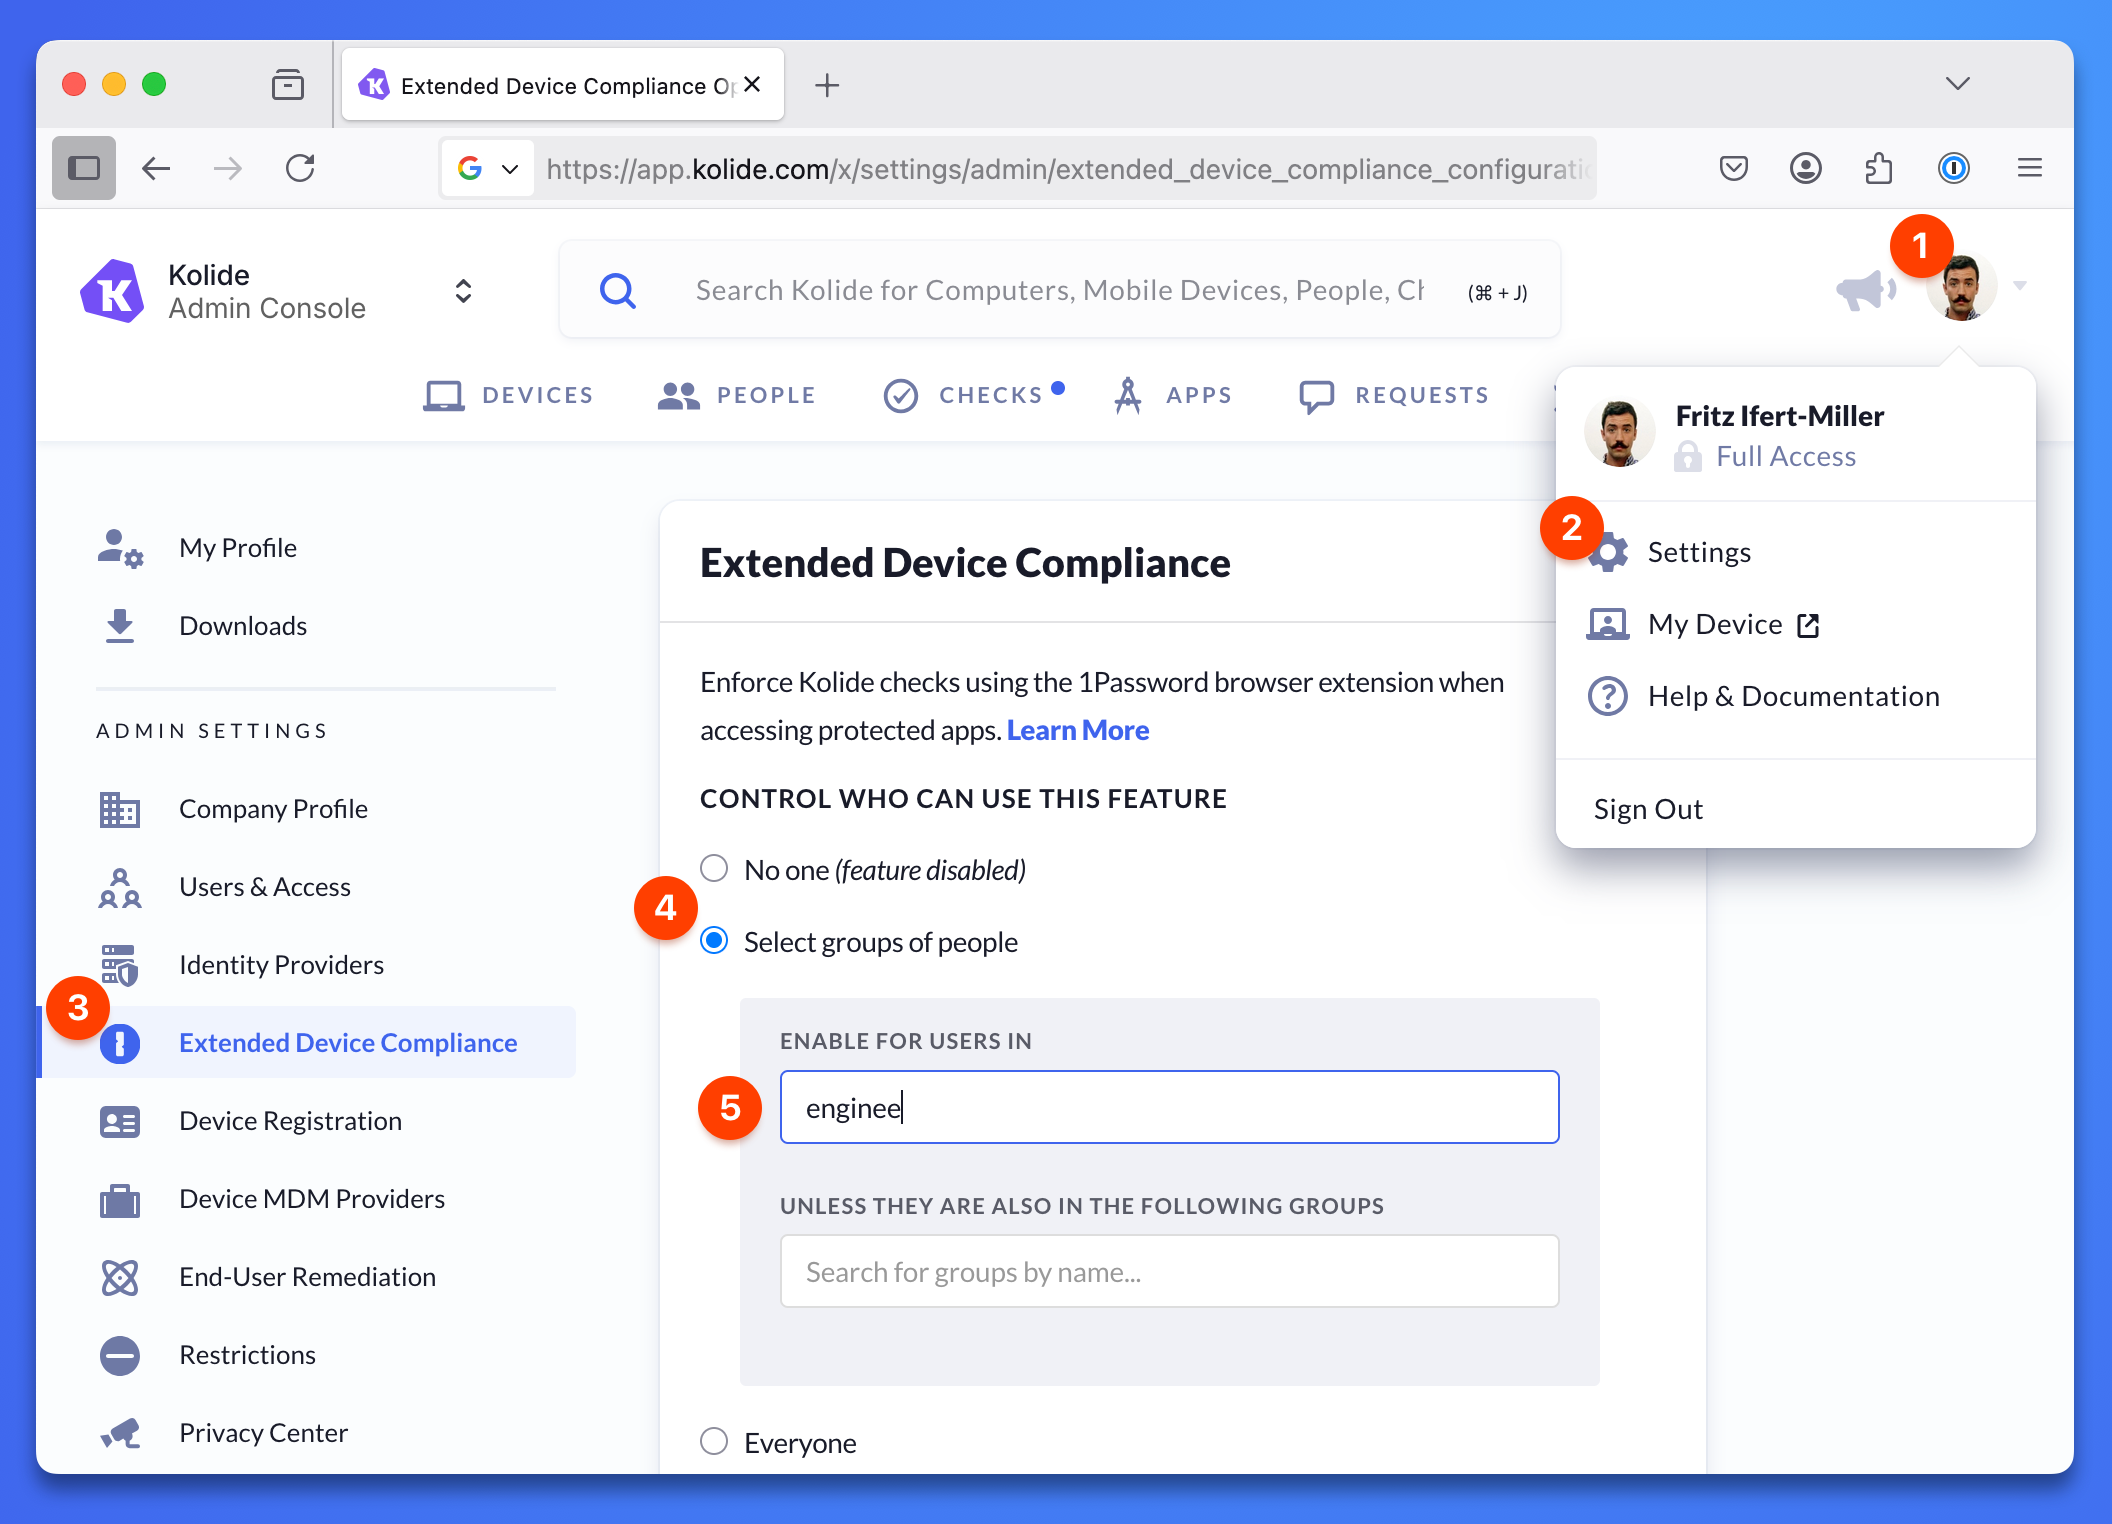
- Select your profile in the top-right corner of Kolide.
- In the profile dropdown select Settings.
- Select Extended Device Compliance in the sidebar.
- In the section “Control Who Can Use this Feature”, choose Select groups of people.
- In the Enable For Users In field, find and select the groups you want to apply Extended Device Compliance to.
- (Optional) Find and select a group in the Unless They Are Also In The Following Groups field to exclude users who also belong to another group.
- Select Submit.
You’ll now see the 1Password groups you chose to have Extended Device Compliance enabled for, and any you have chosen to exclude.
Step 2: Protect a web app with Extended Device Compliance
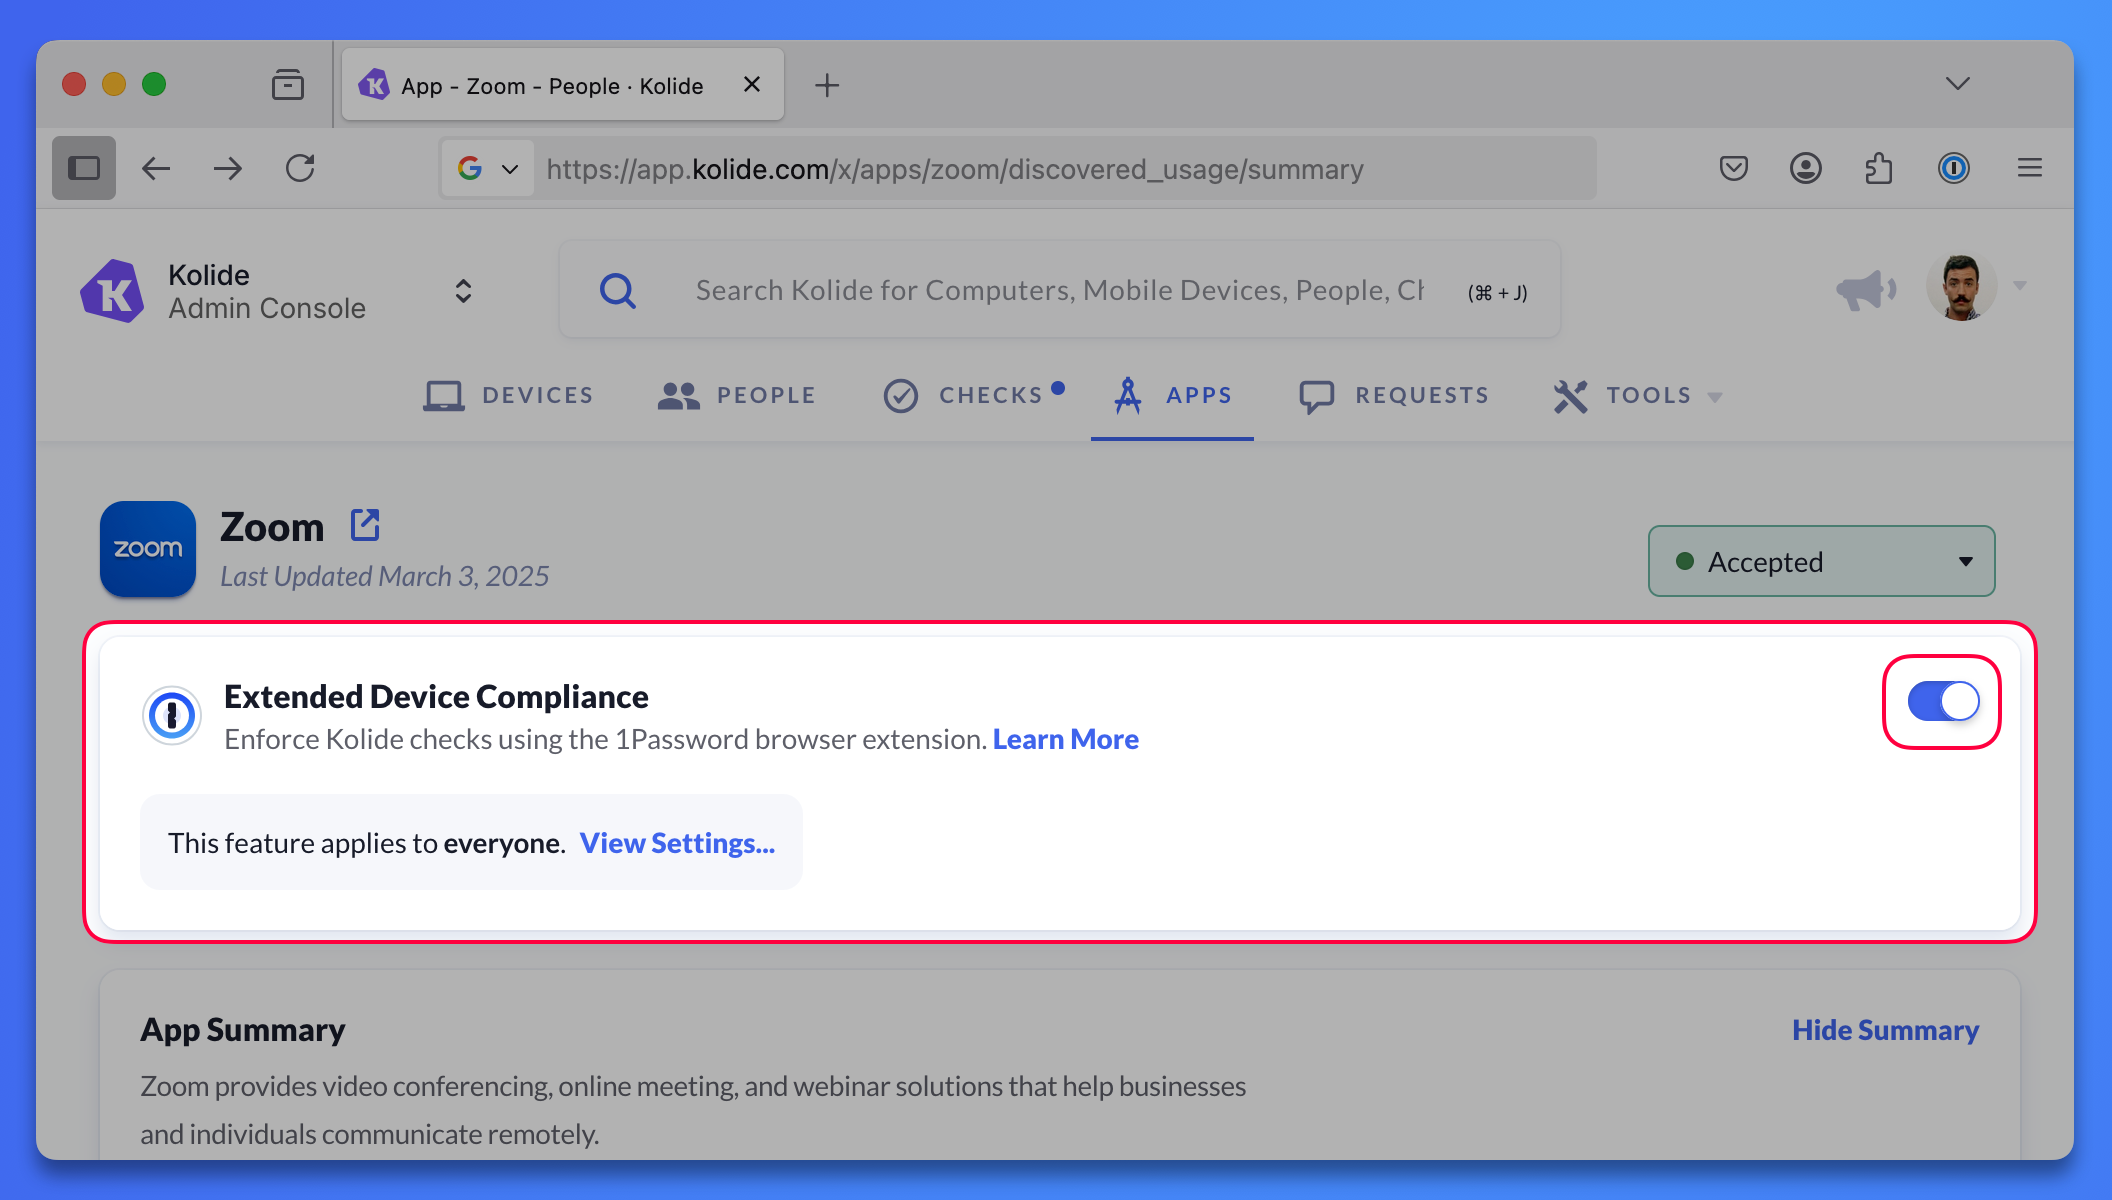
To add Extended Device Compliance to a web app:
- Select the Apps tab in Kolide. You’ll see a list of web apps Kolide has discovered that your team members are using.
- Choose an app that you want to protect with Extended Device Compliance.
- Toggle on Extended Device Compliance.
Step 3: Configure Checks
In Kolide, create a Check or use an existing check that’s straightforward for end users to fix. Some examples include:
- Finder - Require File Extensions to be Visible in Finder (macOS)
- Windows Explorer - Require File Extensions to Be Visible (Windows)
- Terminal - Require Secure Keyboard Entry to be Enabled (macOS)
You’ll test Kolide by failing this check and fixing the issue.
If you’d like to test what it’s like to be blocked from a web app, choose a check that will Block Immediately.
If you want to add a check that blocks you:
- Select the Checks tab.
- Find and select the Check, preferably a Check that’s easy to fix.
- Make sure the Check is turned on, then select the vertical ellipses and choose Configure.
- If you made a device group for testing, in the “This Check Runs Against” field choose your device group and select Save.
- In the “Remediation Strategy" section, select Configure.
- Choose Block Immediately, then select Save.
After you have the Check you want to test, make sure your device is not in compliance with that Check. For example, if you have a Check that requires content caching to be turned off, you’ll turn content caching on.
When you’ve made sure your device is not in compliance, manually re-check your device:
- Select the Checks tab.
- Find the Check you’re using to test Extended Device Compliance and select it.
- Find the device name you’re testing with and select it.
- Select the Check Results tab.
- Find the check and select it again.
- Select Recheck Device Now, and you’ll see that your device is now failing the check.
Step 4: Test Extended Device Compliance
To test Extended Device Compliance, you’ll need your device to fail a Check.
Sign in to the web app you protected with Extended Device Compliance. You’ll see a 1Password notification in your browser listing any issues you need to fix before you can access the web app. You can select the issue in the notification to see instructions on how to fix the issue yourself.
Fix the issue and select Recheck in the 1Password notification. If you choose a check that allows you to snooze the notification, you’ll be able to select Snooze on this notification.
If you choose a check that blocks your device immediately, you won’t be able to sign in to the app until you fix the issue.