

Configure Checks
Kolide’s configuration options allow you to control how Checks are organized, targeted, and enforced across devices.
Managing Tags
Given the large number of Checks available in Kolide, organizing them with custom tags can make management much easier. Tags let you categorize Checks by severity, use case, or any other criteria that fit your needs. When available, Kolide will display each Check’s associated tags in the UI.
To add tags to a single Check:
- Click the ellipsis menu on the Check’s results card to bring down the menu.
- Choose Configure…
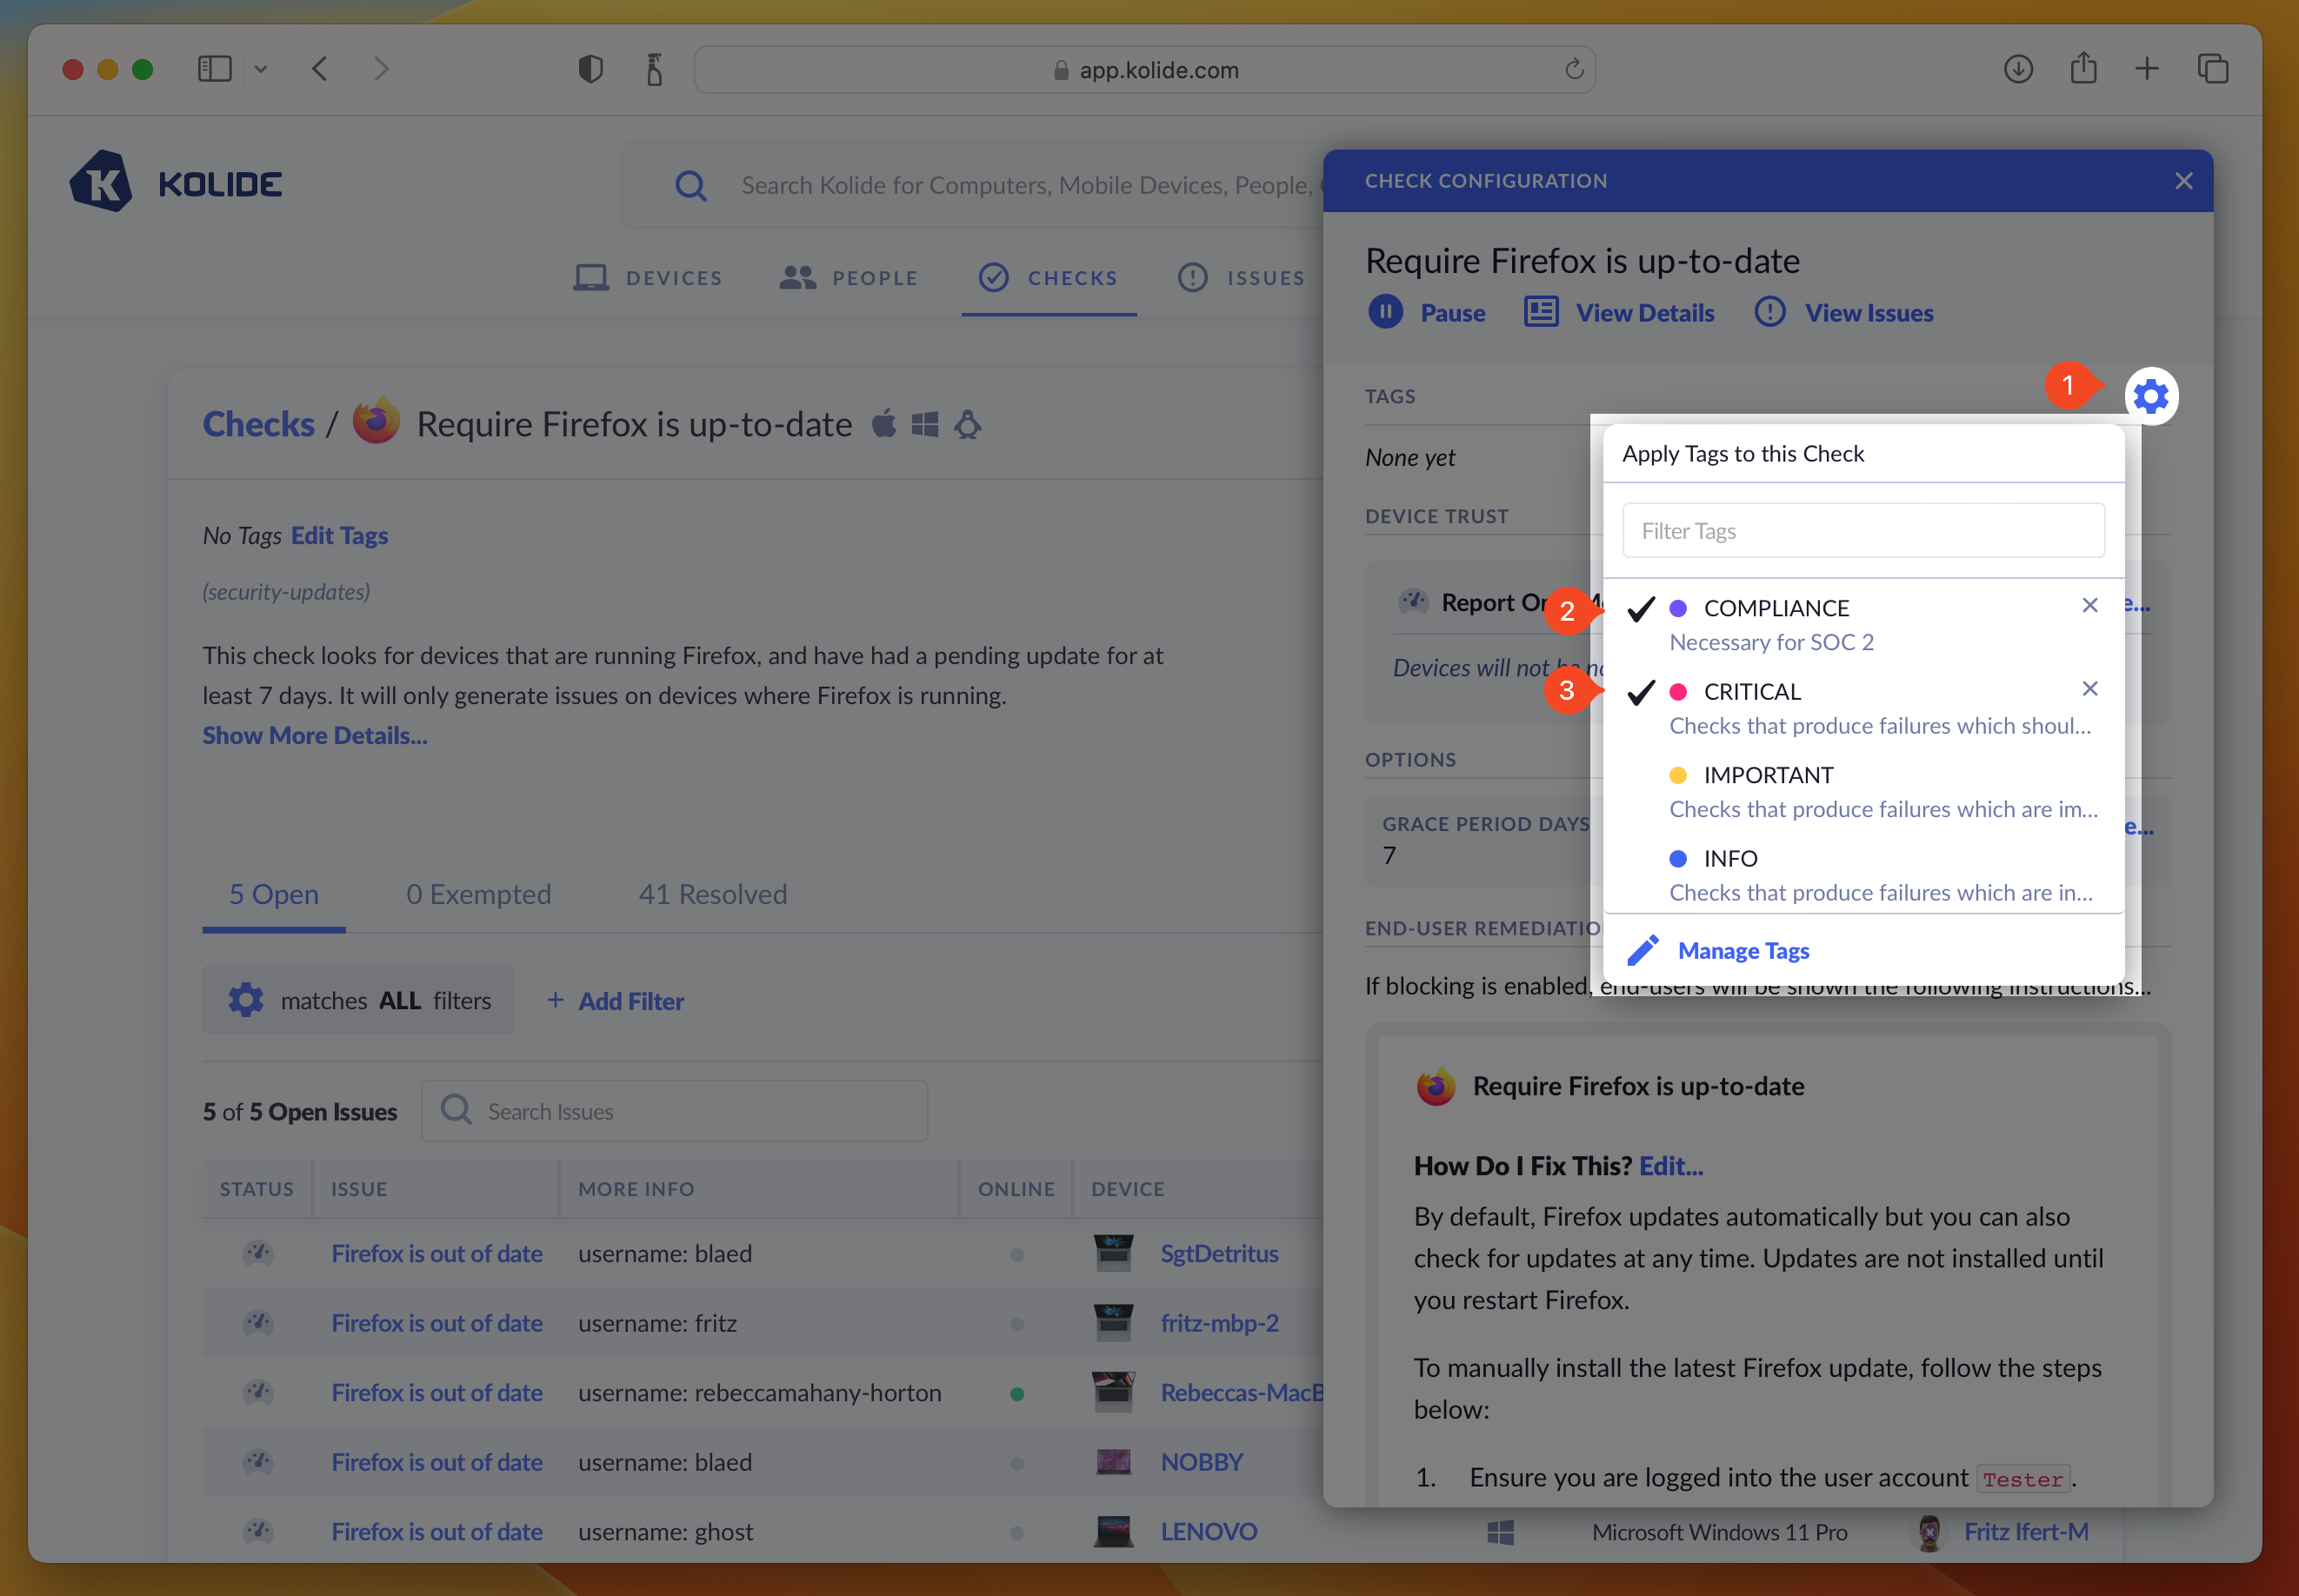
- In the sidebar that slides over, click the gear to the right of Tags section header to reveal the tag selector.
- Select the tag(s) you would like to add to the Check (click again to deselect).
- Once you are happy with your selections, simply click outside of the tag menu which will close it and apply your tags.
If you’d like to manage the tags to multiple Checks at once, you can check the checkboxes next to the Checks you’d like to manage and select Tags in the mass-action menu that appears.
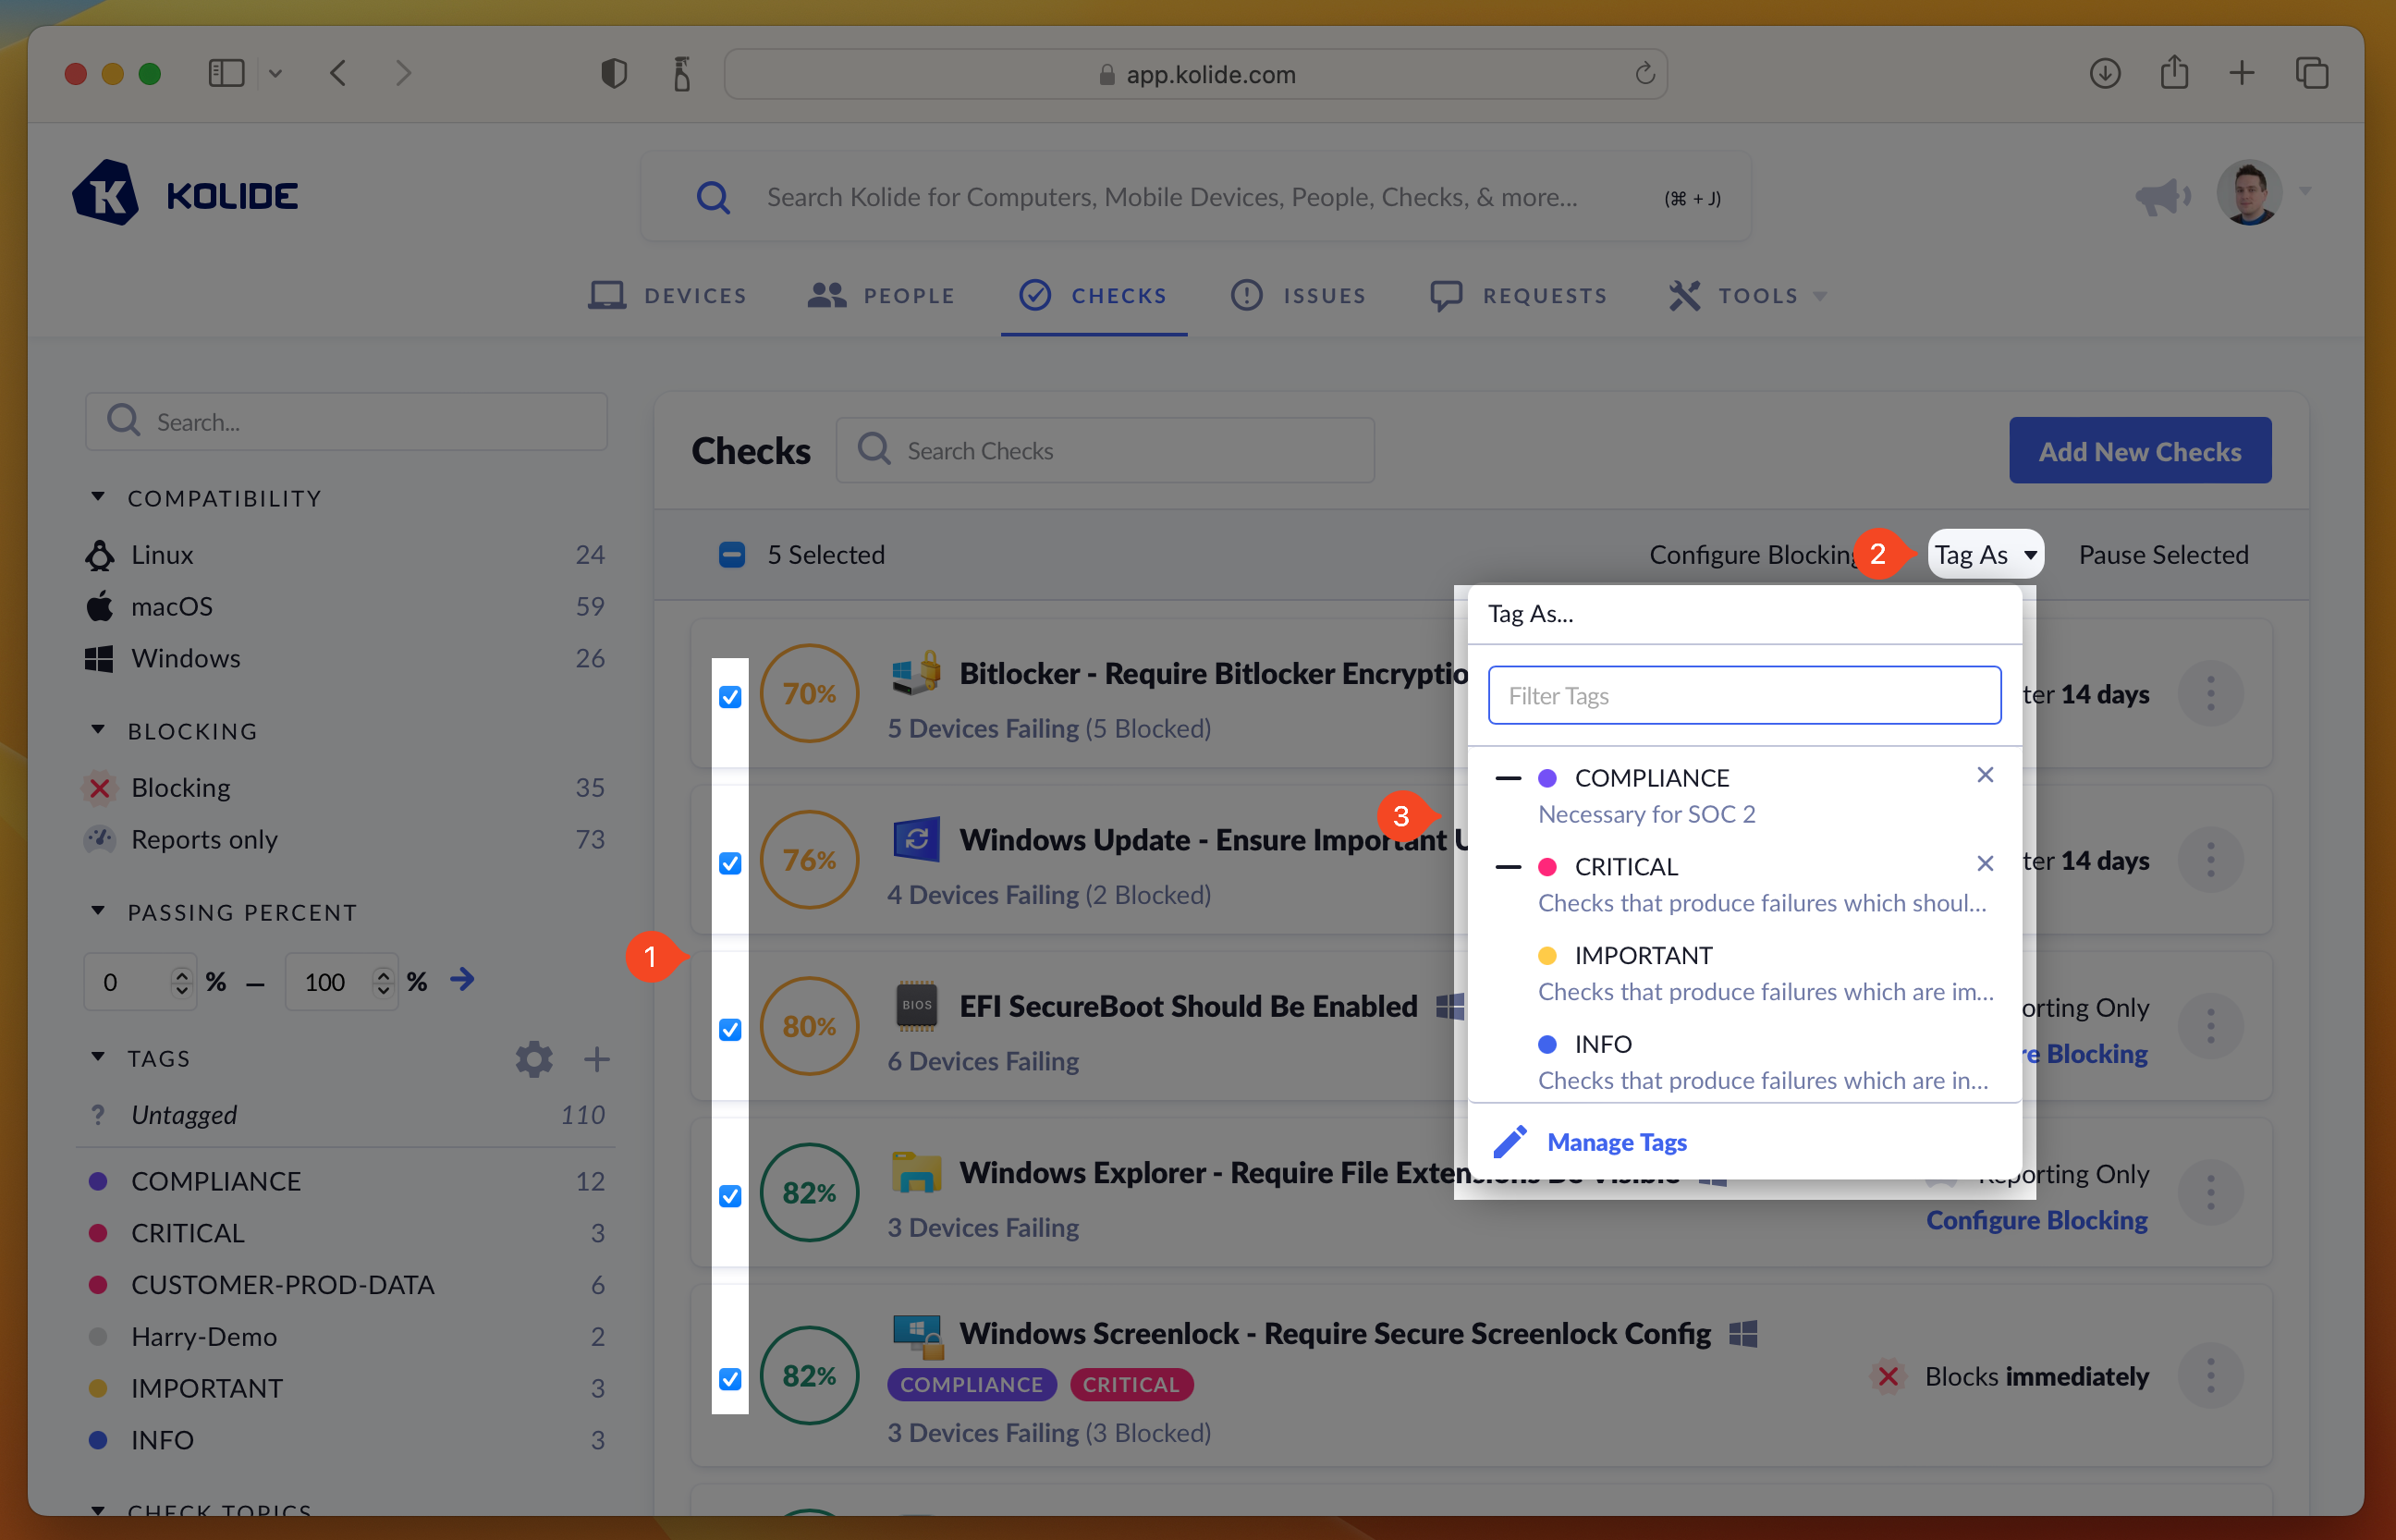
– symbol preceding it when that tag is added to only
some of the Checks in your selection. By clicking it, you can toggle its state
so that all or none of the Checks will have that tag applied.
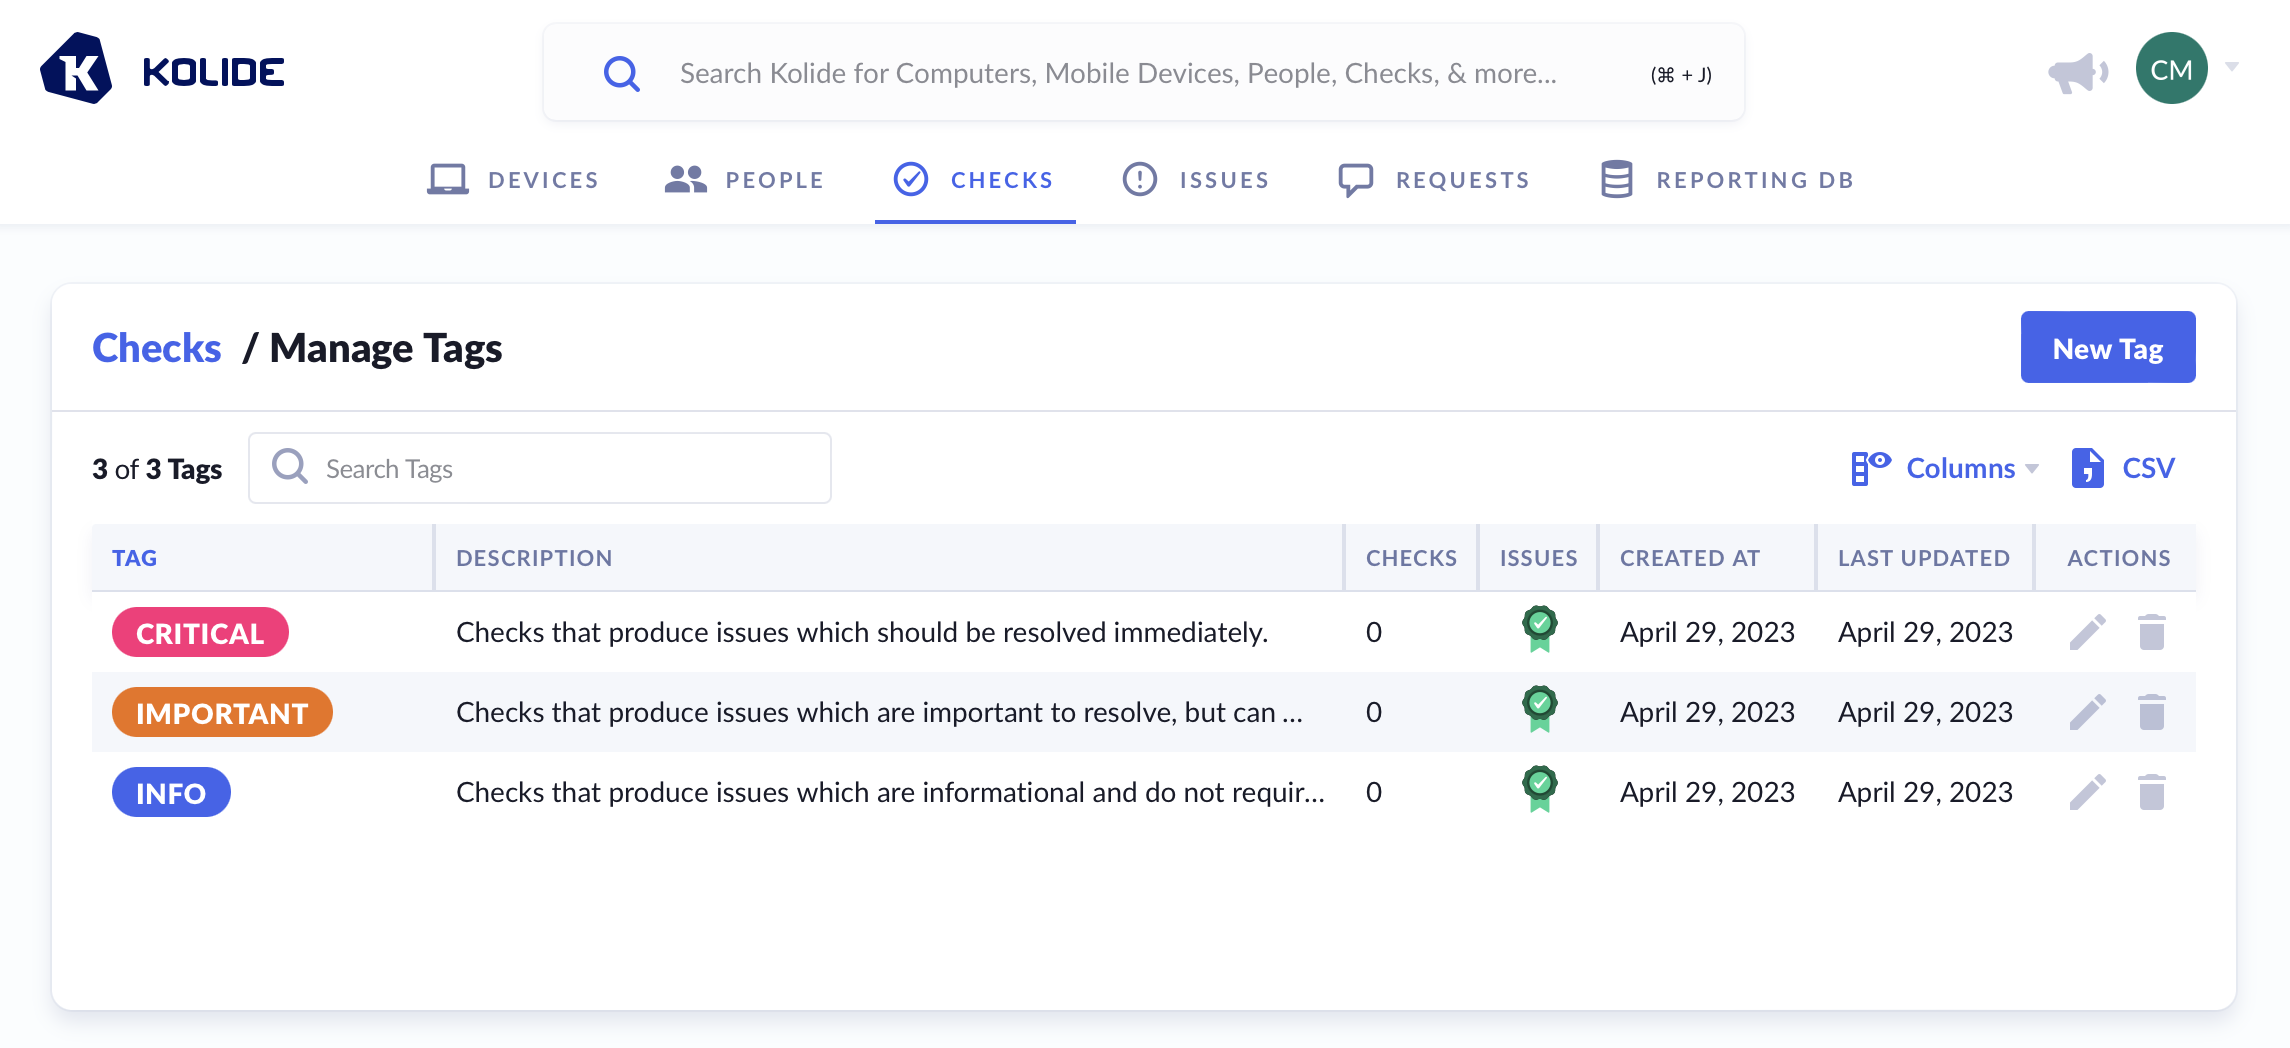
You can add more tags to Kolide by clicking the gear/cog icon and selecting Manage Tags, or by navigating directly to Tag Management.
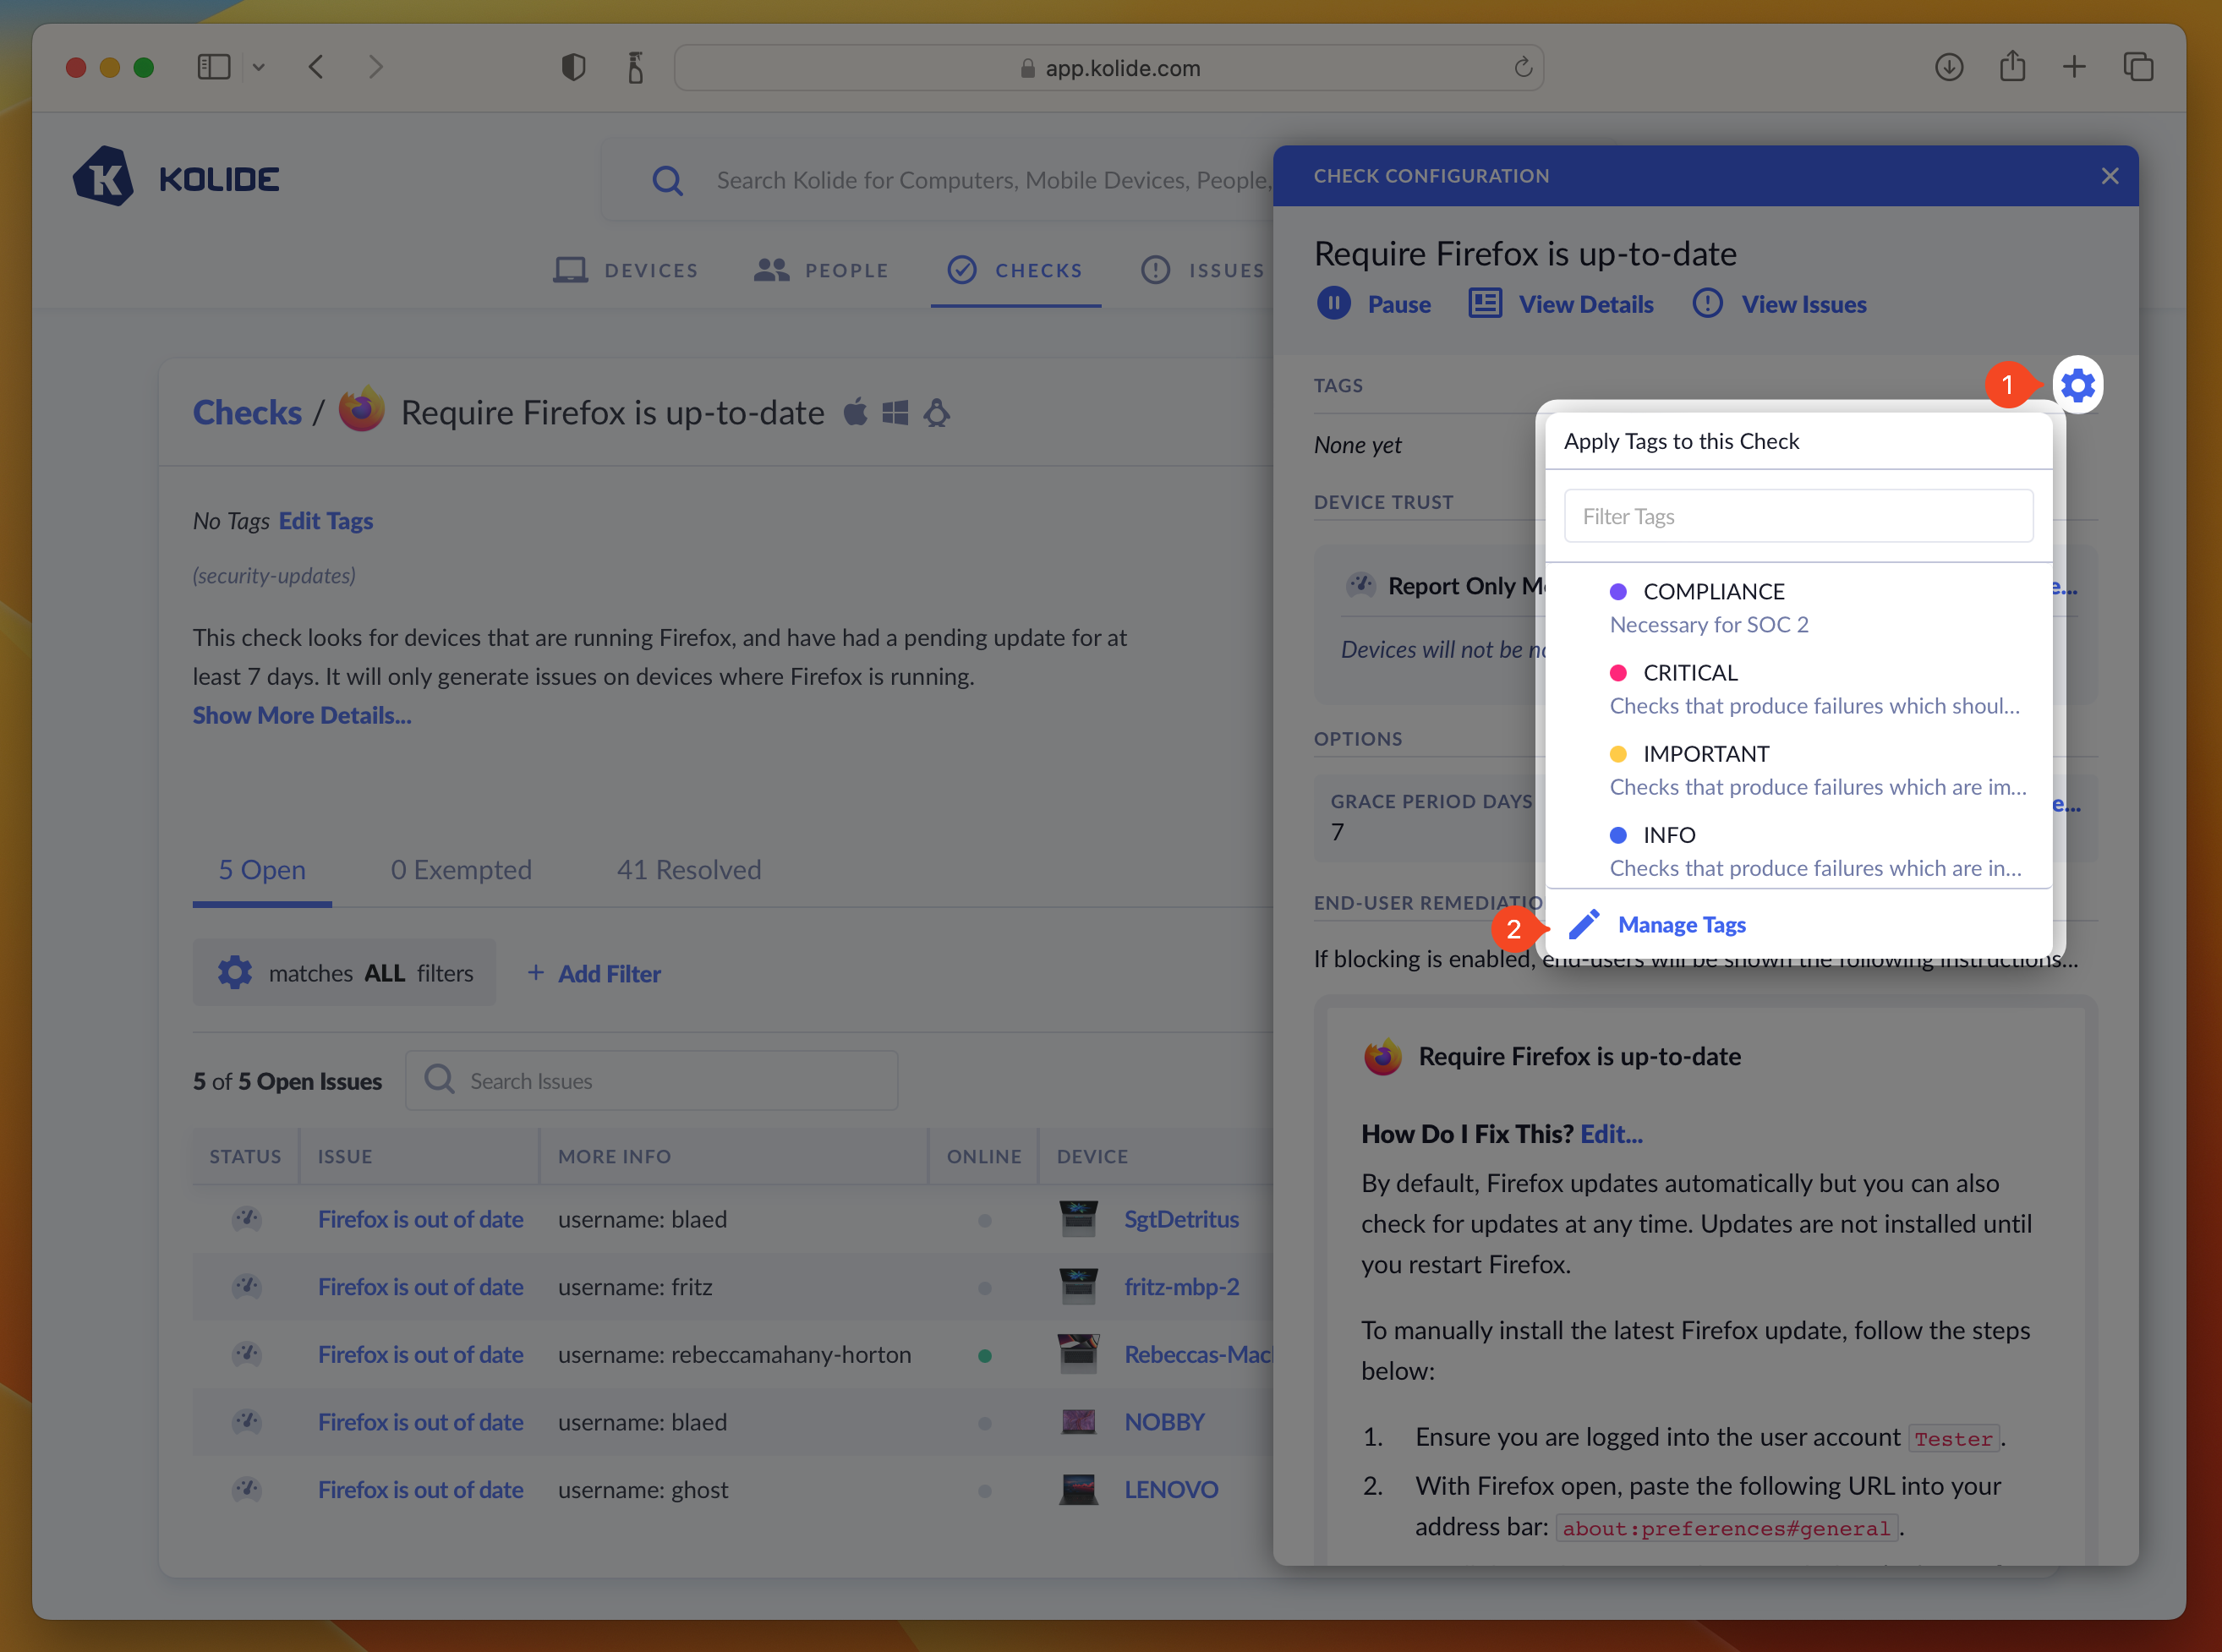
By default, Kolide automatically creates three tags to get you started when you establish a new account, Critical, Important, and Info.
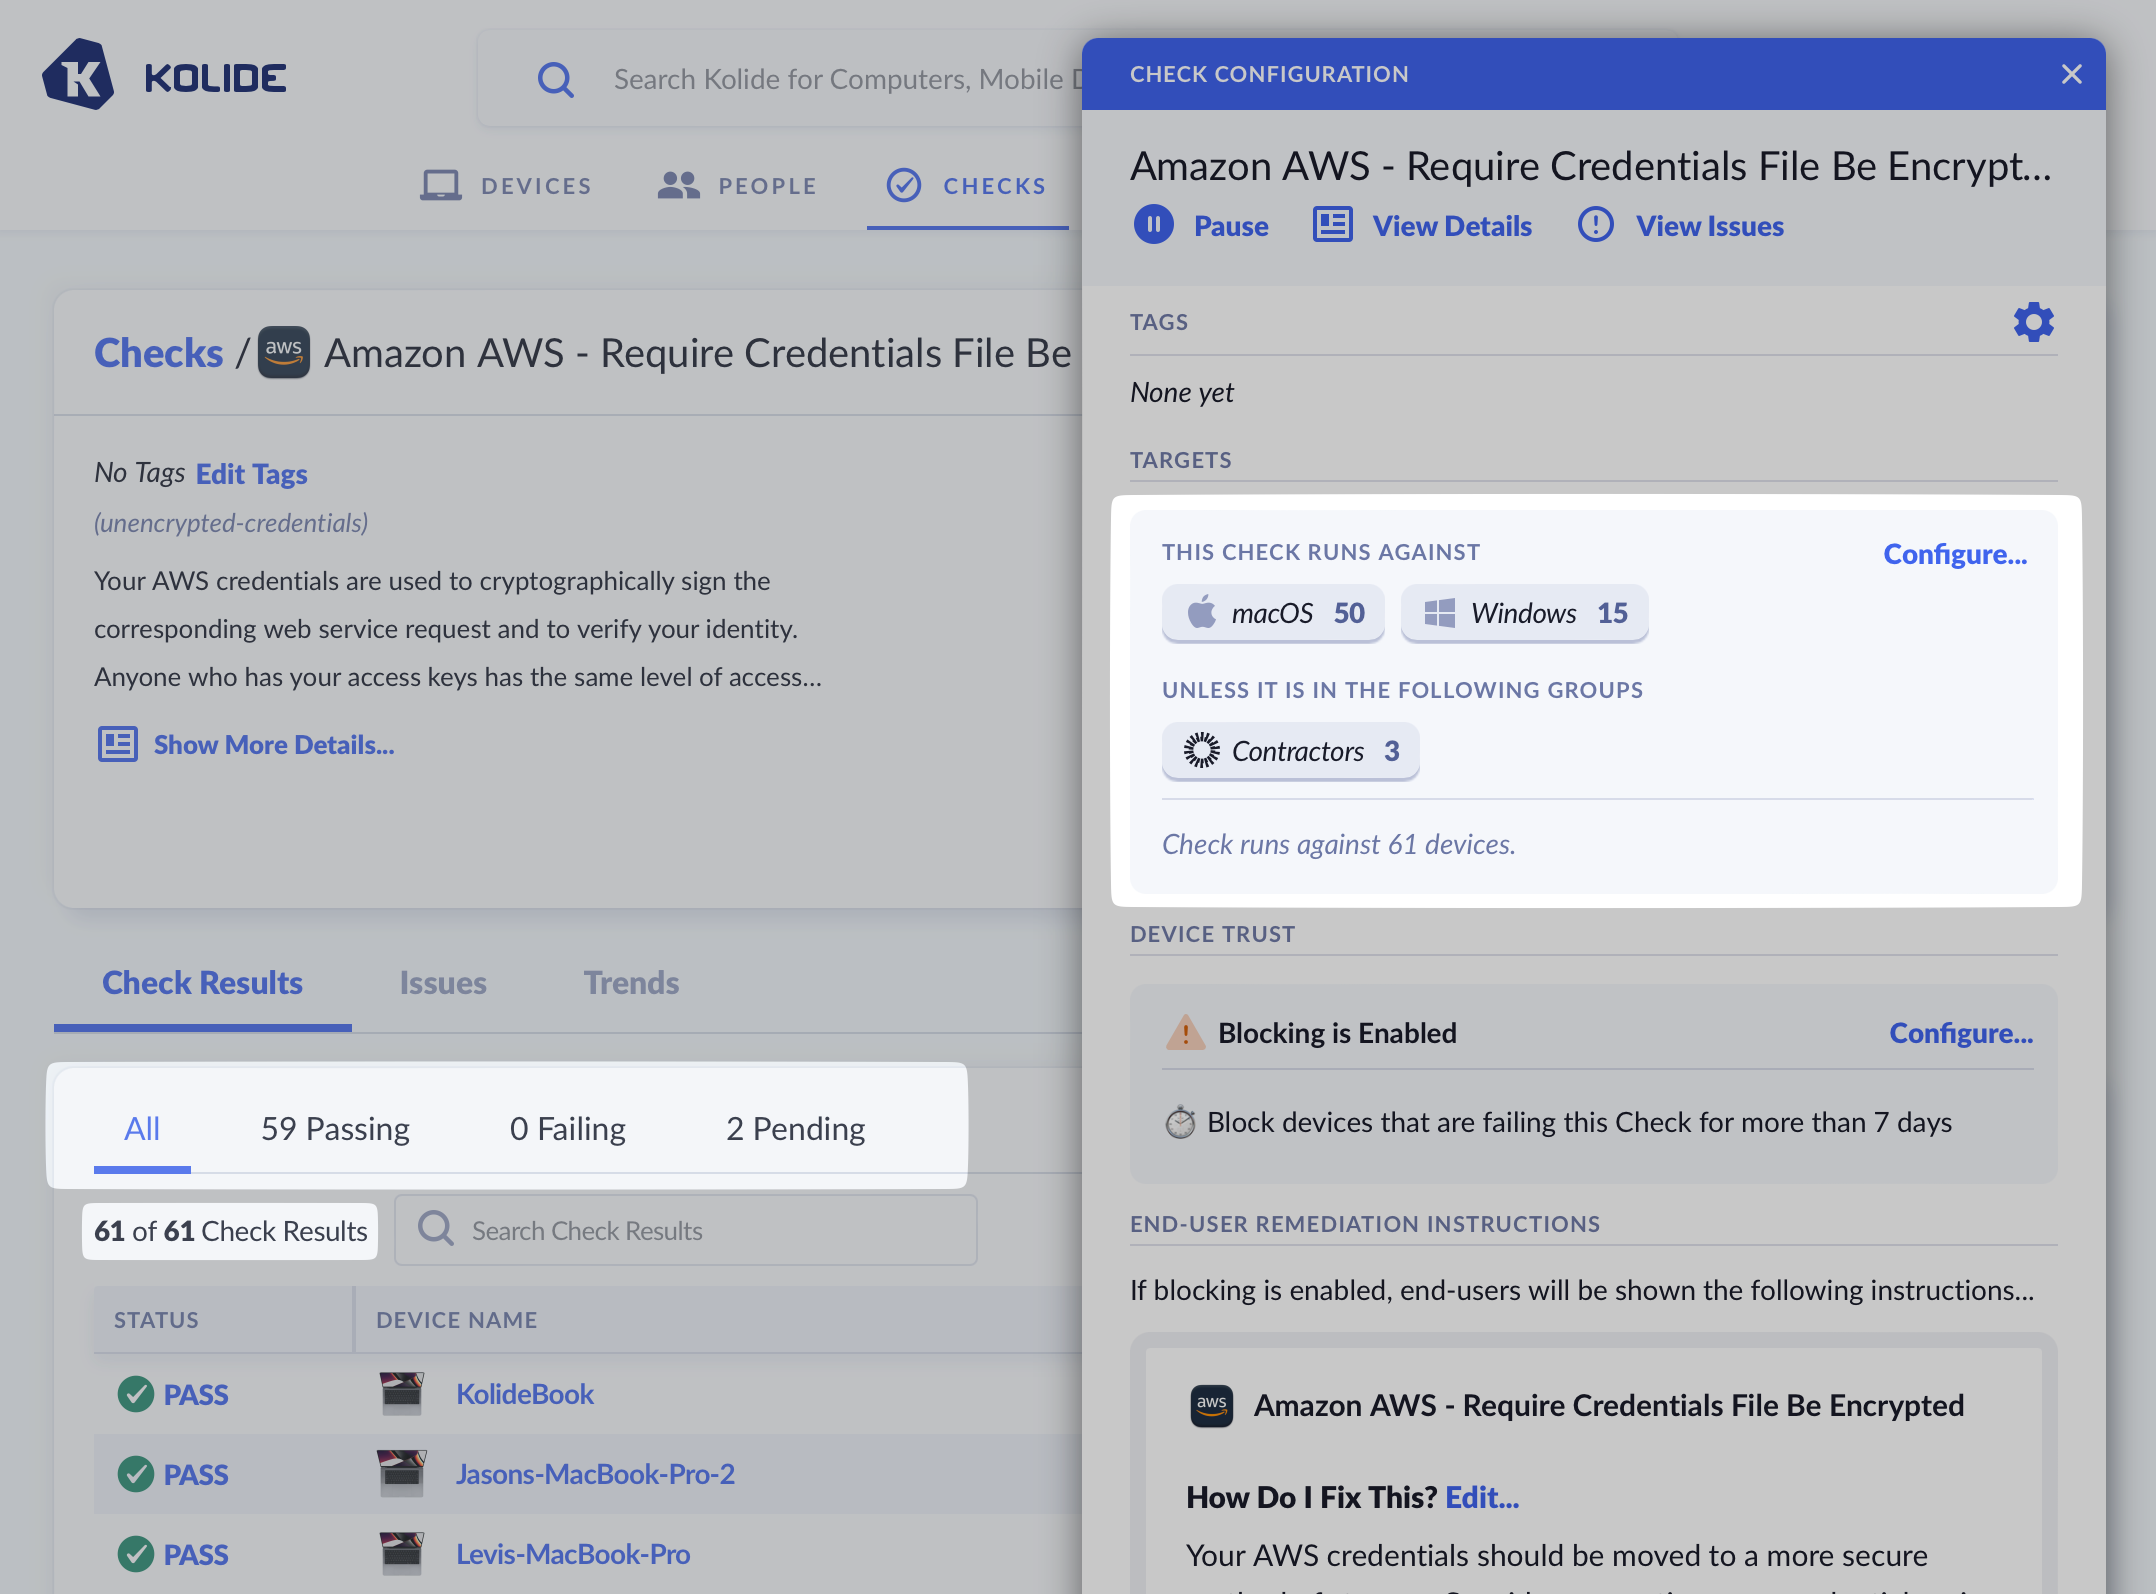
Controlling Targets
By default, Checks will automatically target all devices that match each of its compatible platforms. You can customize targeting by platform or group.
- Click the ellipsis menu on the Check’s results card to bring down the menu.
- Choose Configure…
- In the sidebar that slides over, click Configure… underneath the Targets section.
- In the form that appears, check the box preceding the text Run on only a subset of devices…
- Choose the platforms, 1Password groups, Okta groups, Google Workspace groups, or Device Groups you’d like the Check to target. You can also avoid targeting groups by selecting them in the “Unless It Is Also In The Following Groups” section.

- Click Save. Once complete you’ll see an updated summary that describes
which devices are targeted by the Check.
Remediation Strategies
One of the most effective ways to improve a Check’s success rate across your fleet is to select a remediation strategy.
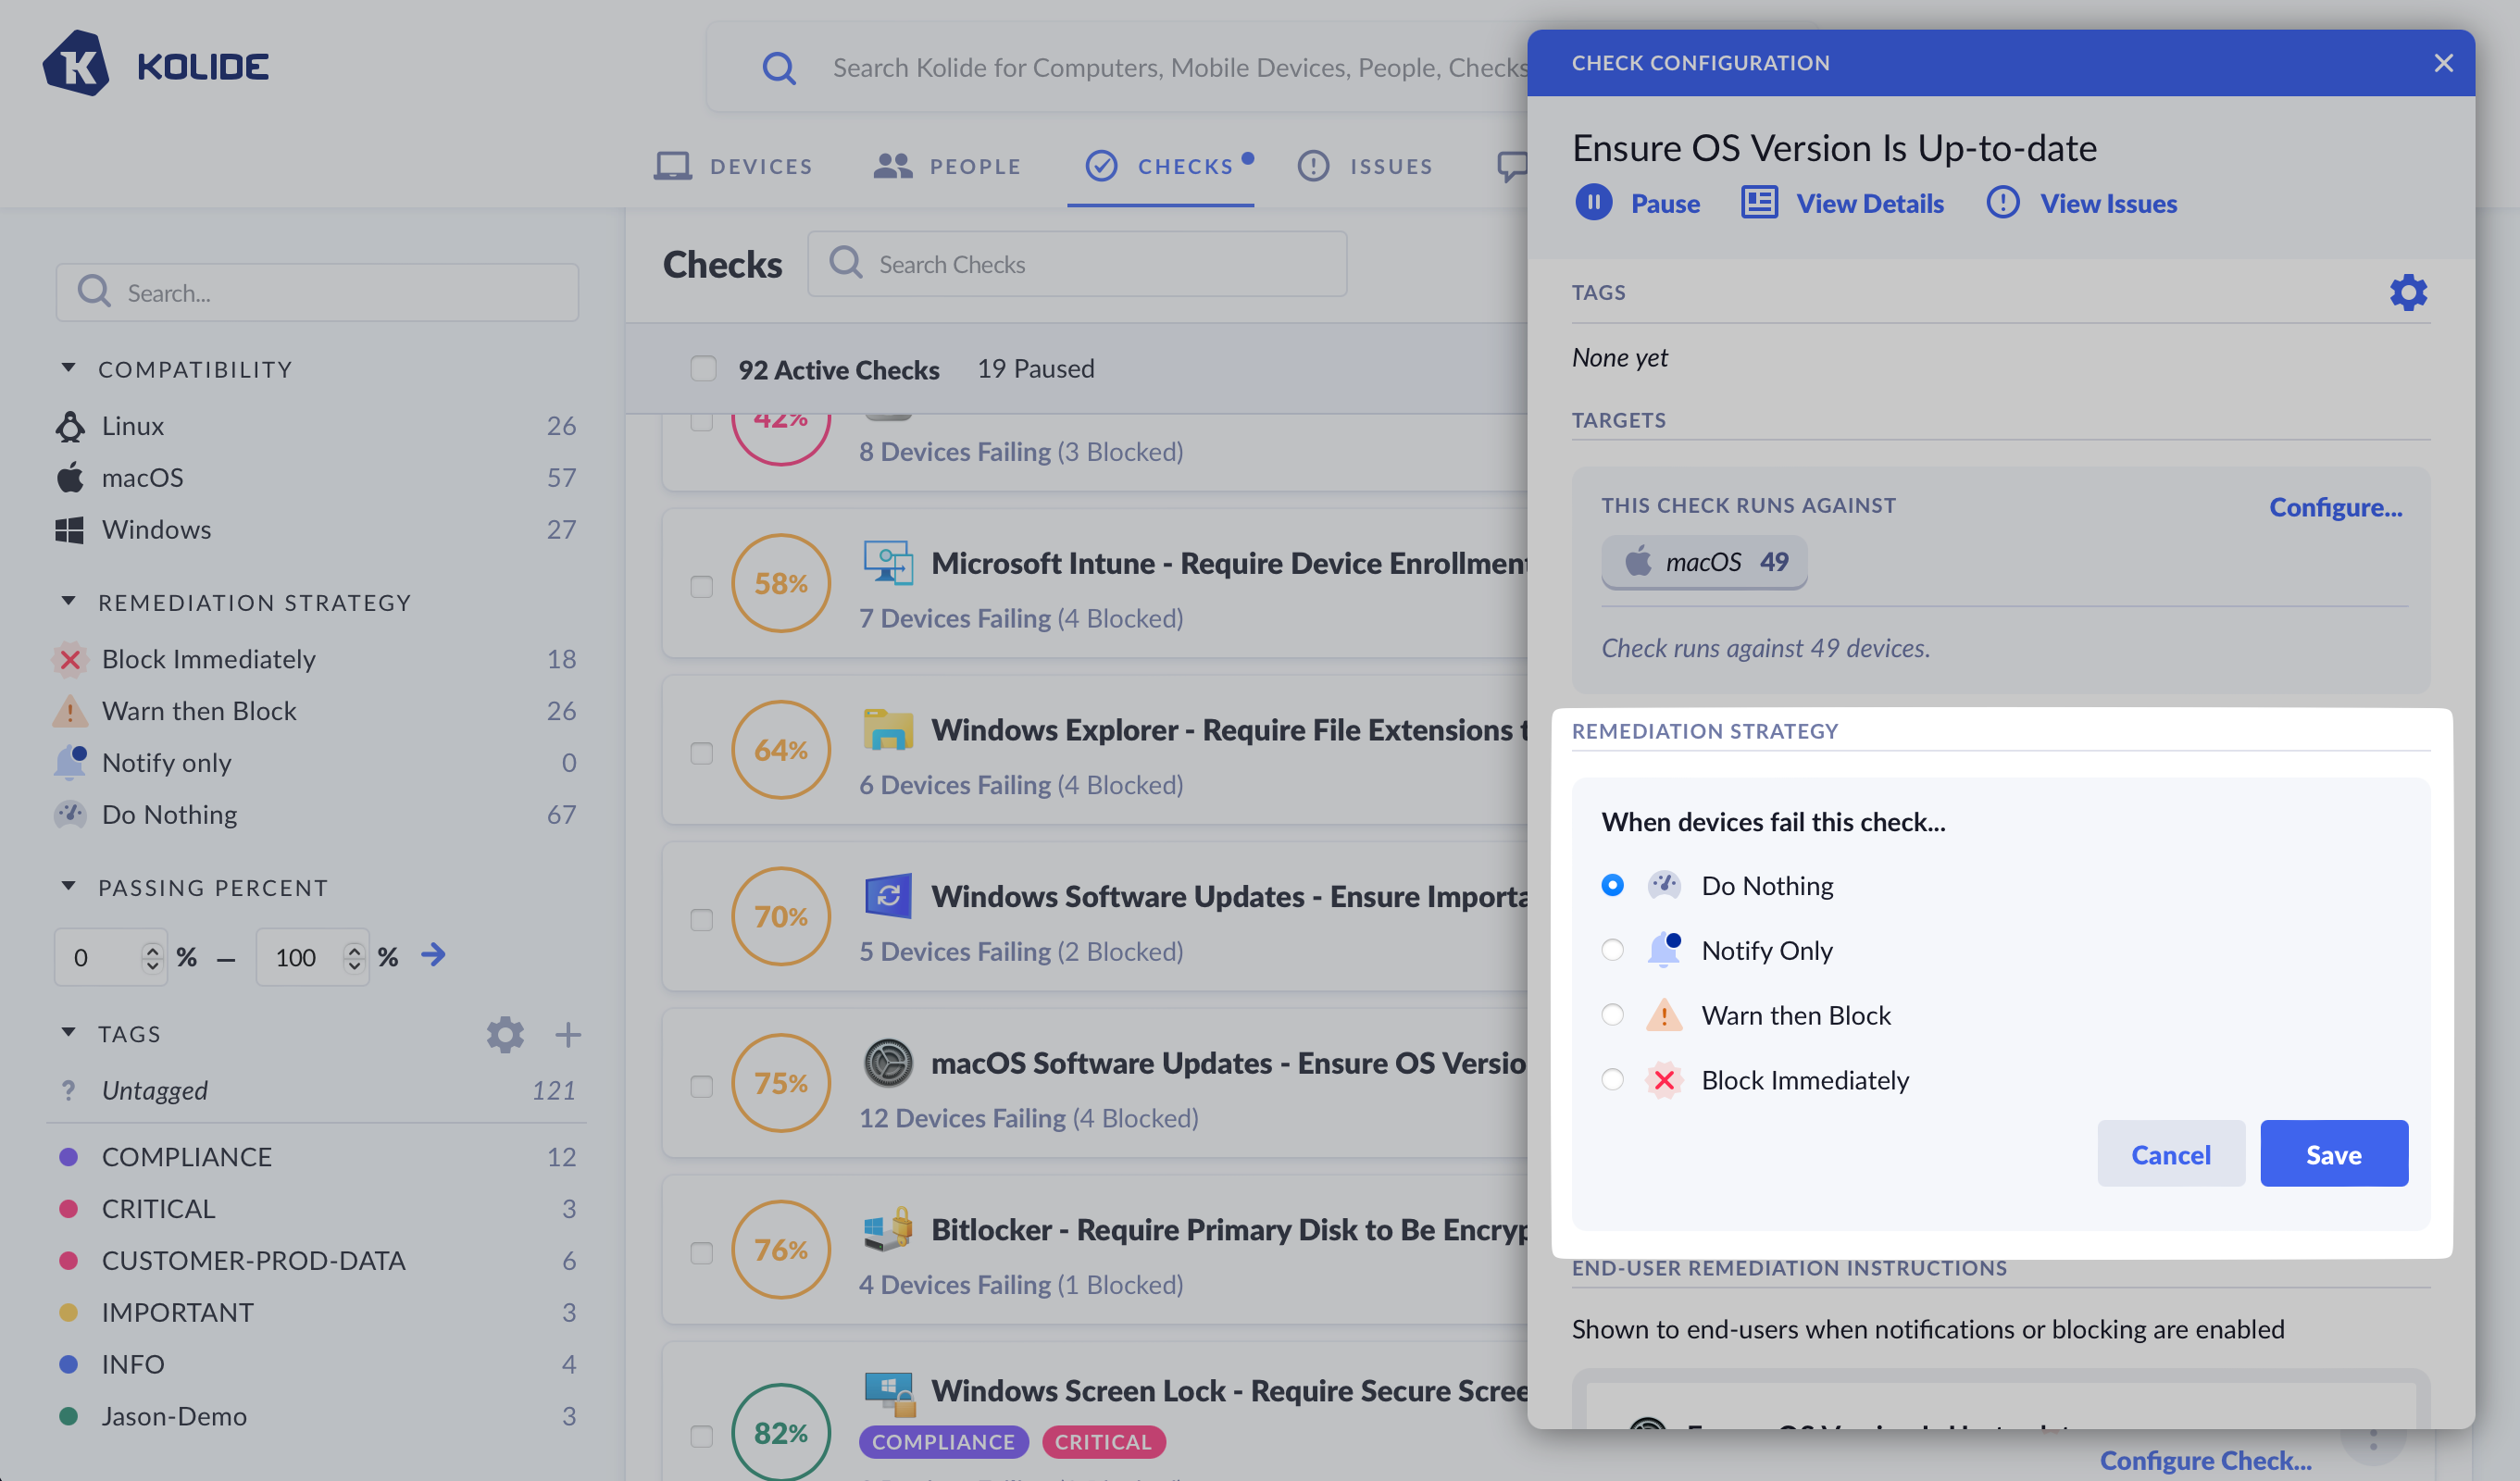
Kolide offers four different remediation strategies that can be chosen from the Check’s configuration sidebar.
Kolide offers four distinct strategies:
- Do Nothing (the default)
- Notify Only
- Warn then Block
- Block Immediately
Each strategy is discussed in detail below.
Do Nothing
The “Do Nothing” strategy, also known as “Report Only,” is the default strategy for all Checks in Kolide.
When this strategy is chosen, the Check still runs on devices, but the end-user has no knowledge of their passing or failing state. The end-user will never receive notifications or have their authentication interrupted, regardless of the Check’s status.
Notify Only
The “Notify Only” strategy offers end-users a gentle introduction to Kolide’s ability to interrupt the authentication flow and to produce notifications via the Kolide Menu Bar App without the consequences of blocking.
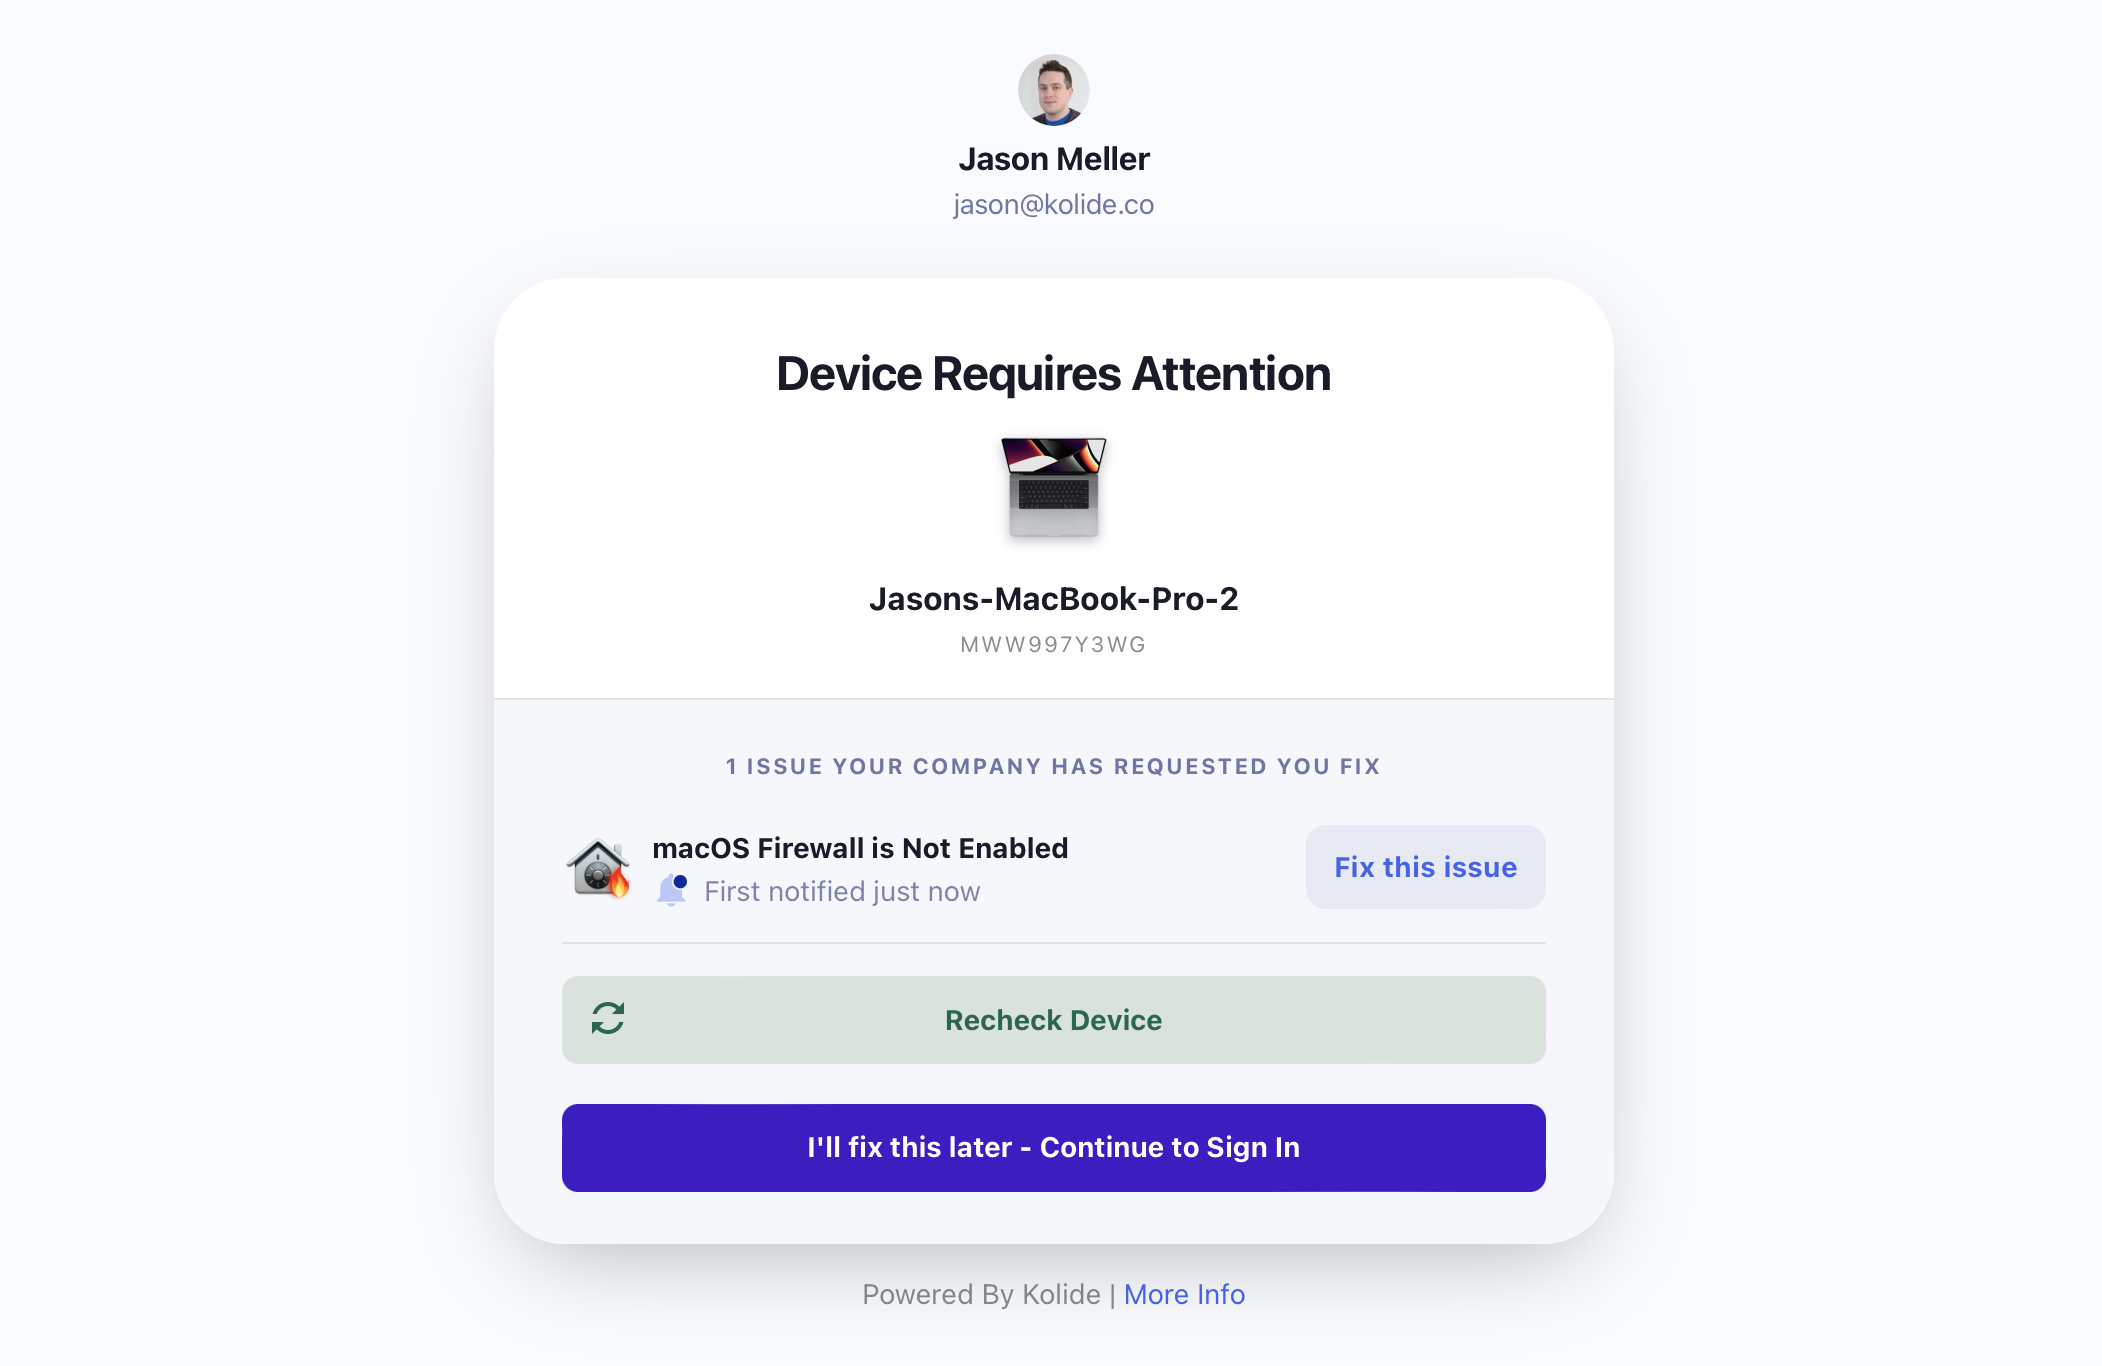
When using “Notify Only,” users are always able to bypass notifications when they sign in to apps protected by Kolide Device Trust.
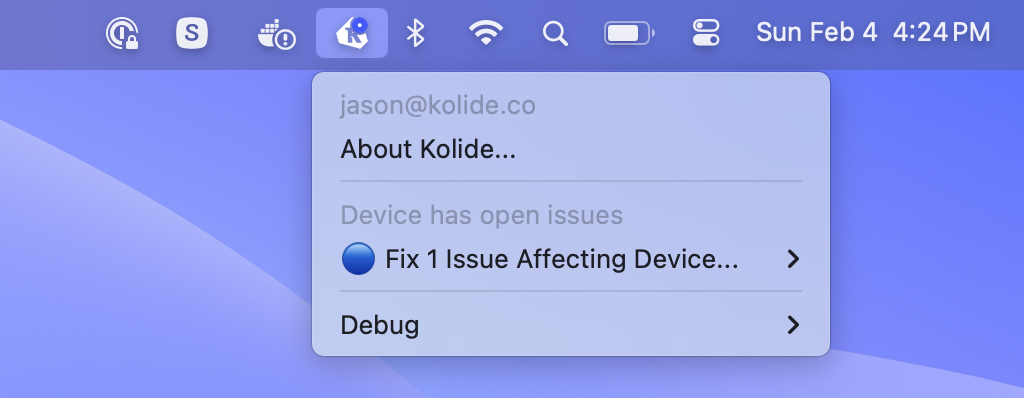
The Kolide Menu Bar App will display a blue dot when the device fails a Check that’s “Notify Only.”
While the “Notify Only” strategy will increase the compliance percentage of a Check by promoting user awareness, it is likely to have reduced efficacy in comparison to a blocking strategy, due to the lack of consequences for ignoring the notifications.
Deferring Notifications
By default, “Notify Only” will immediately send an end-user a notification as soon as Kolide determines that the device is failing the Check. In some cases, you may wish to delay when this initial notification is sent. For example, when it’s likely that a large percentage of failing devices will resolve a problem on their own without the extra end-user notification (such as an out of date operating system which prompts users to perform an update).
To defer notifications, click the dropdown and select After a delay of and choose the desired number of days.
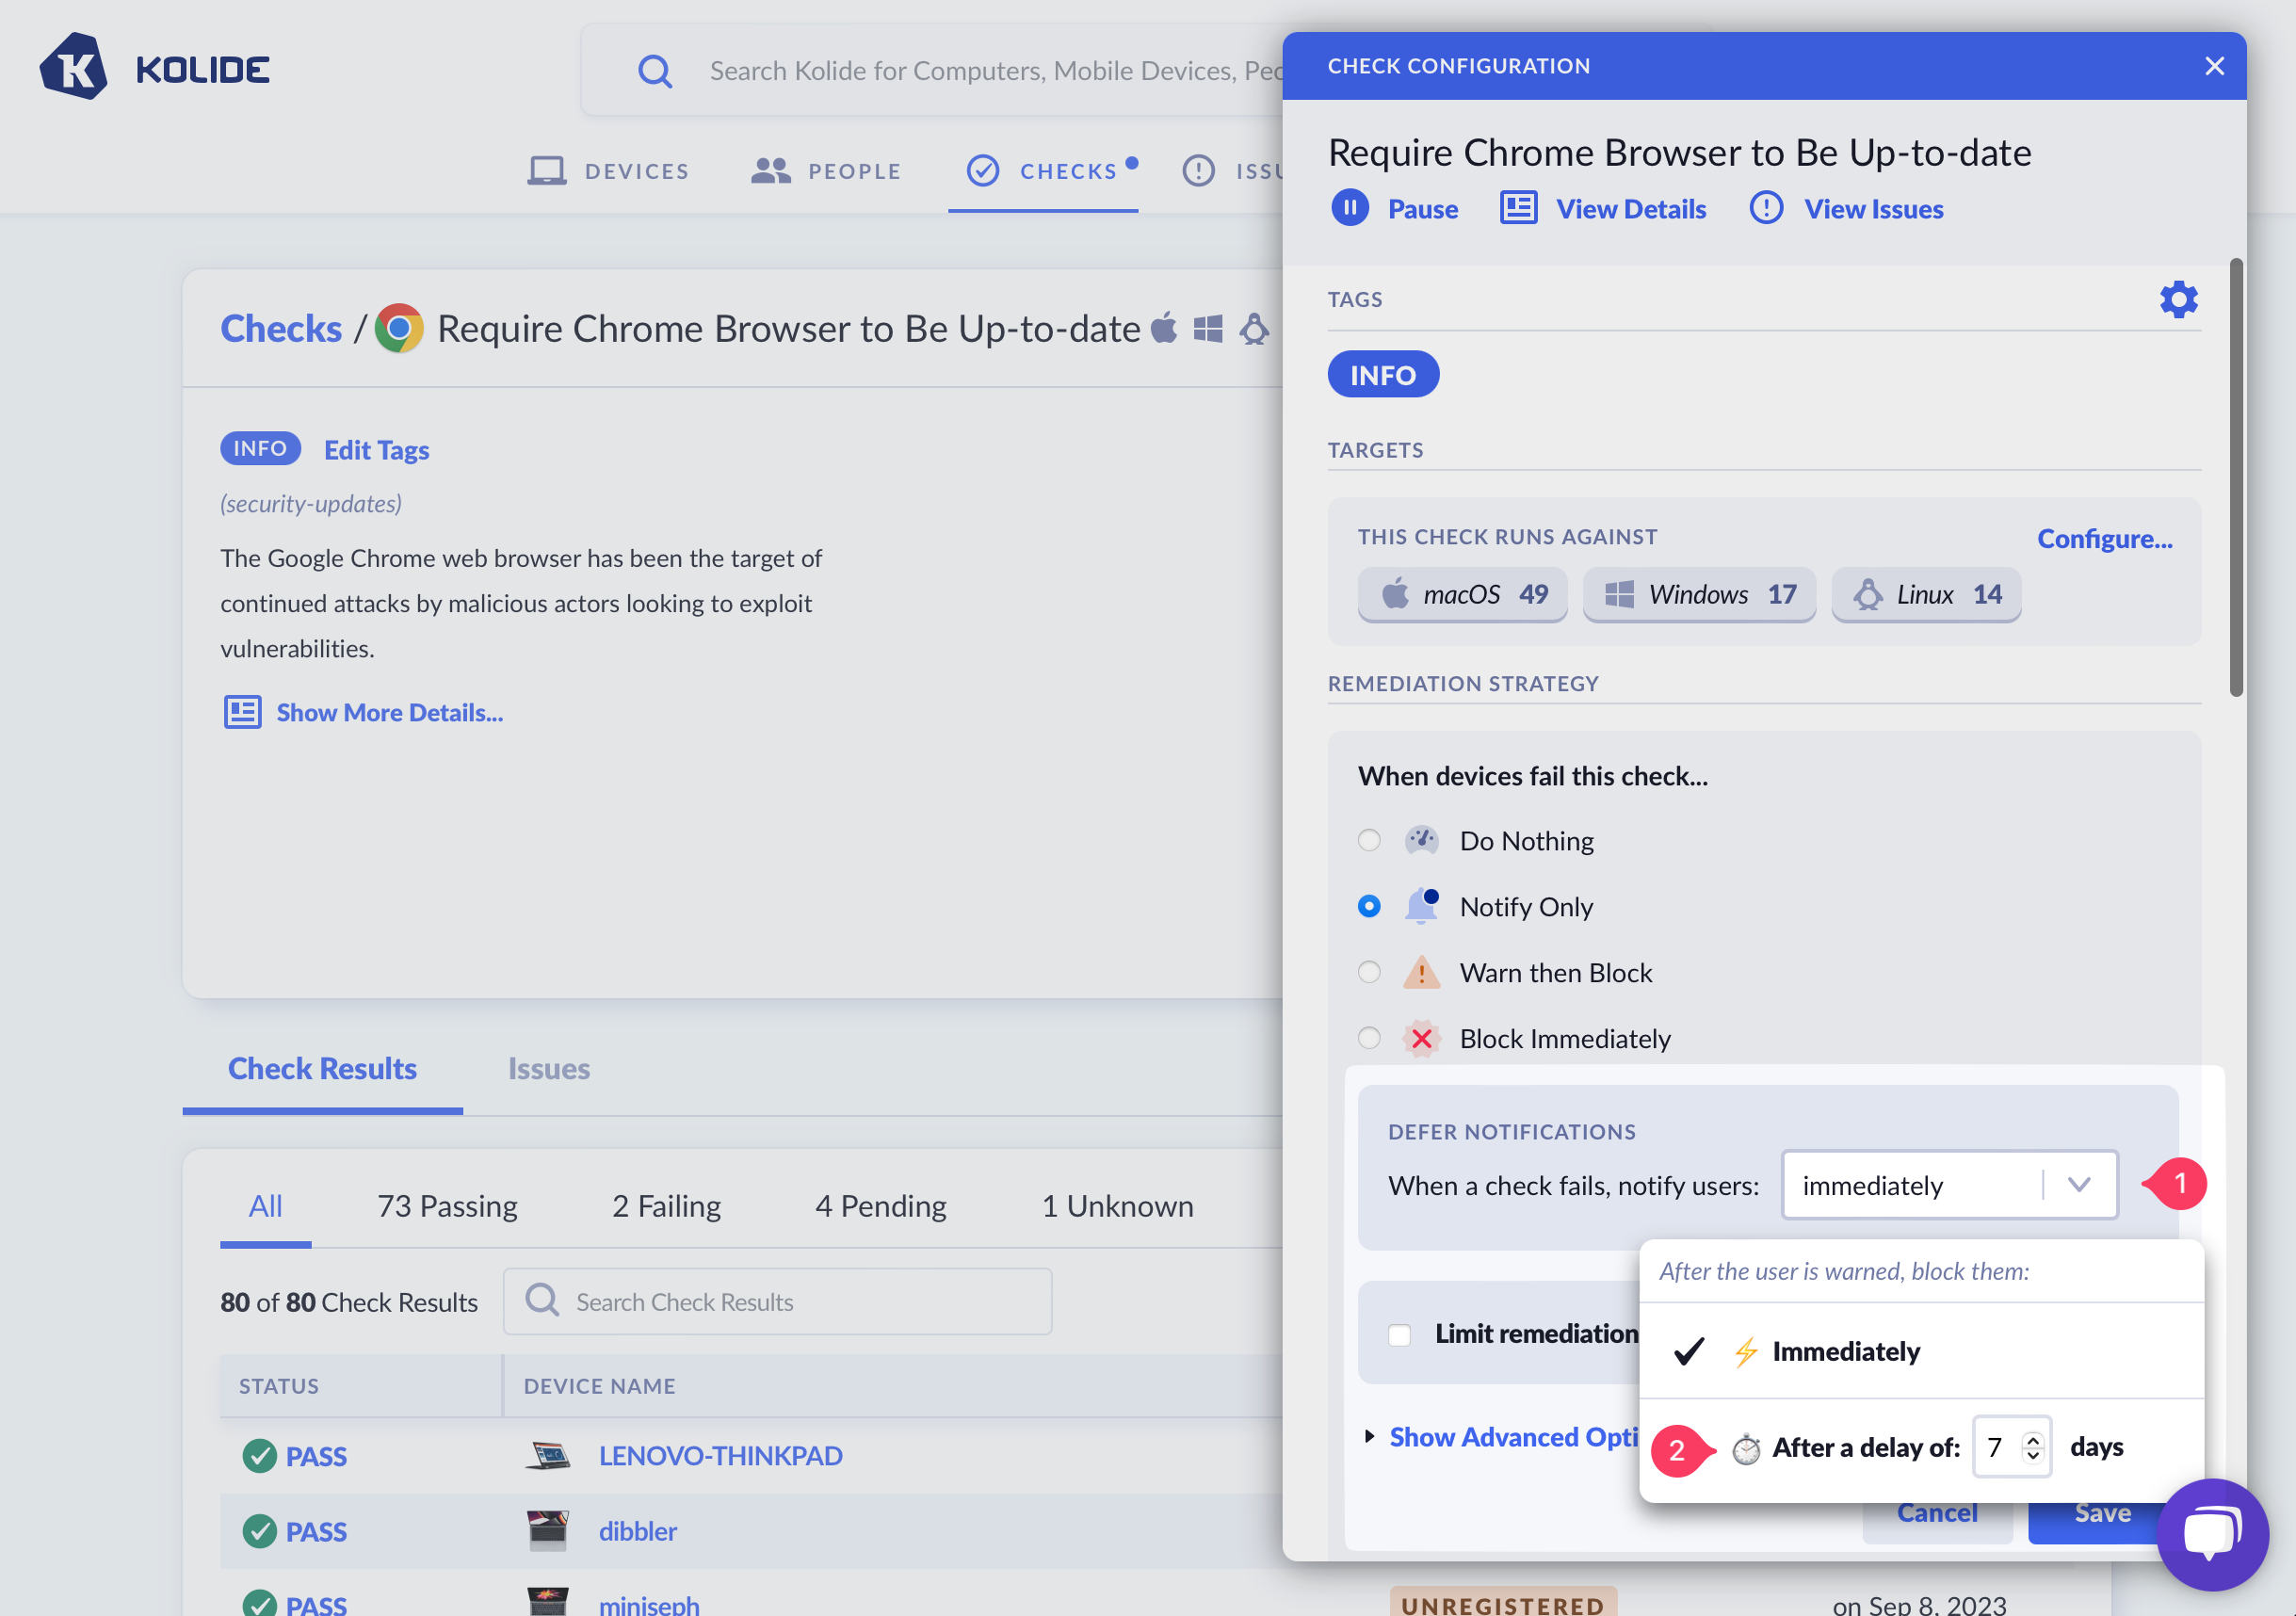
It’s important to note that when a Check fails, it will still produce an issue, but an end-user will have no knowledge of the Check failure until the deferment window has elapsed.
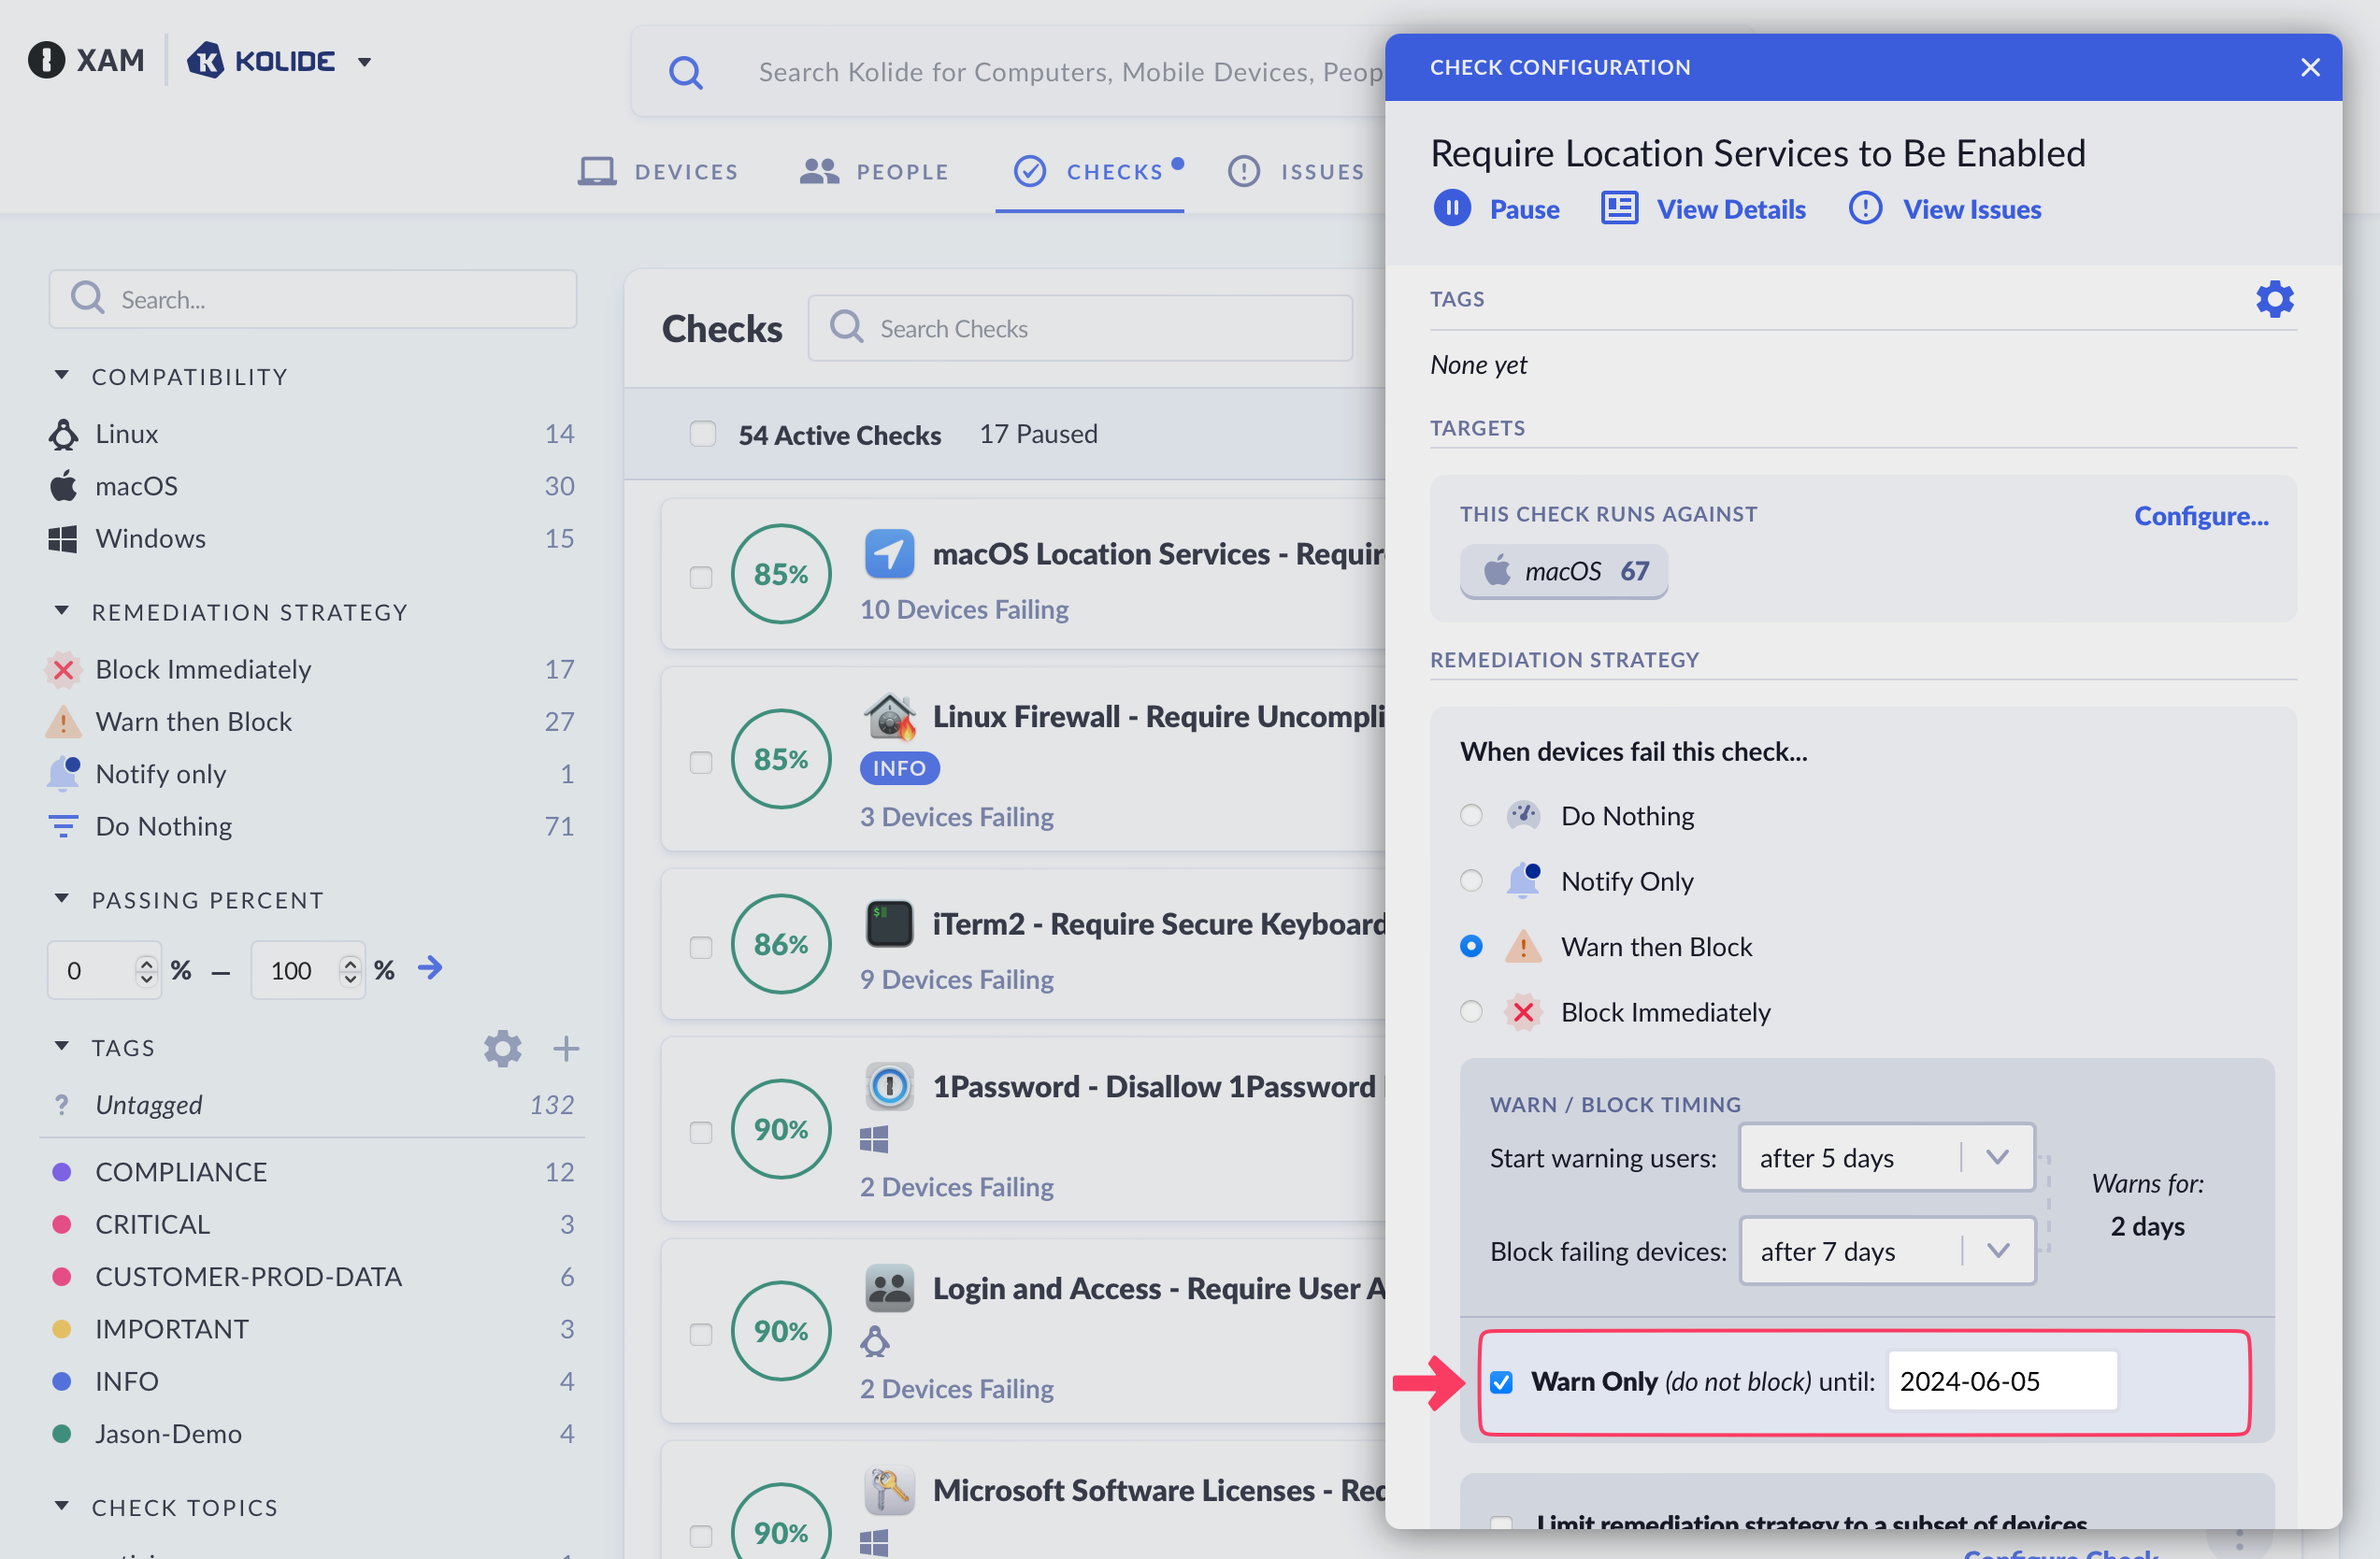
Warn then Block
“Warn then Block” is the recommended remediation strategy for Checks that you wish to achieve a high degree of compliance, while also giving users adequate time to resolve problems on their own before they are blocked.
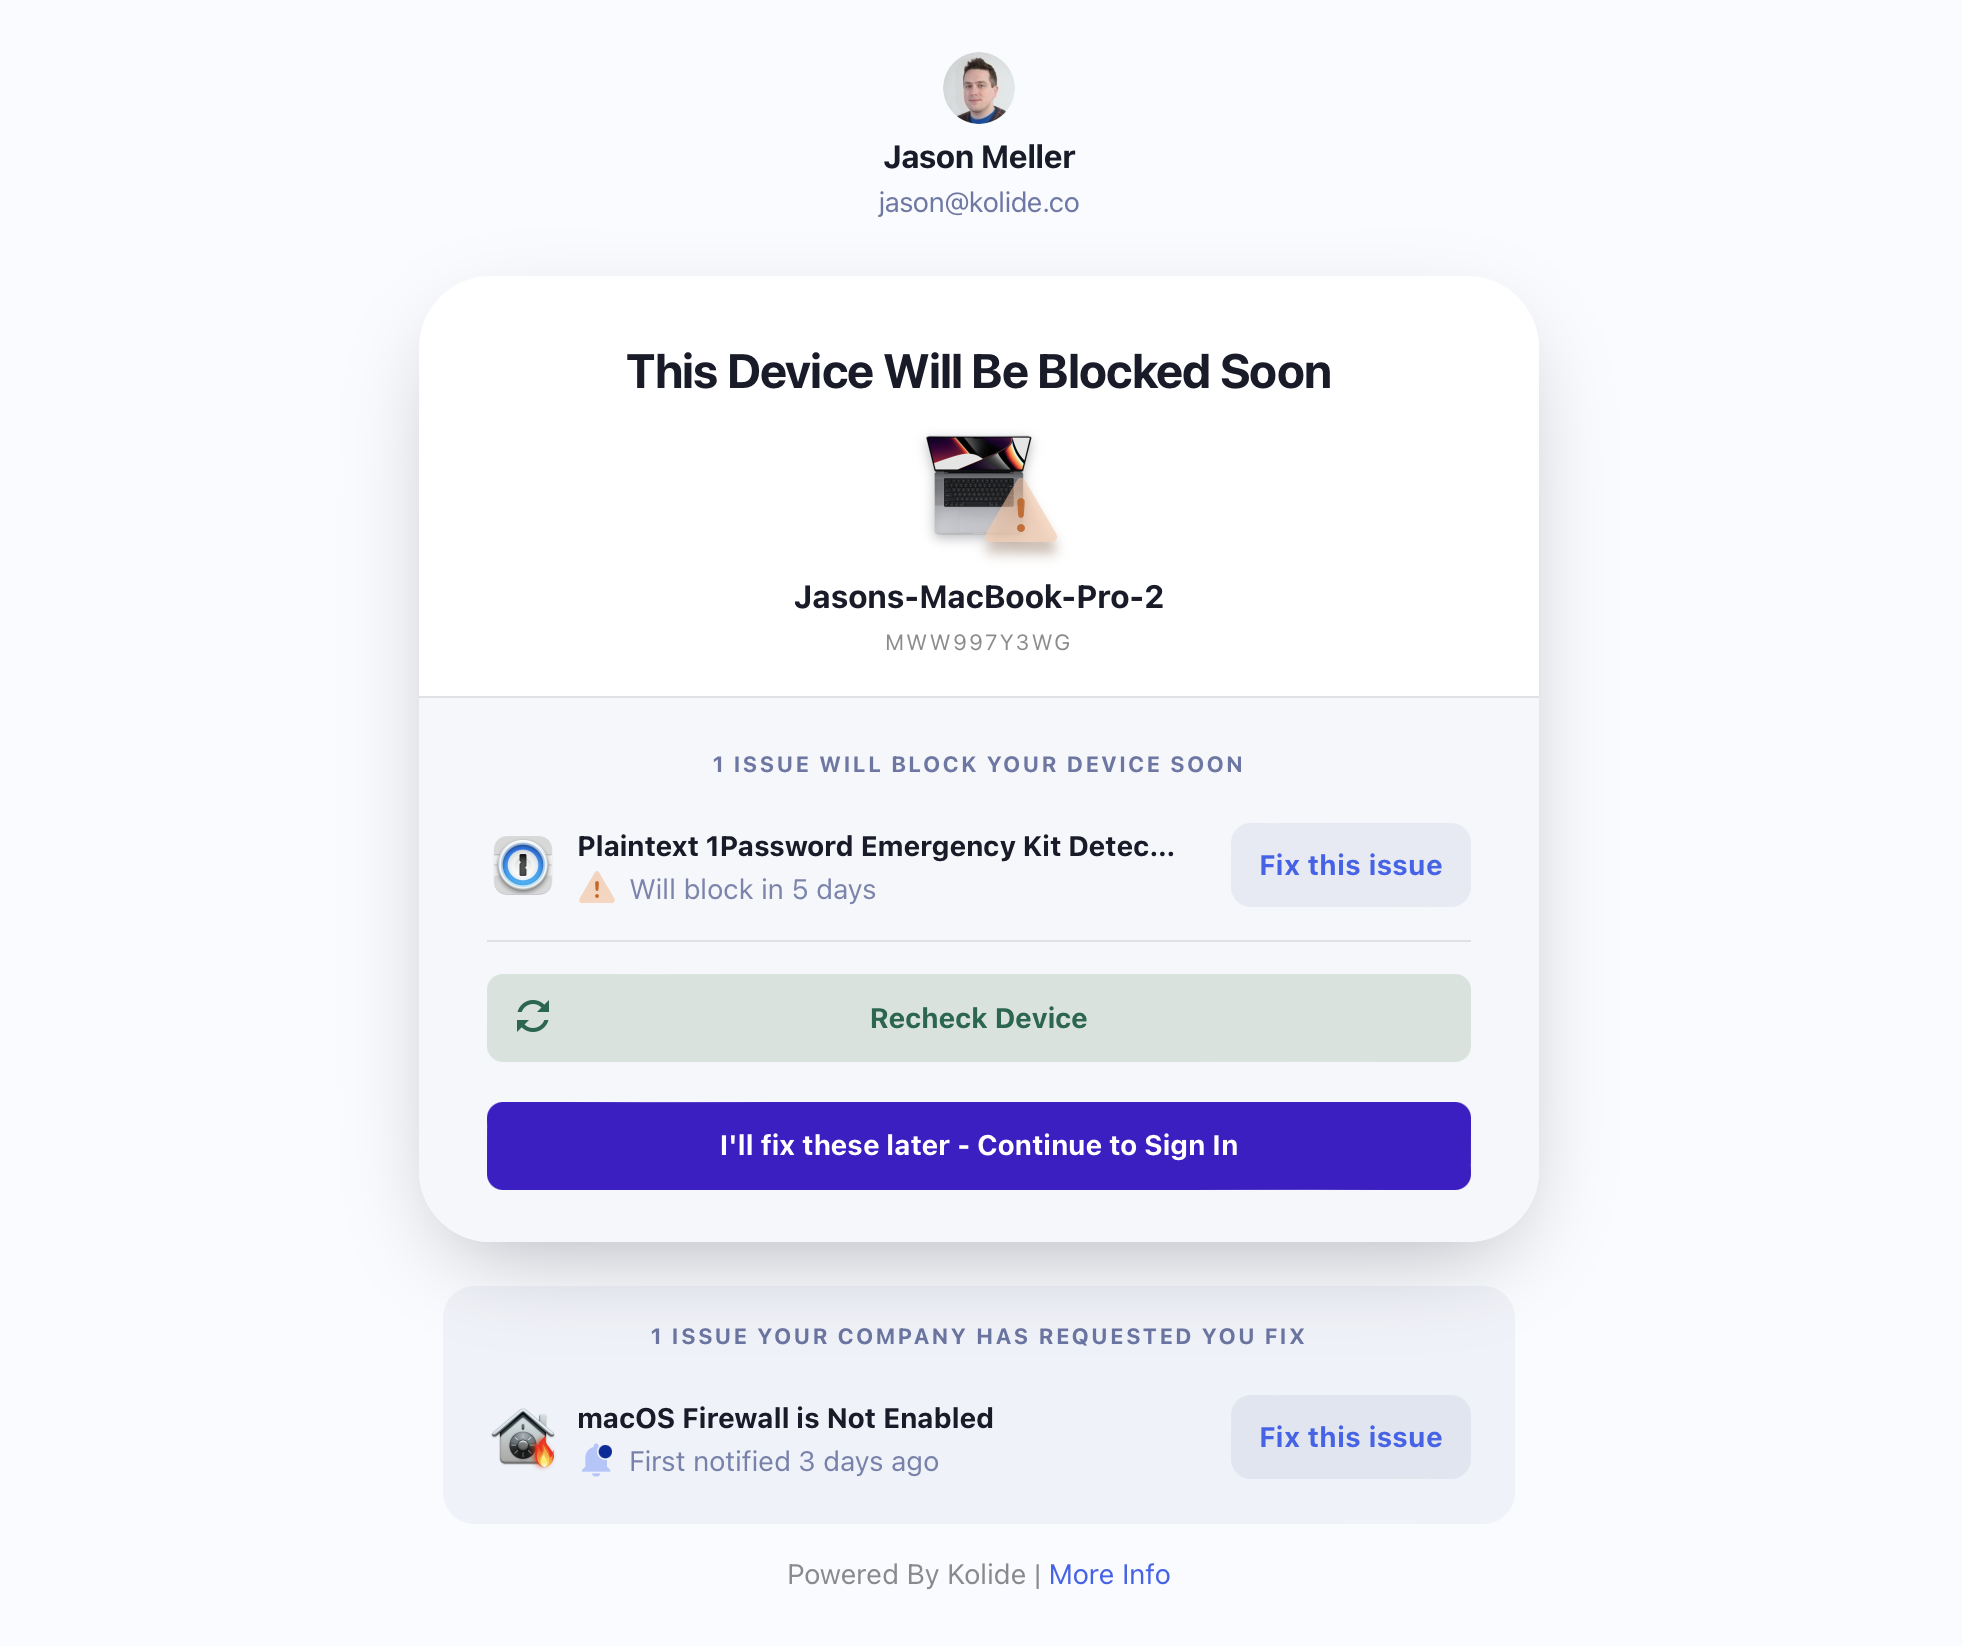
When using “Warn then Block,” users are able to bypass the warning until the warning period expires.
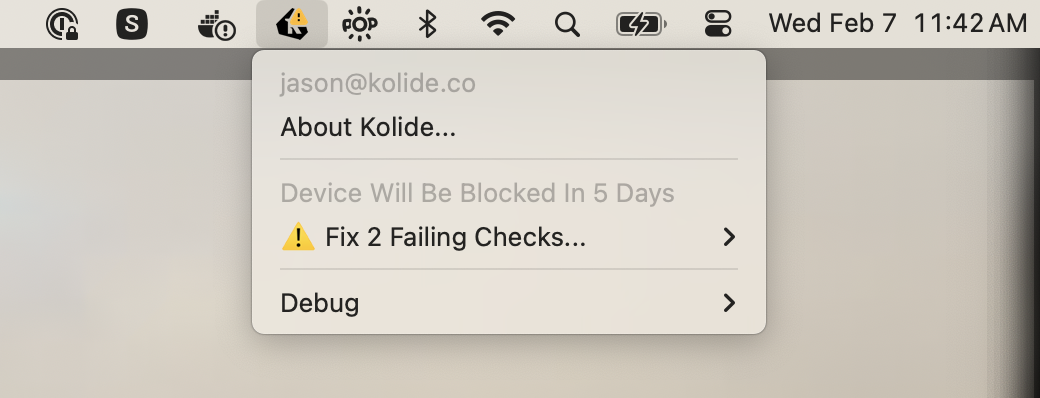
The Kolide Menu Bar App will display a yellow warning badge when the device fails a Check that’s “Warn then Block.”
Warn / Block Timing
When using the “Warn then Block” remediation strategy, a user will first be warned for a failing Check, and then subsequently blocked if that Check failure has not been resolved within the specified time period.
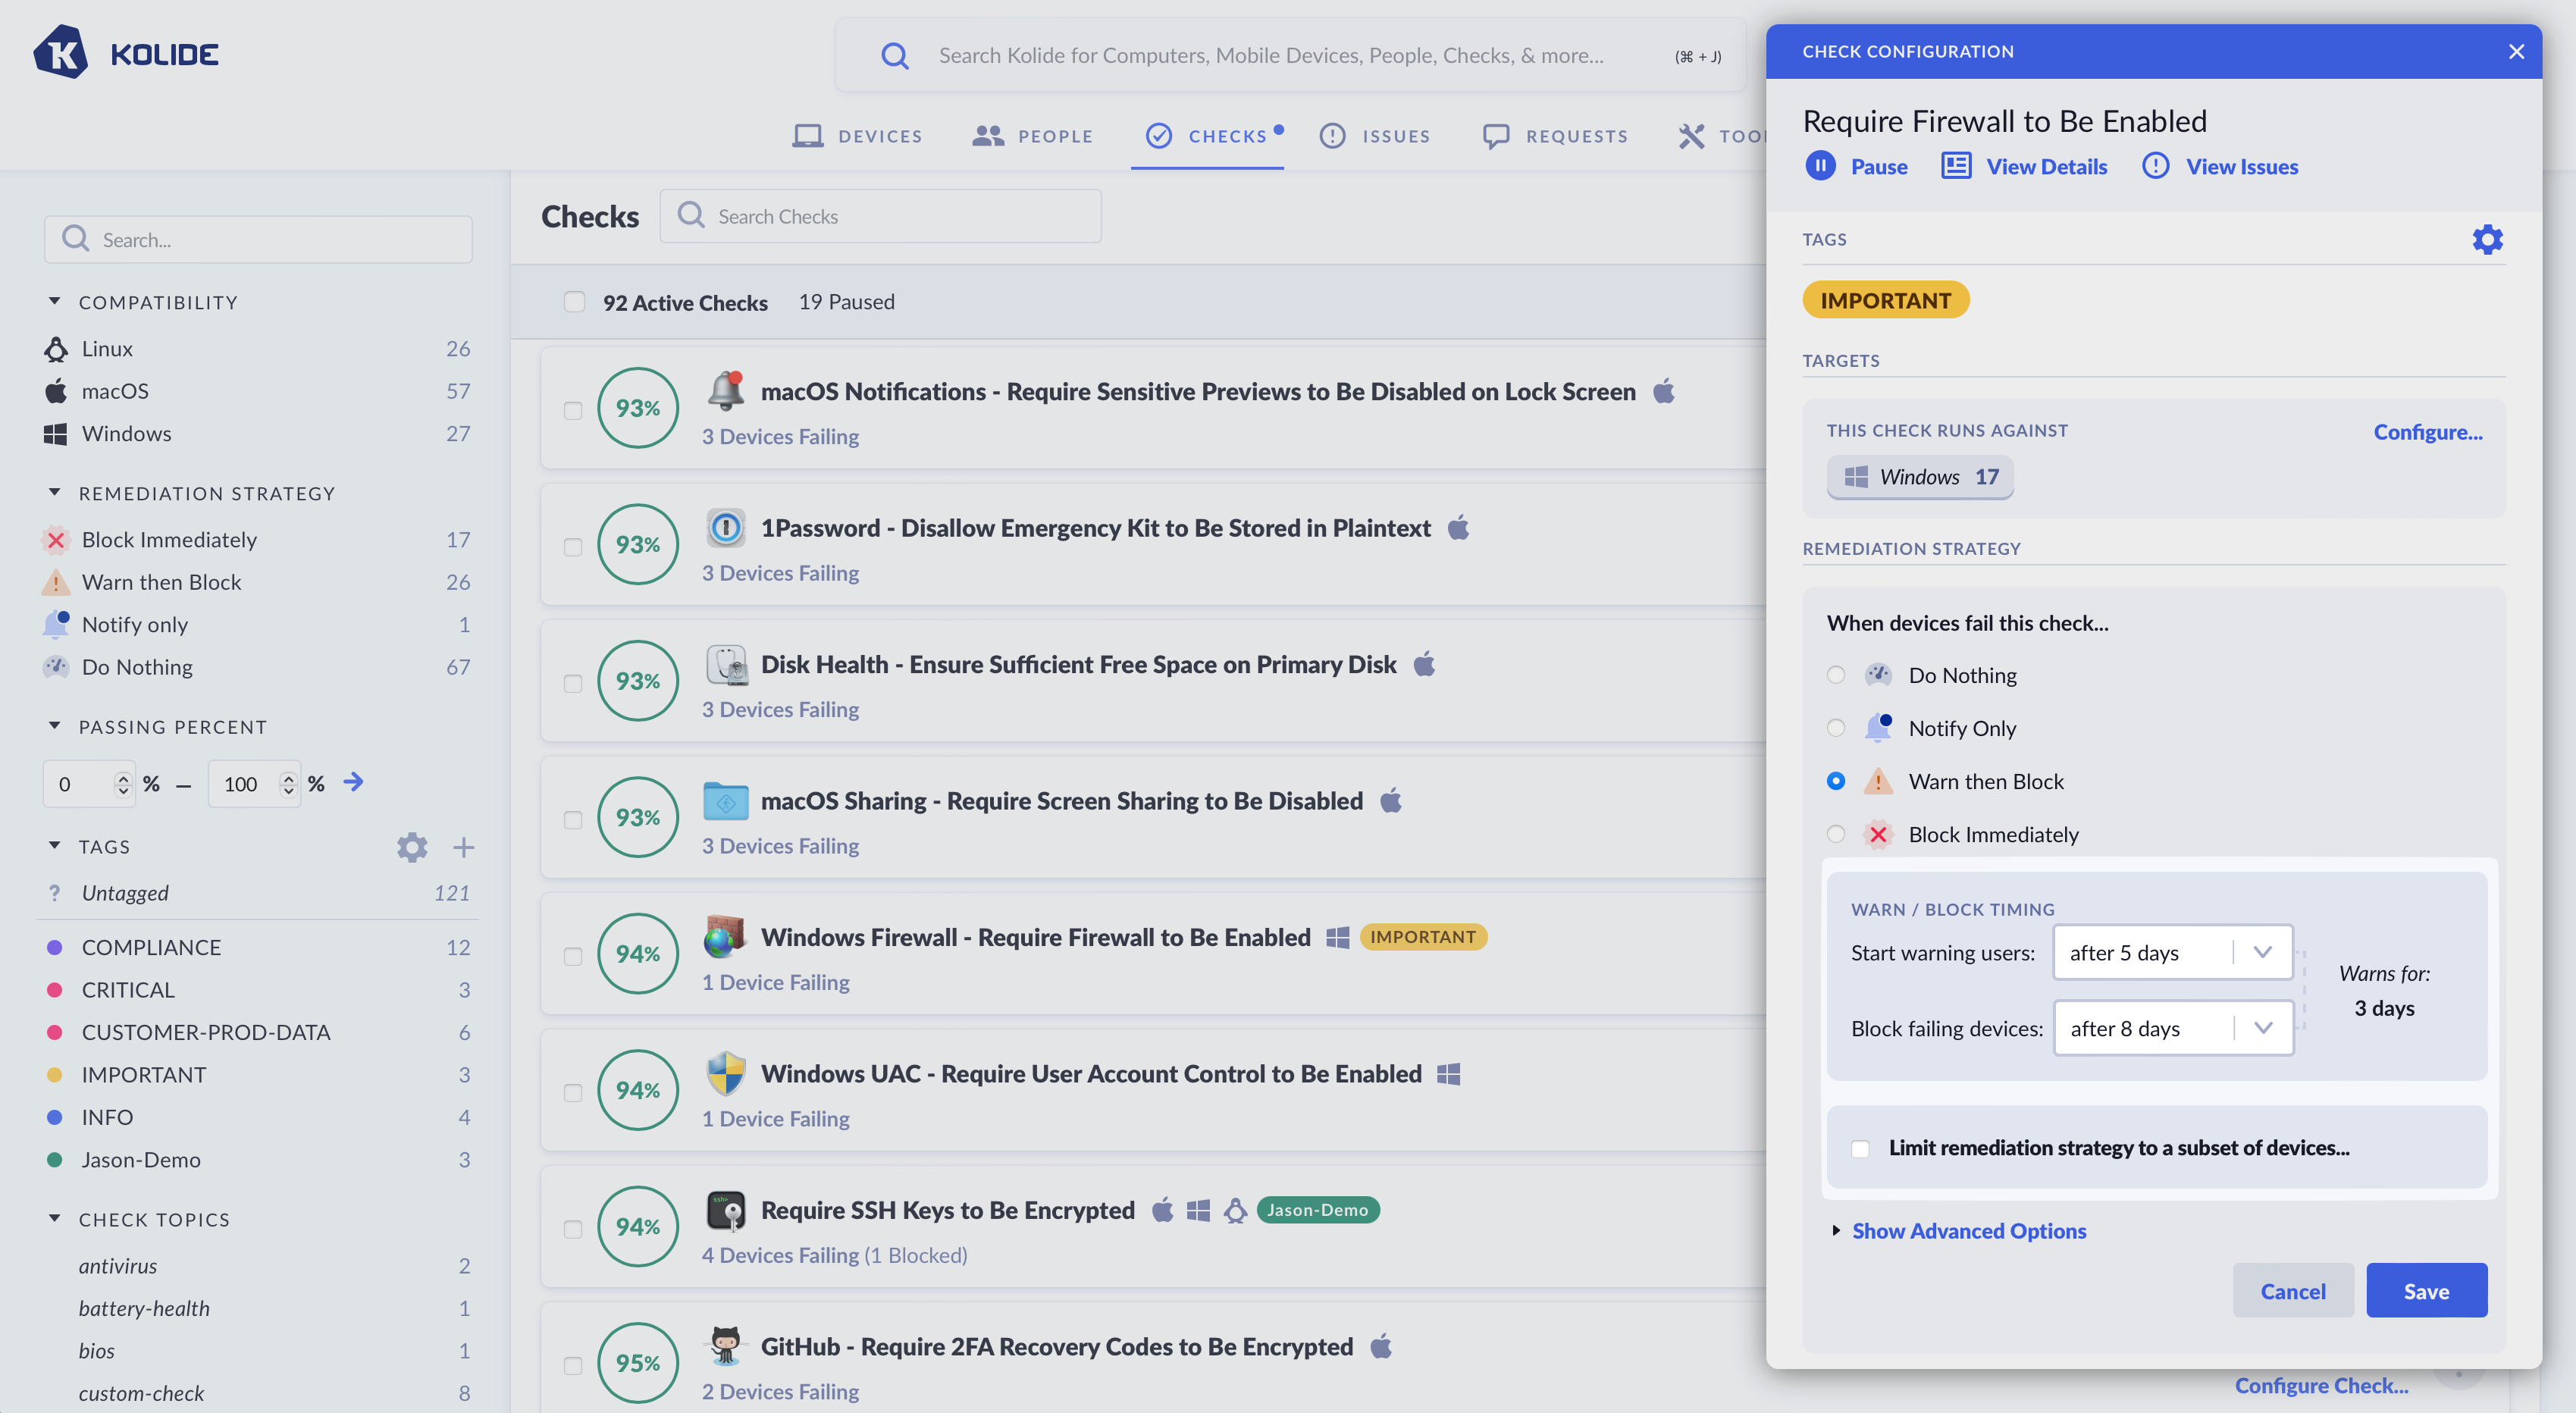
You can control the precise timing of both the Warning and Blocking phases. Delay intervals can be configured for each, allowing you to fine-tune how long a user will be warned for, and when blocking will begin. This allows you to create blocking schedules such as:
- When a Check fails, start warning user immediately, and block after 4 days.
- When a Check fails, start warning users after 5 days, and block after 8 days.
Delaying when the initial warning is sent can be desirable in situations when it’s likely that a large percentage of failing devices will resolve a problem on their own without explicit end-user intervention.
Block Immediately
“Block Immediately” is the most extreme remediation strategy and should only be used in situations that require an immediate response by end-users. Unlike “Warn then Block,” end-users will receive no prior warning of an issue before they are unable to access any applications protected by Kolide Device Trust.
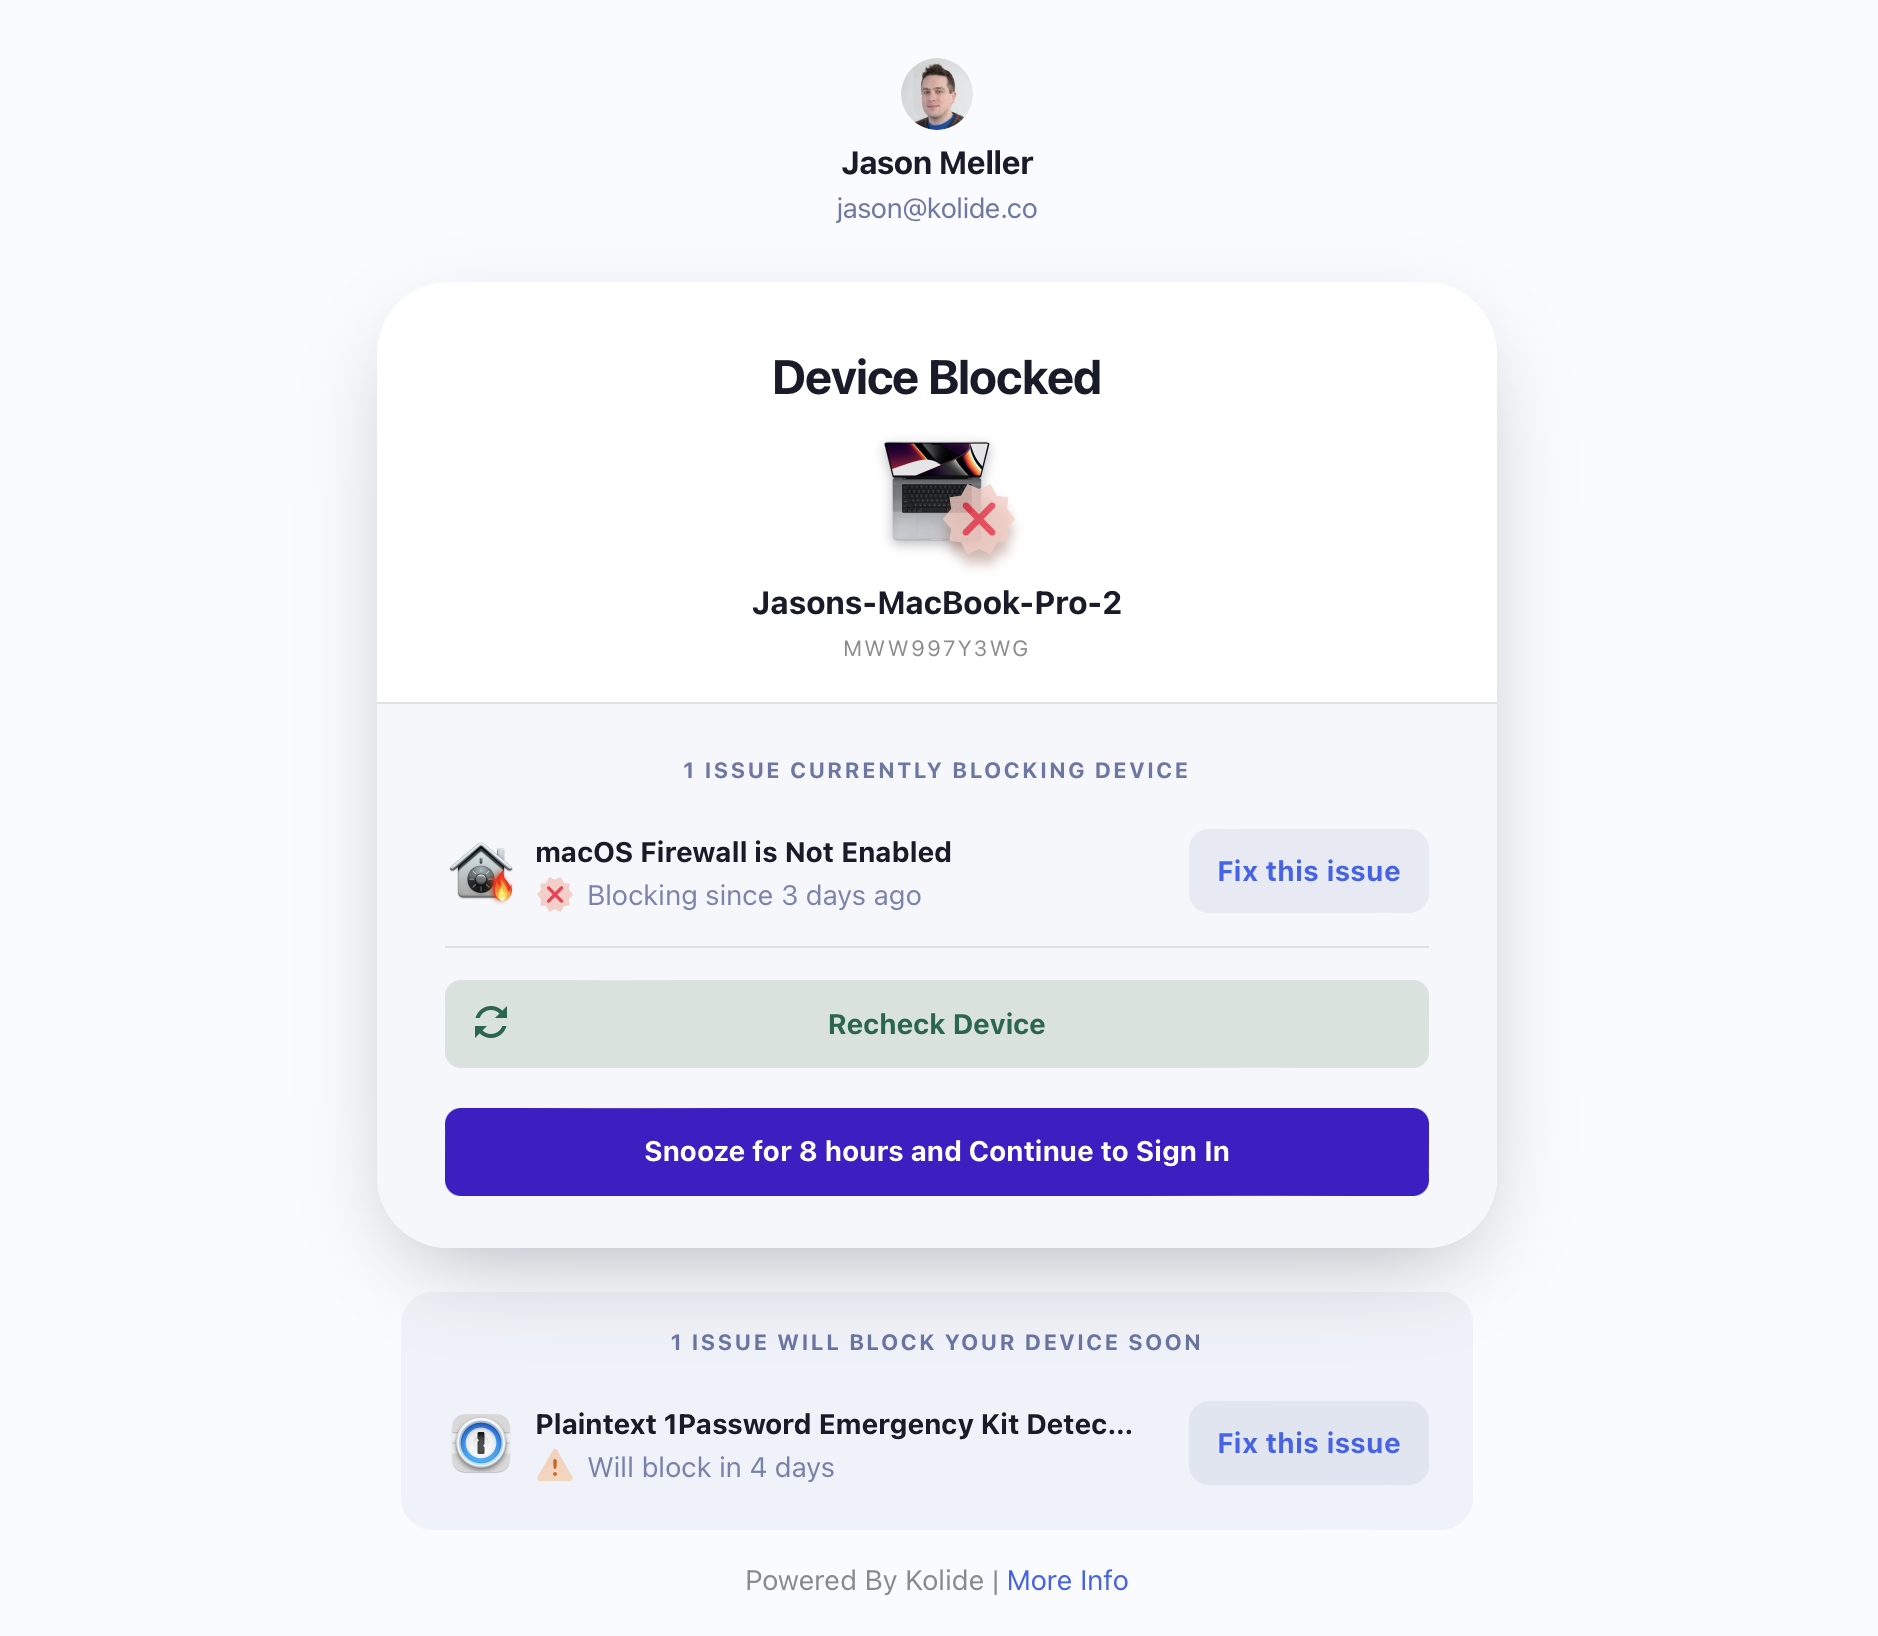
When using “Block Immediately,” users cannot proceed with authentication, unless snoozing is enabled.
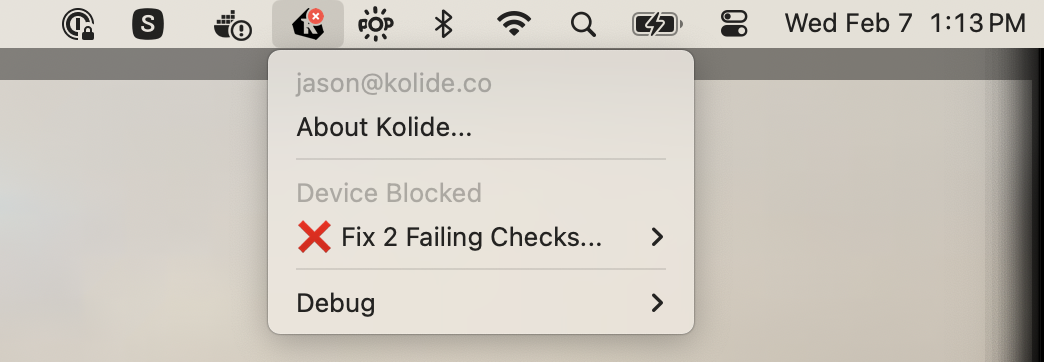
The Kolide Menu Bar App will display a red “x” when the device fails a Check that’s set to “Block Immediately” or, when they fail a Check that’s set “Warn then Block” and the warning grace period has expired.
Using “Do Not Block Until…”
When using either the Block Immediately or the Warn then Block strategies, there are situations where, based on your settings, some devices may become immediately blocked. The Warn Only (Do Not Block) Until setting allows you to set a specific date that blocking is allowed to start, even if the device should have been blocked based on the other aspects of the Remediation Strategy configuration.
This is a great way to ensure users don’t have a negative experience or feel needlessly punished the first time blocking is enabled for a check that’s been running on devices.
Previewing Strategy Changes
As you make changes to the remediation strategy, a popup box will appear to the left of the sidebar to summarize how the remediation options will impact the current population of registered devices.
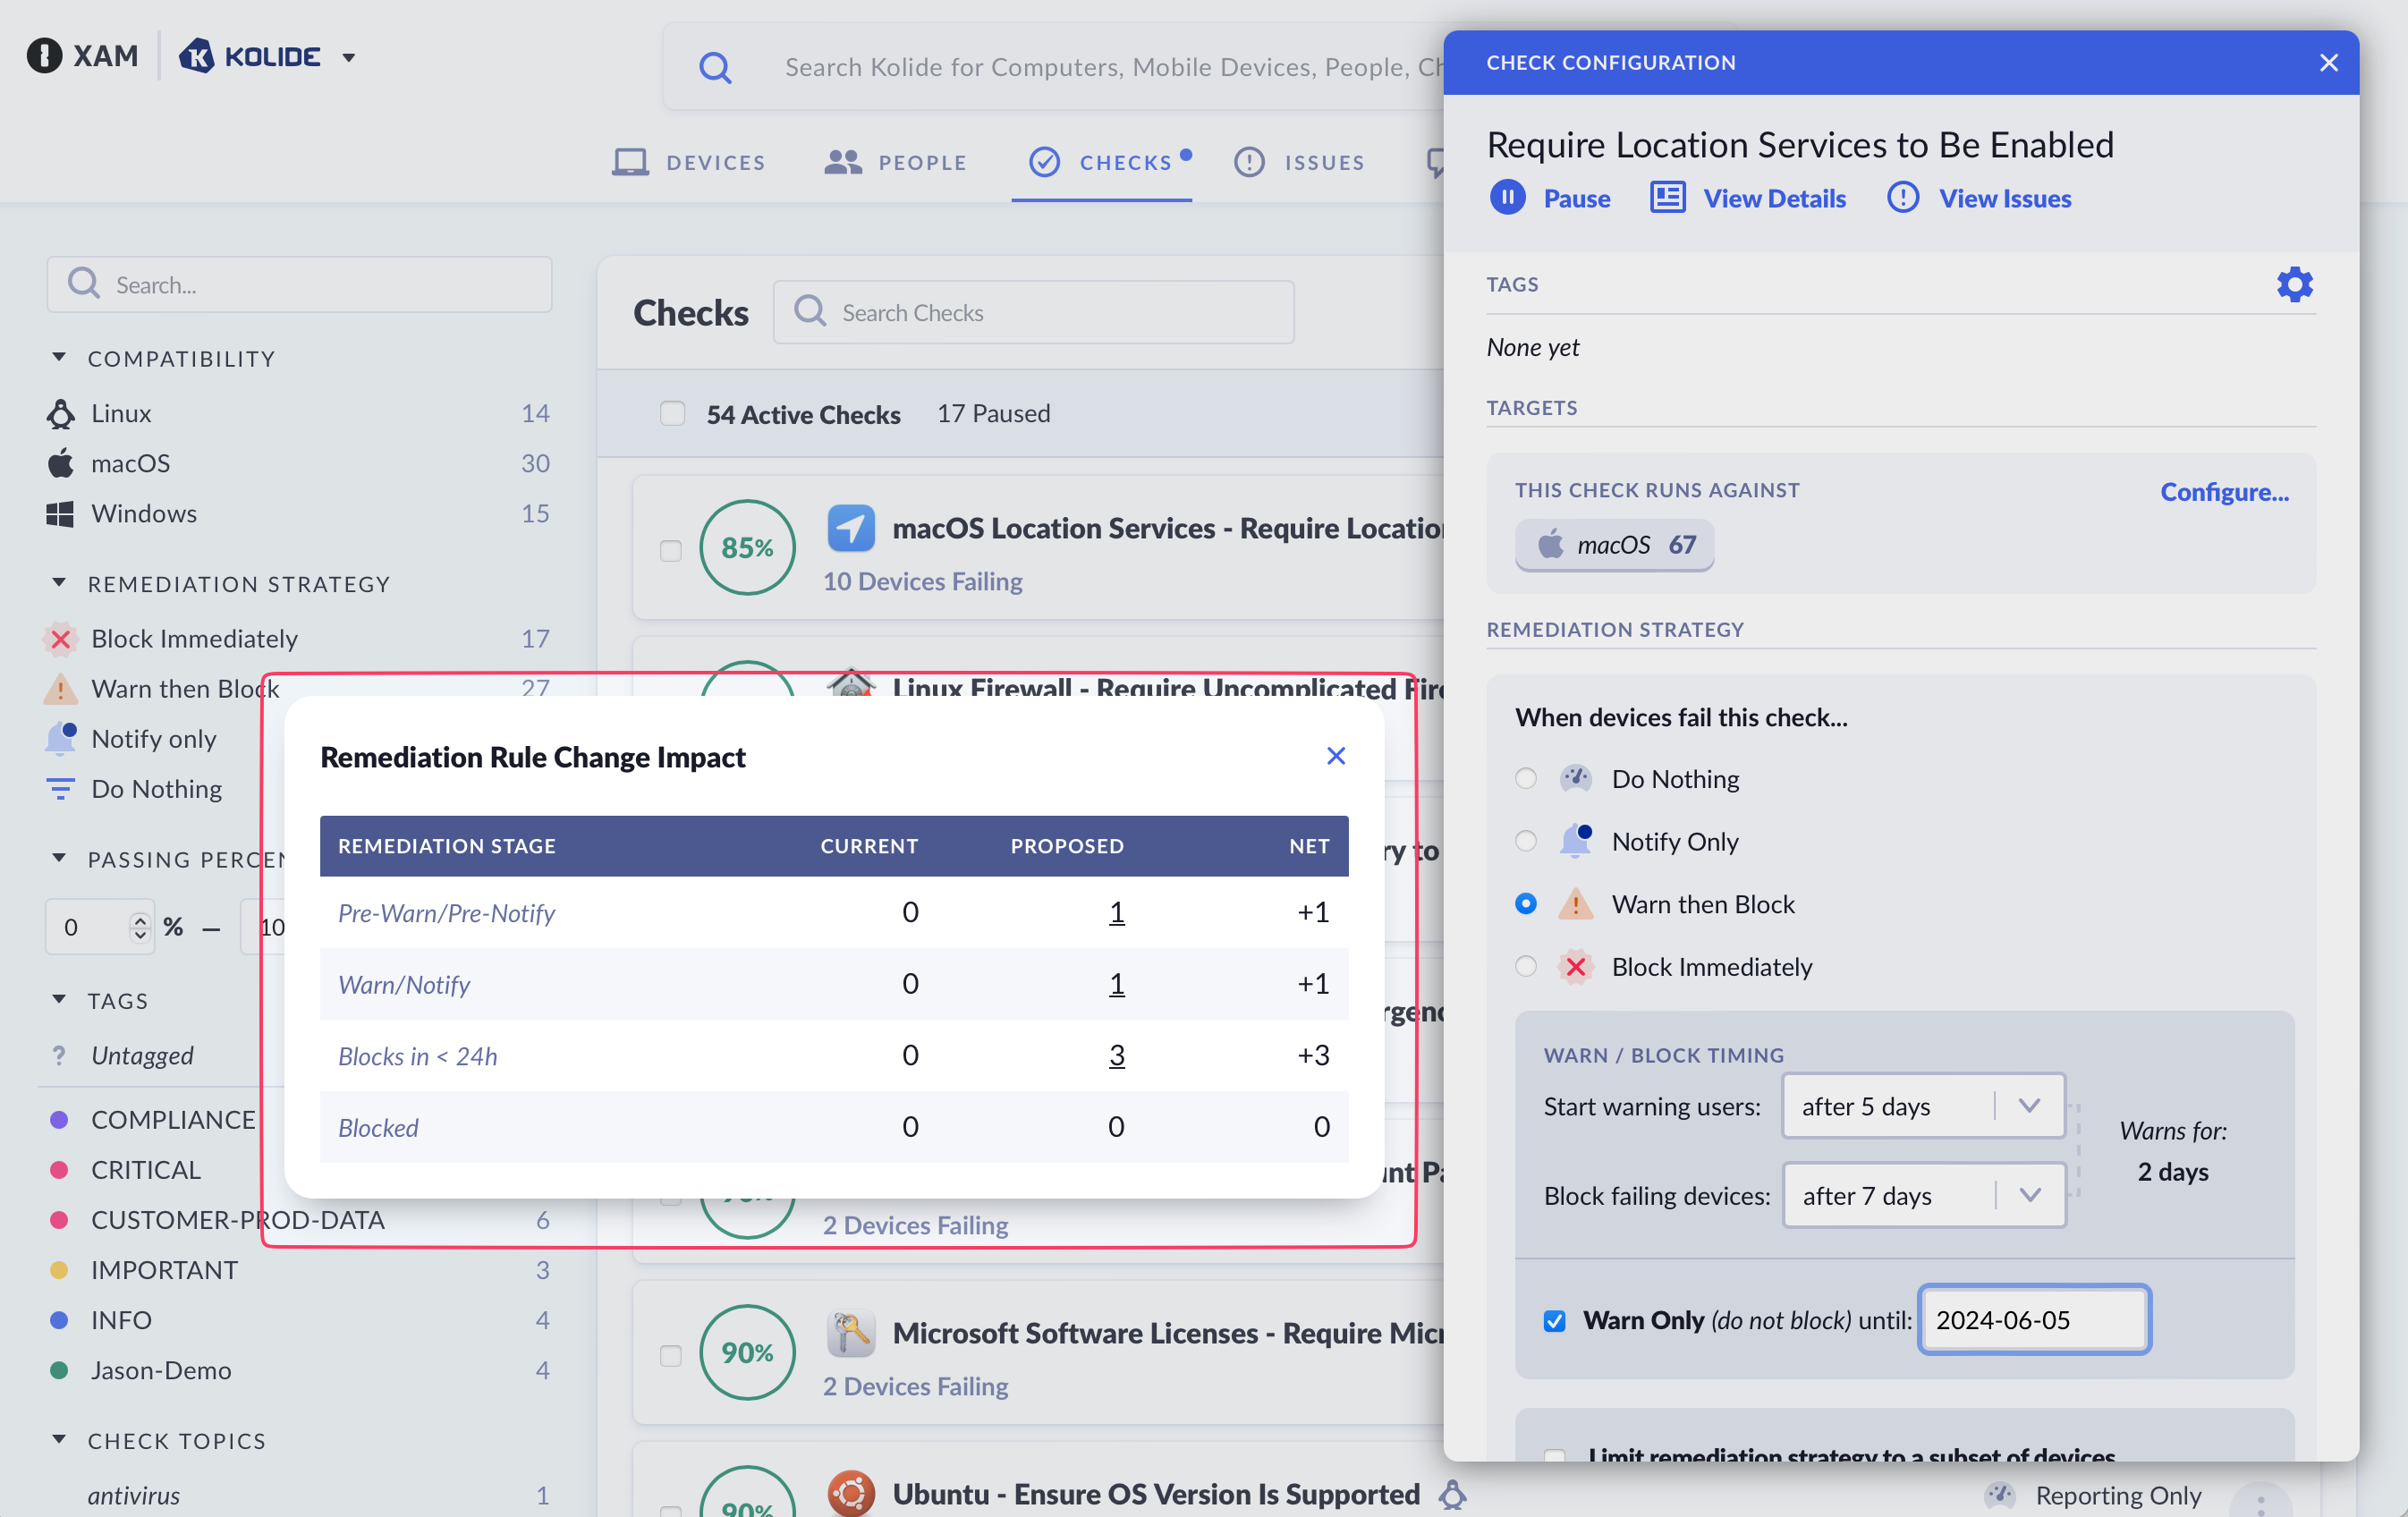
The preview popup will appear to help you understand the impact of your proposed remediation strategy changes.
This popup is organized into four columns:
-
Remediation Stage - Which can be one of the four stages:
- Pre-Warn/Pre-Notify - The device is failing the check, but the end-user has not been notified/warned about it as they are still within the grace period.
- Warn/Notify - The device is actively failing the check, and the end-user is being actively notified/warned about it via the Menu Bar app or as they authenticate to a Kolide-protected app.
- Blocks < 24h - Equivalent to Warn/Notify except the device will transition to a blocked state within 24 hours.
- Blocked - The device is currently blocked from authenticating to apps protected by Kolide.
Current - The outcome of the pre-existing remediation strategy on registered devices across the remediation stages.
Proposed - The outcome of the proposed remediation strategy on registered devices across the remediation stages.
Net - The difference between Current and Proposed.
In addition to viewing the counts, you can also click any count within the Current and Proposed columns to see a listing of devices that the count represents.
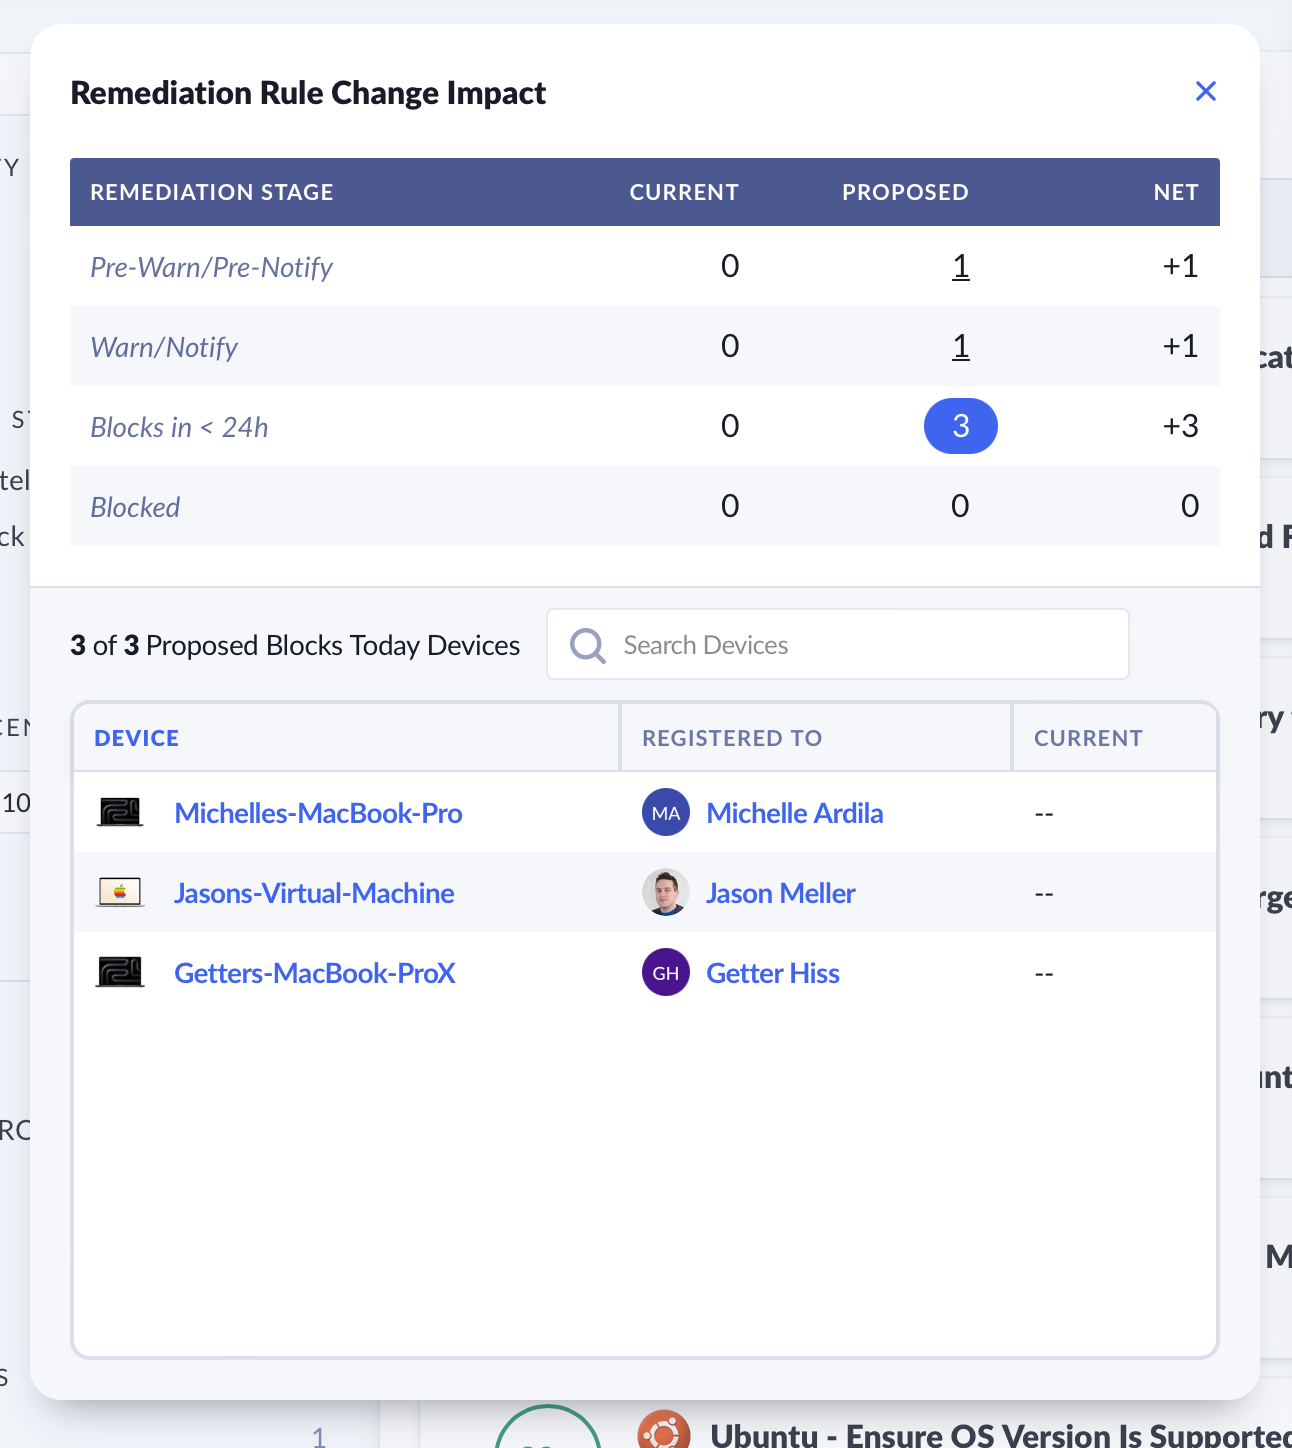
You can view and search through a list of devices that are impacted by your proposed changes.
Advanced Settings
Limit Blocking to a Subset of Devices
Similarly to Check Targeting, you can control which Devices the Device Trust Settings apply to. You can the scope of blocking by platform, or by groups (requires Kolide Max).
To get started, check the box Limit blocking to a subset of devices.
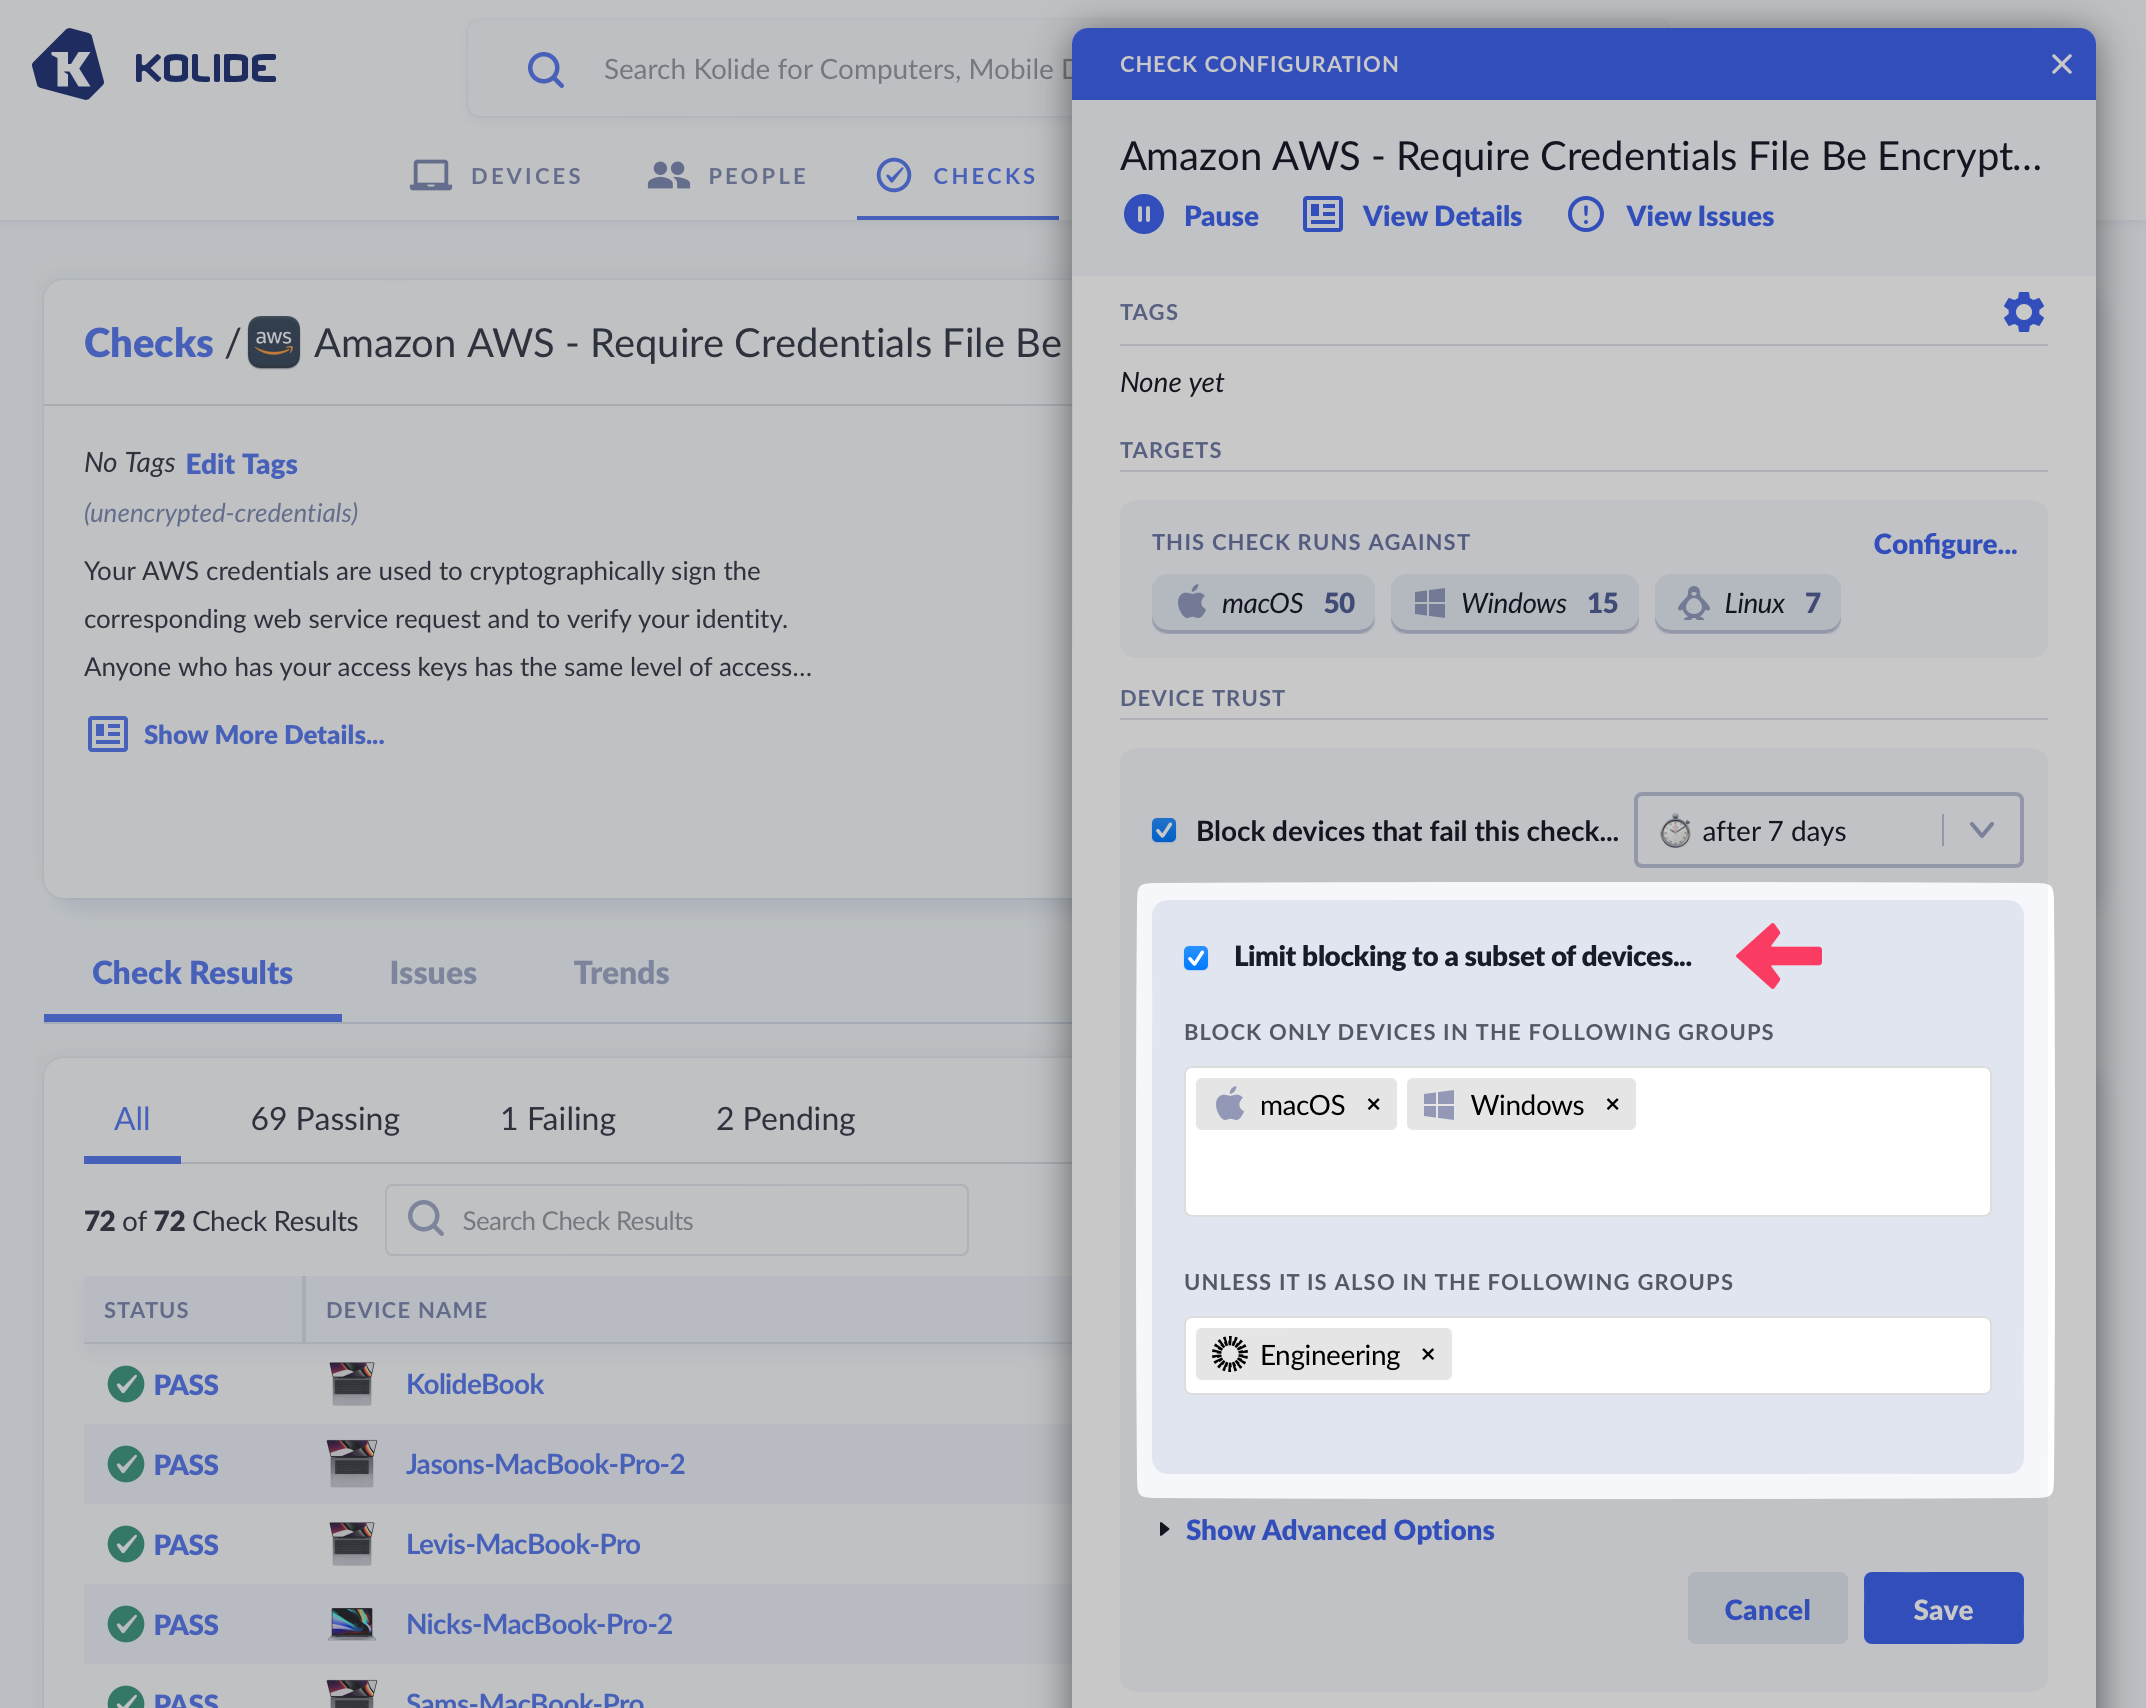
Choose the platforms, 1Password groups, Okta groups, Google Workspace groups, or Device Groups you’d like the Check to target. You can also avoid targeting groups by selecting them in the “Unless It Is Also In The Following Groups” section.
Check Shelf-Life
When you enable blocking on a Check another dropdown will appear asking you to configure when you want to require a live recheck during authentication. This settings controls the Check run’s shelf-life, or, the amount of time Kolide will consider data fresh enough to use for a Device Trust authentication decision.
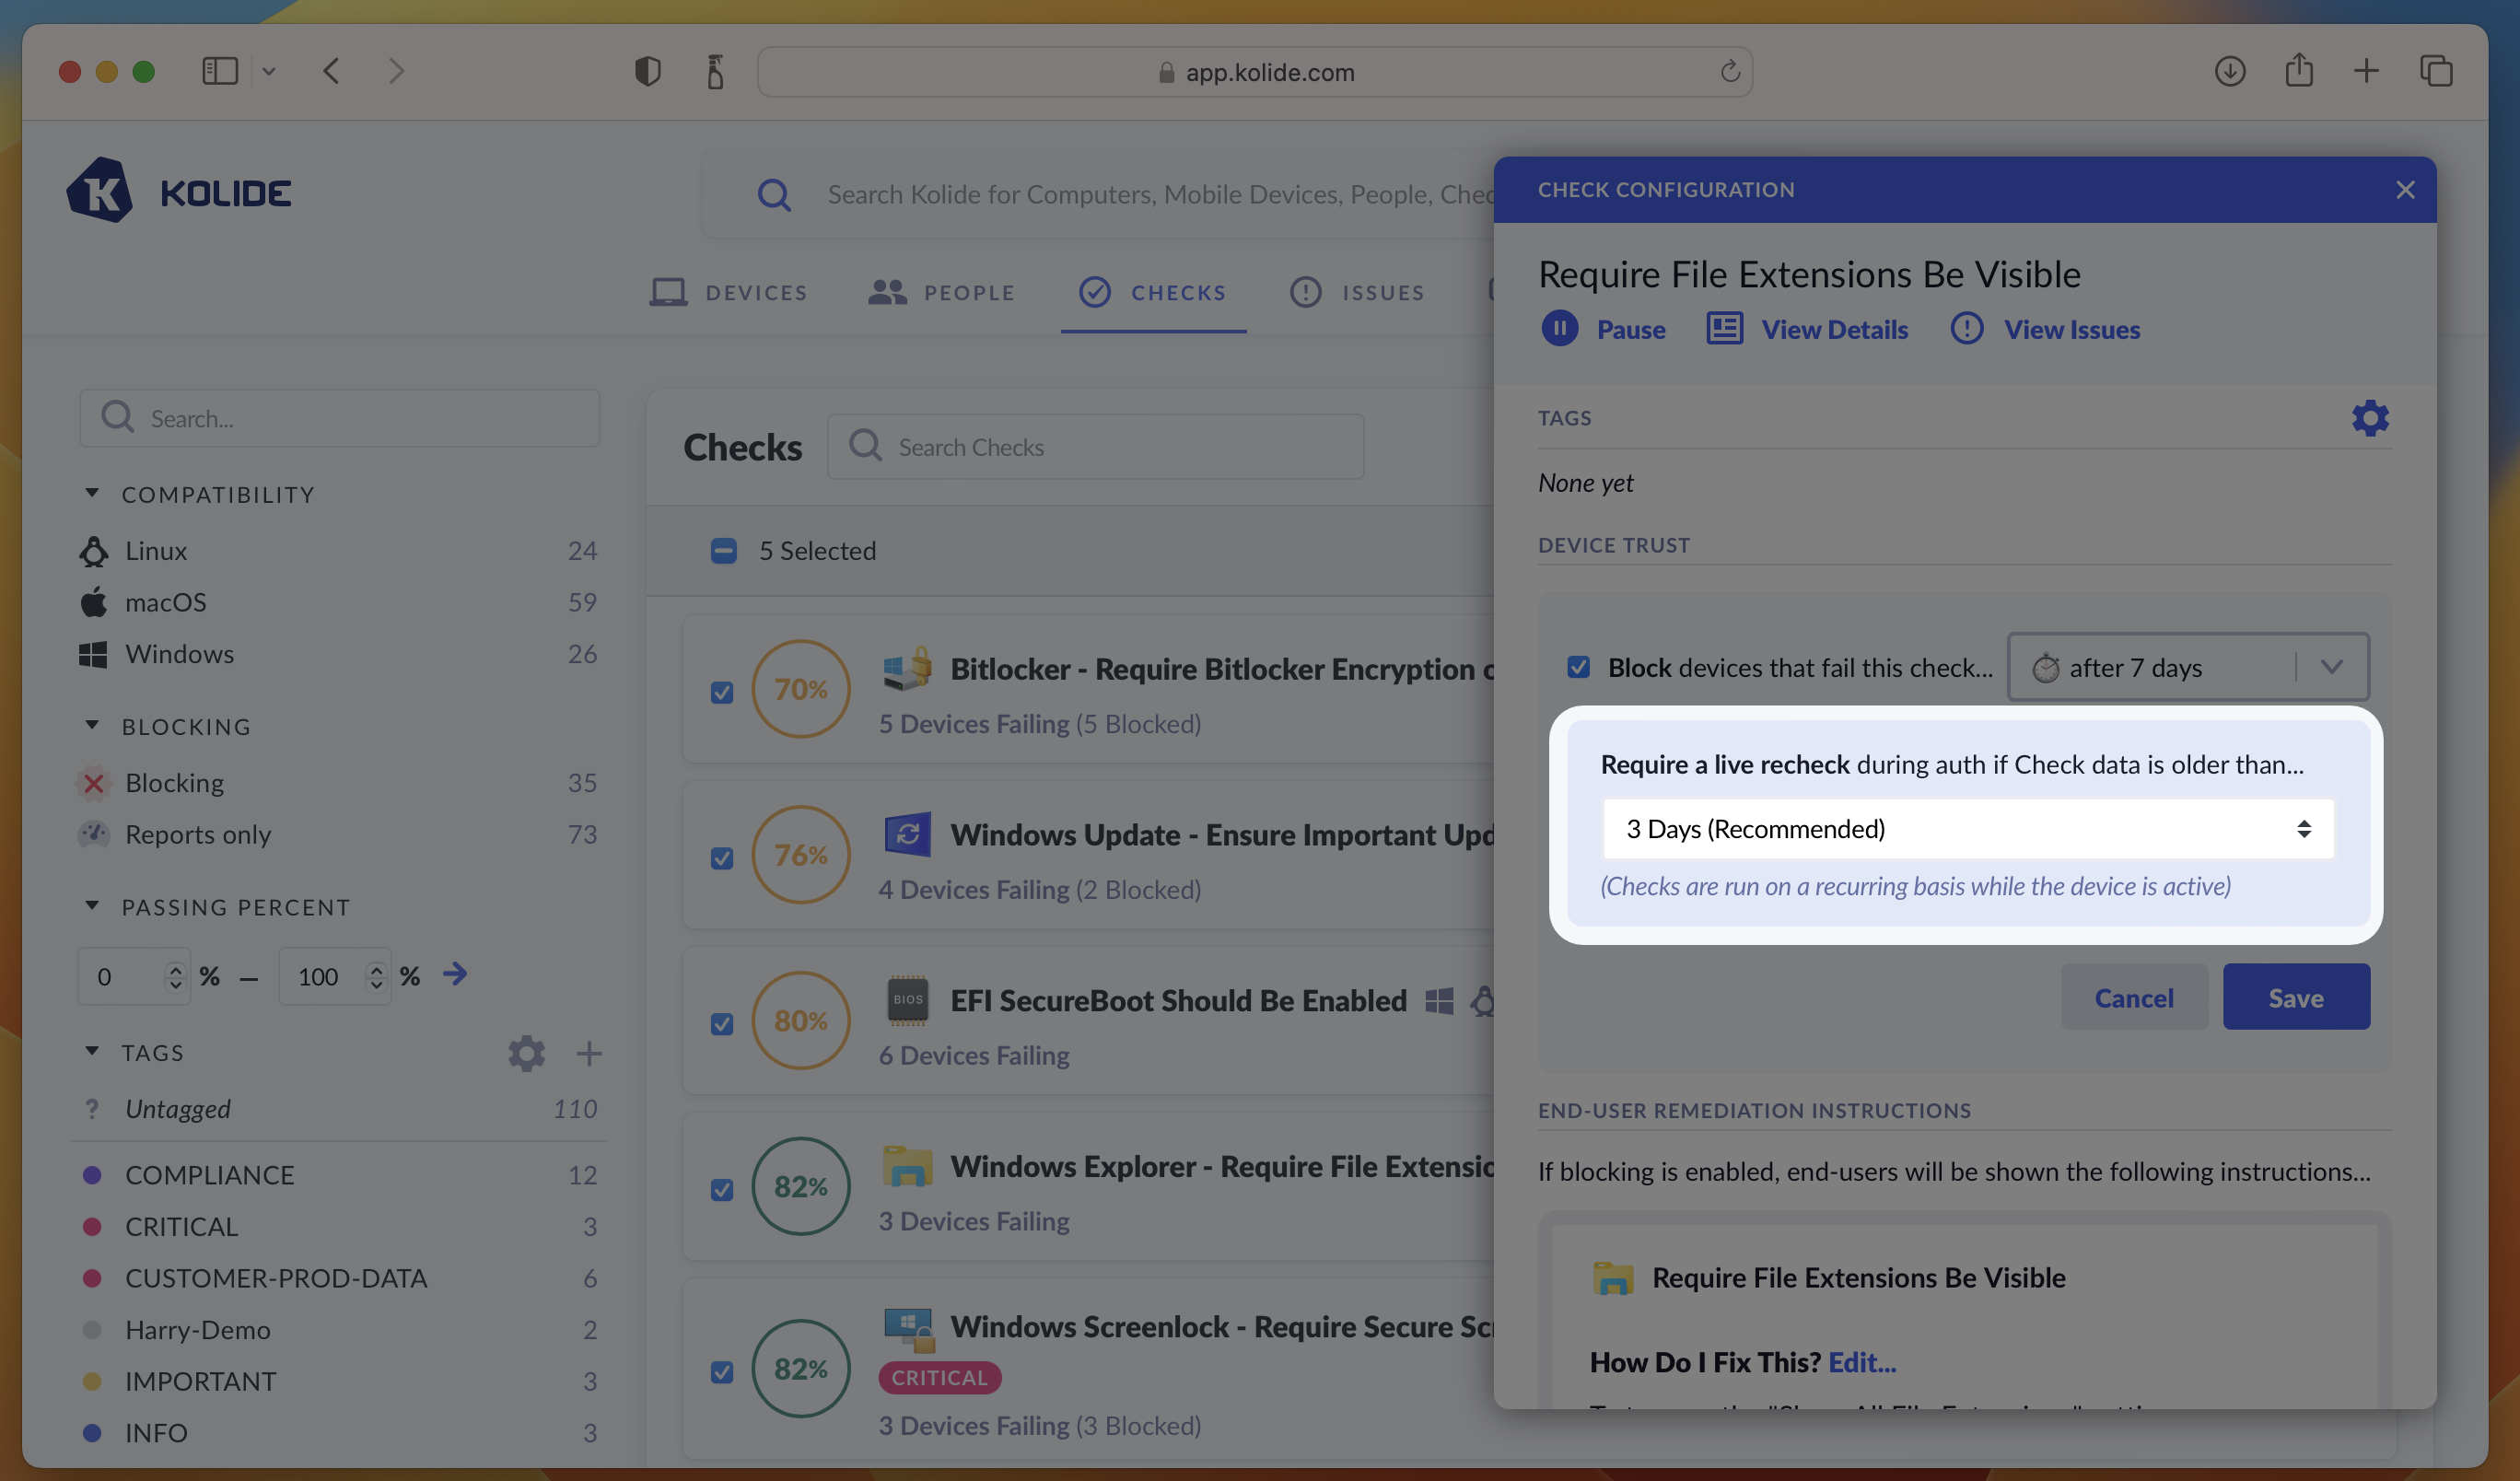
If the shelf-life of Check result has expired at the time the user is signing in Kolide will require the user to wait for a fresh Check result to come back before proceeding.
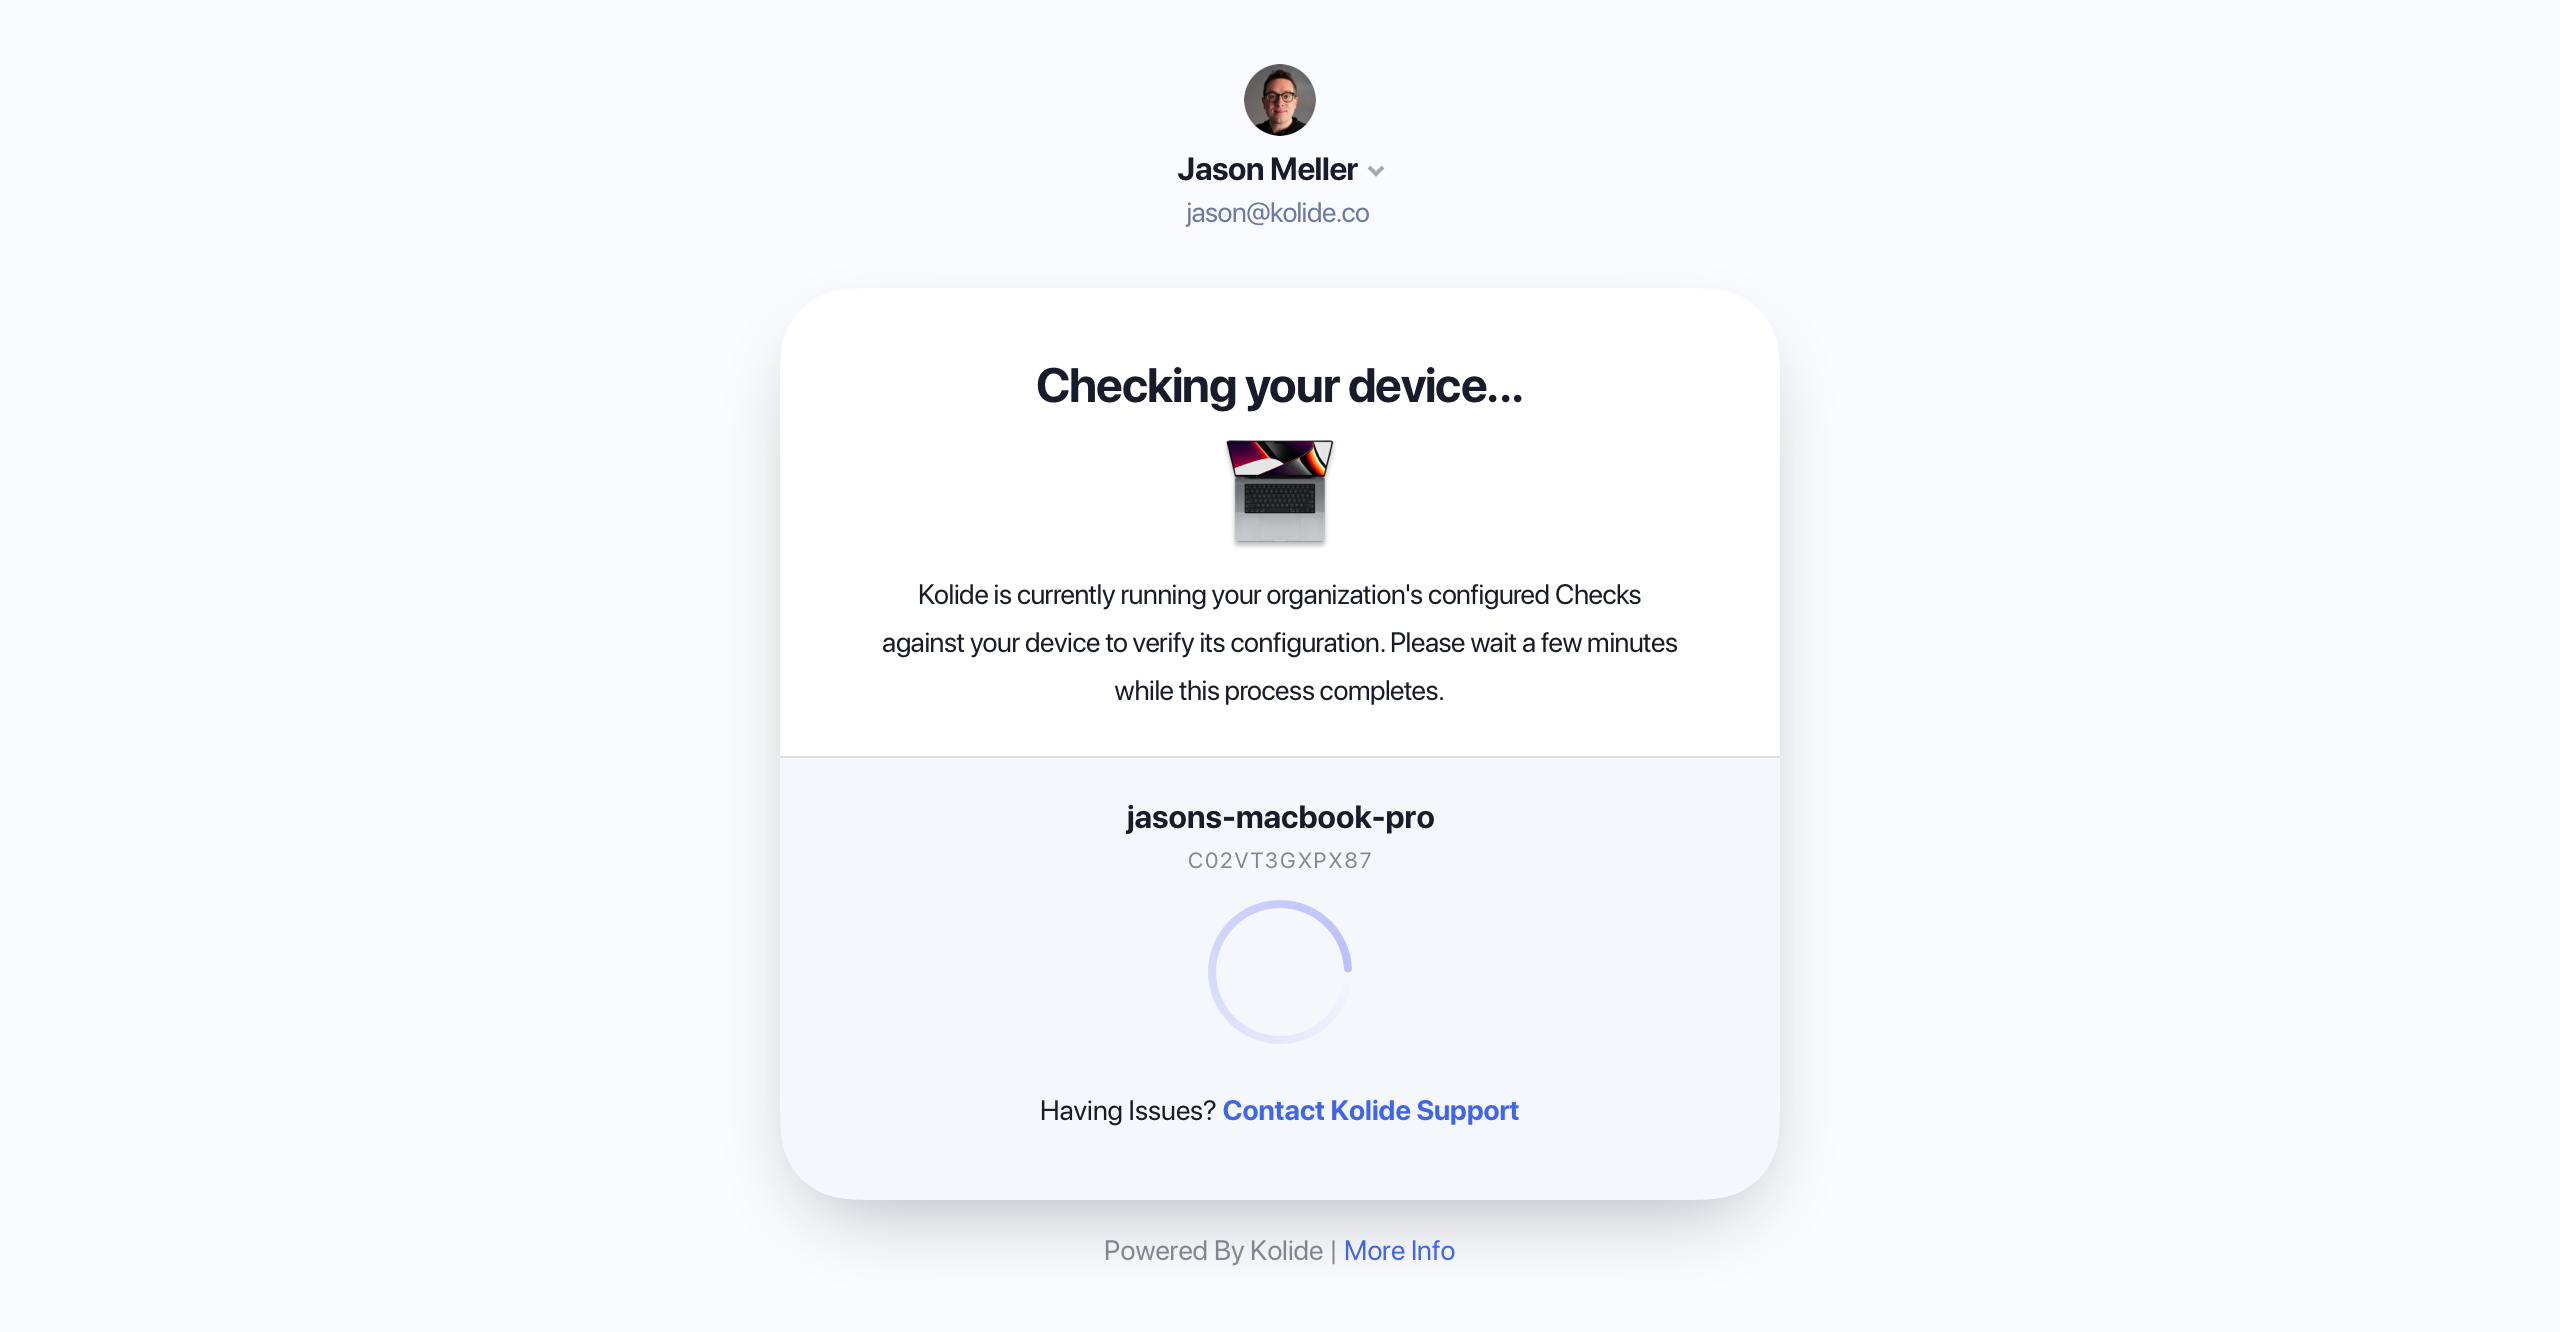
What your end-users will see if a recheck needs to run during authentication.
Kolide adjusts the frequency a Check will run on the device so that an online device generally always has “fresh” data.
Kolide will immediately re-run Checks related to the operating system version when the computer starts up so that this information will be up to date when the user attempts to sign in.
If a device has been offline for many hours and suddenly comes back online, Kolide will immediately attempt to refresh all Check data ASAP.
Kolide recommends 3 days as the default as a reasonable compromise between freshness and performance. Checks are run much more frequently than this, but their results will be less than 3 days old when used for an authentication decision. (This could happen when a device is offline for a long weekend, and is used to authenticate first thing Monday morning).
Snoozing
By default, end-users are allowed to receive extra time to fix a Check that is blocking their device from authenticating. This is called snoozing. The goal of snoozing is to ensure that, if an end-user has an emergency, they can still sign in temporarily. Here are some facts about snoozing:
Snoozing extends the time a Check will block a device by an additional 8 hours.
A Check can only be snoozed at most once a week. This prevents the feature from being abused to avoid fixing issues regularly.
An end-user snoozes an entire Check at once, not individual issues failing the Check. This ensures that if new blocking issues are generated for that check during the snooze window, they will also be granted extra time.
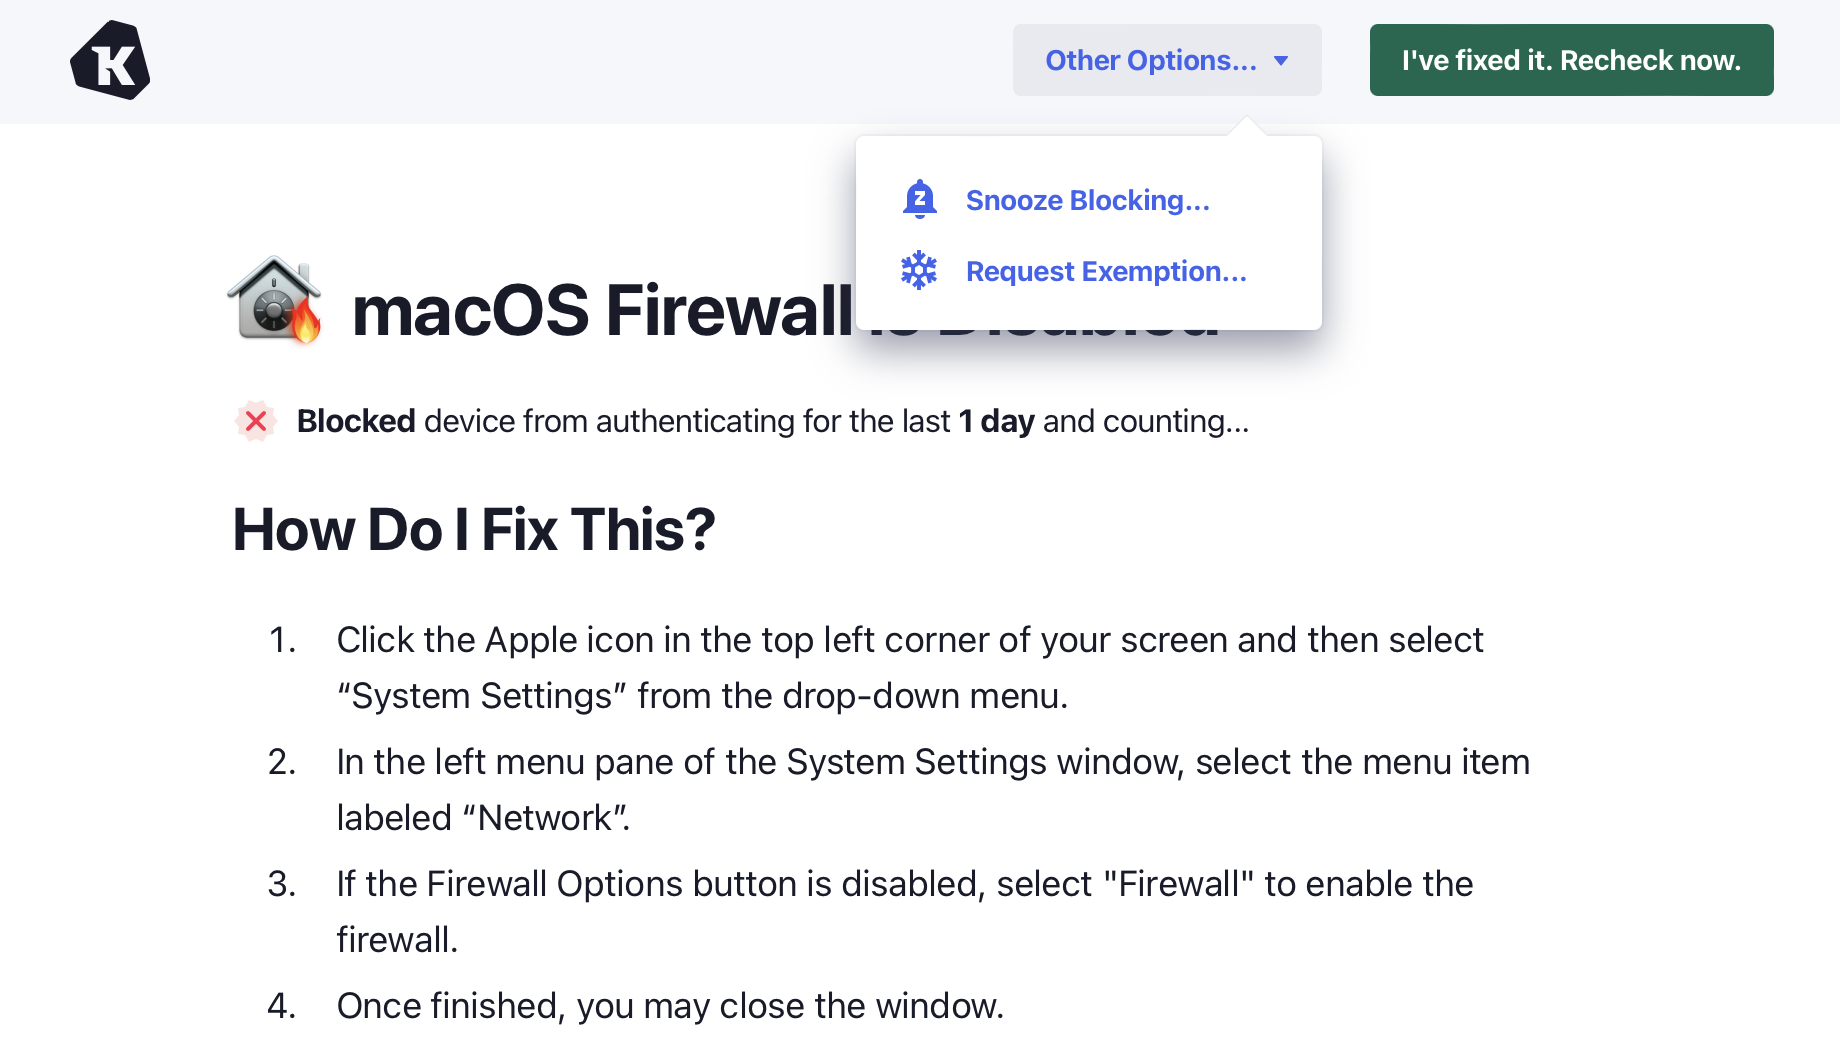
End-users can access the Snooze feature by clicking on a failing Check and choosing Snooze Blocking… from the Other Options… menu.
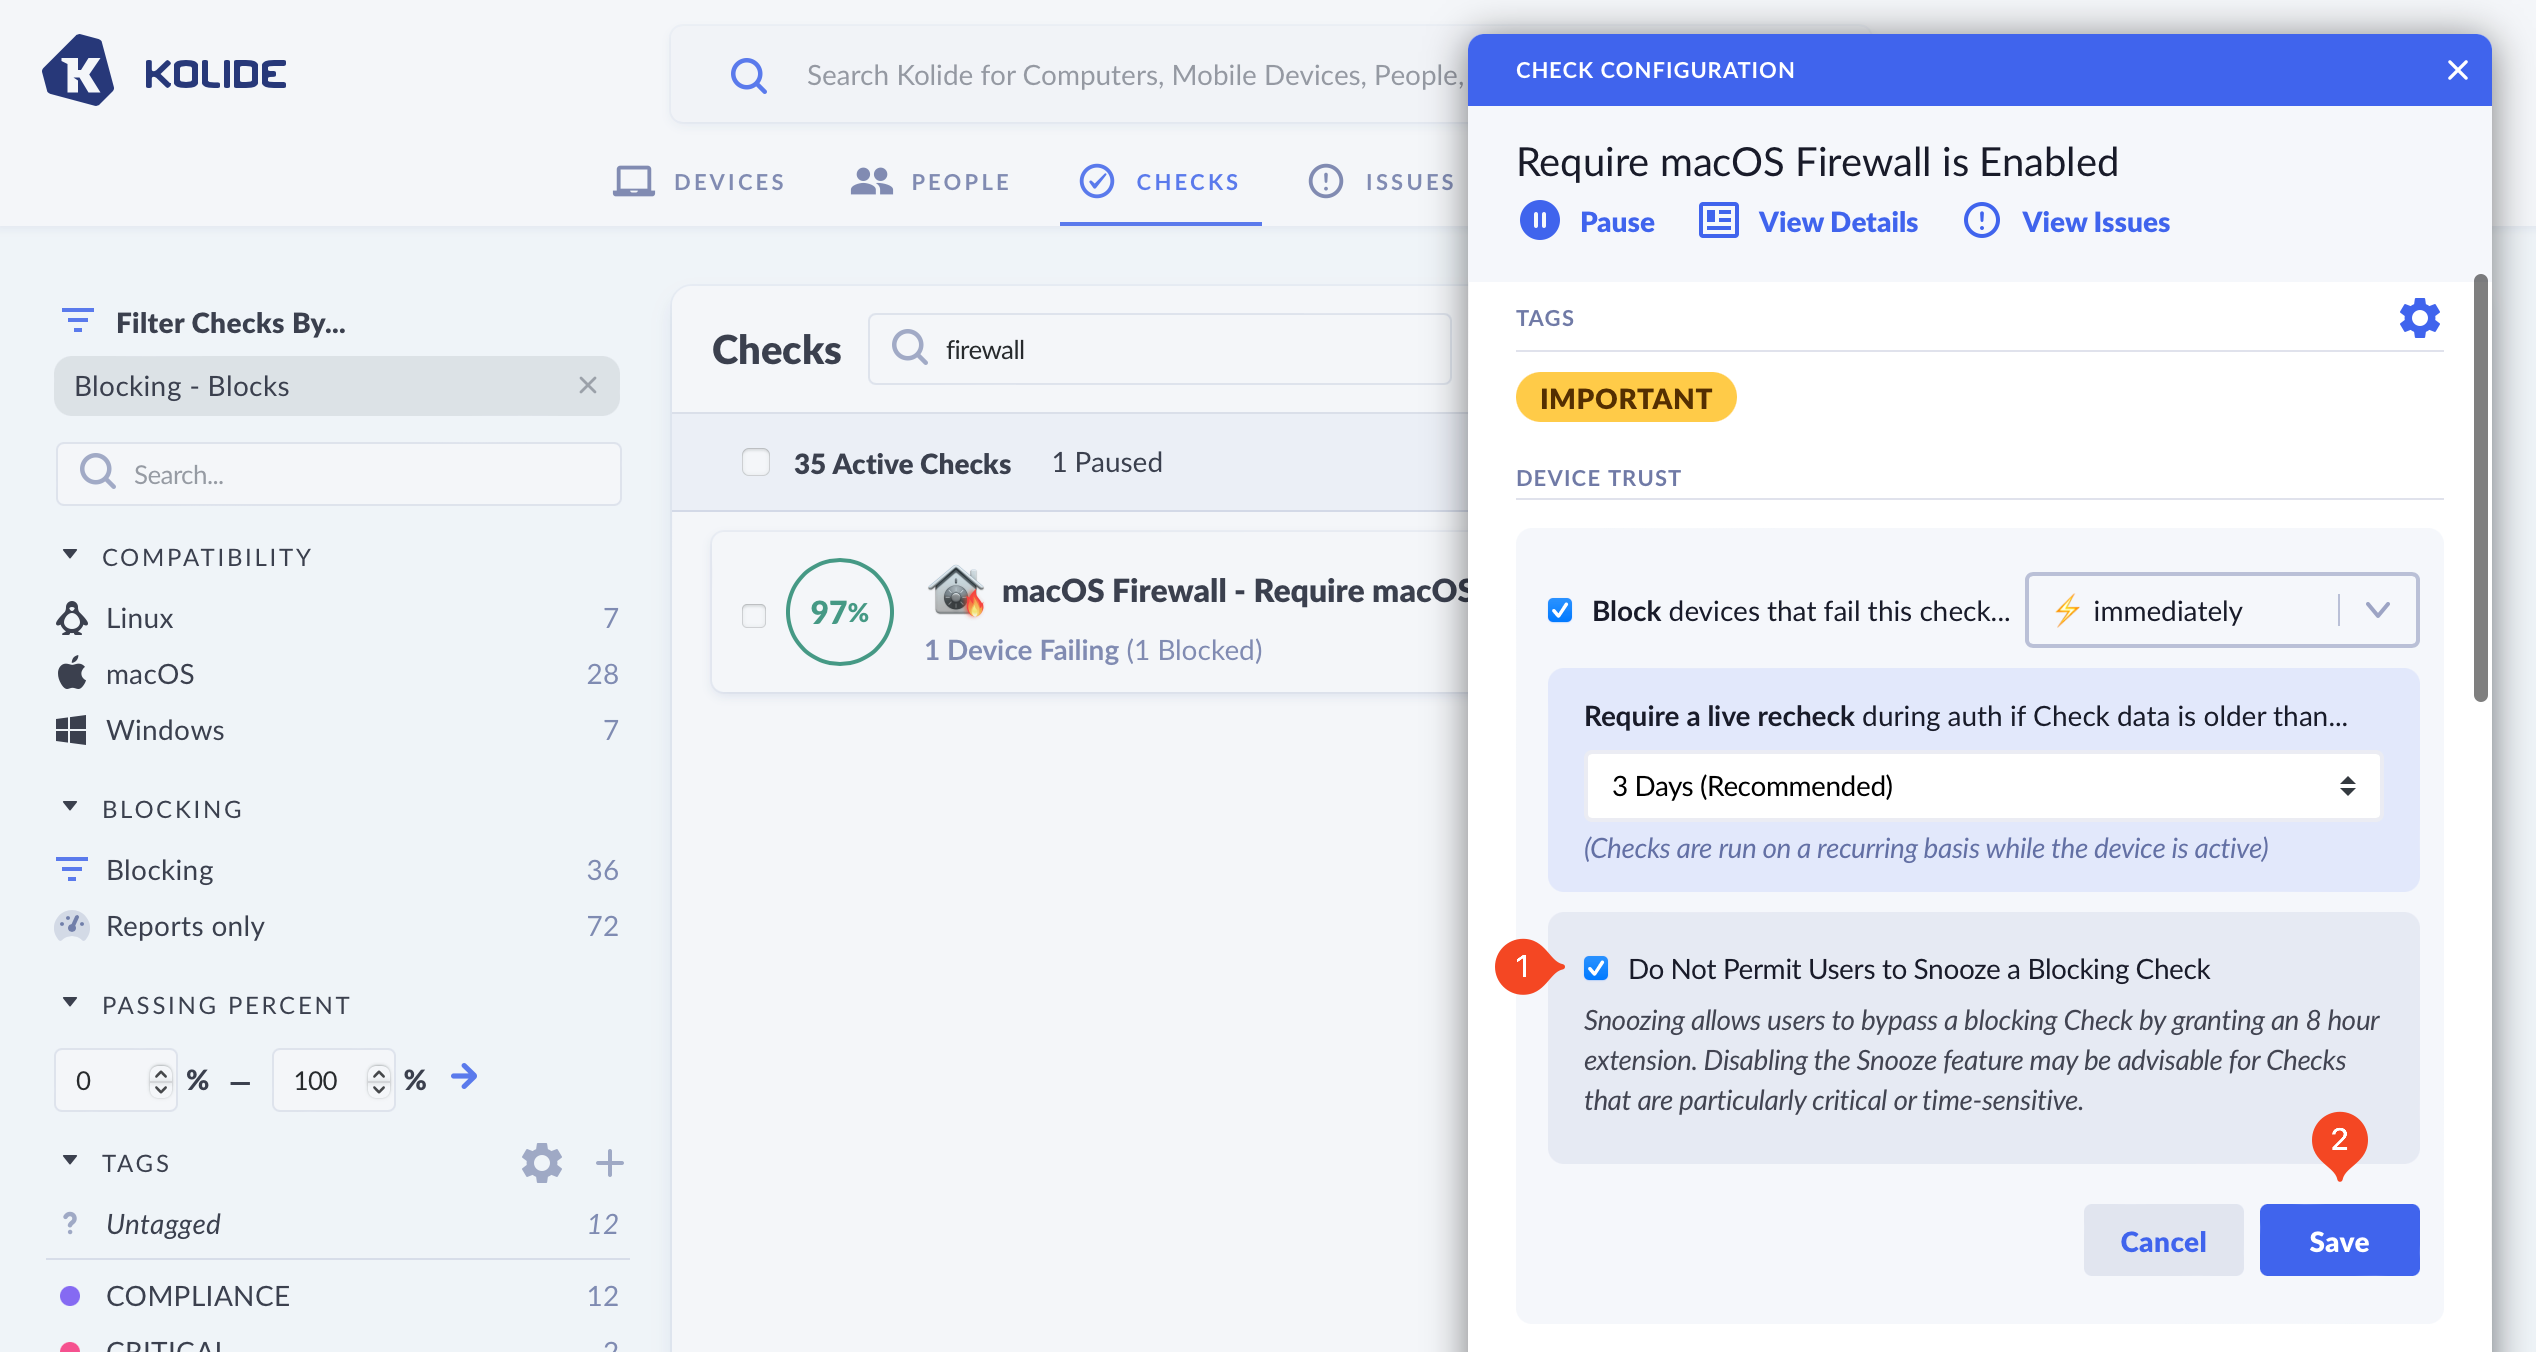
The ability to snooze a block can be turned off on a per-check basis. To turn off Snoozing, simply check the option Do Not Permit Users to Snooze a Blocking Check and click Save.
Global Settings
Kolide Administrators with “Full Access” can also control end-user remediation strategy behaviors (e.g., controlling how often an end-user has their authentication interrupted by the same failing Check) in End-User Remediation Settings