

Customize Checks
Kolide has flexible customization options that let administrators tailor how Checks operate and provide guidance to end-users.
Customize Check Options
Some Kolide-provided Checks allow you to customize their behavior with a set of bespoke options. If available, these options appear in the Check configuration.
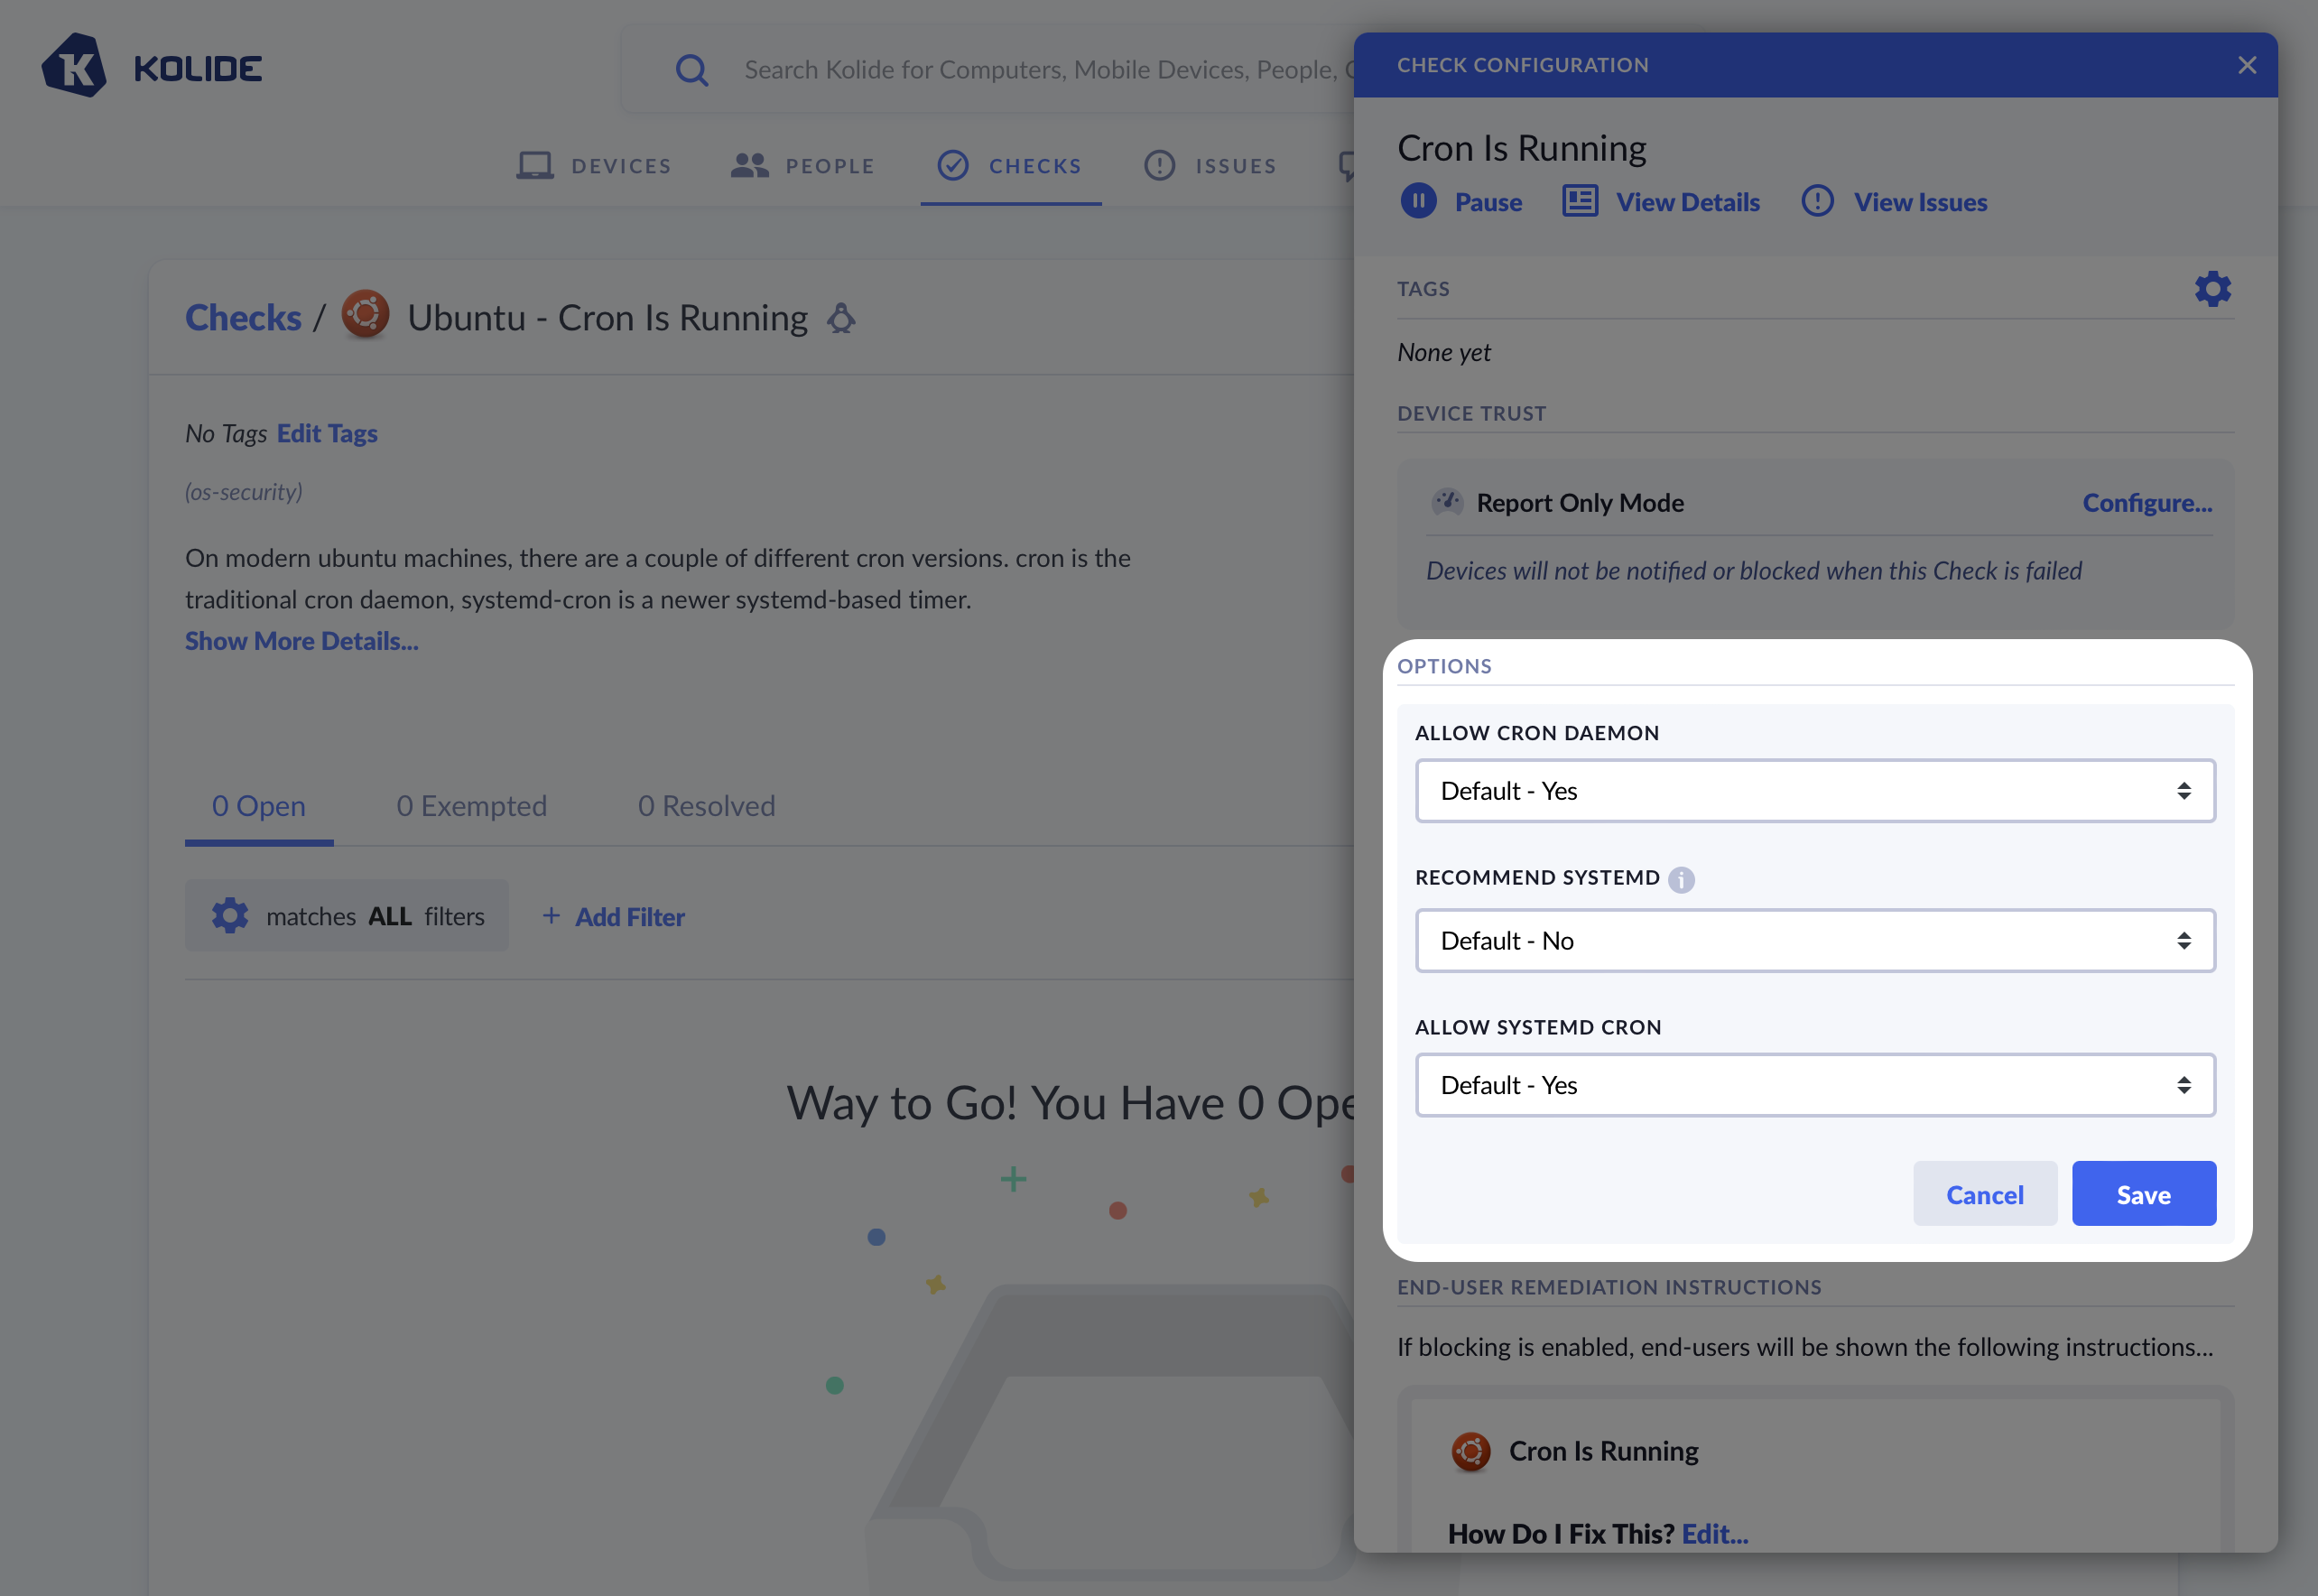
The Linux Cron check allows you to modify its behavior using special options. These options are specific to this Check only.
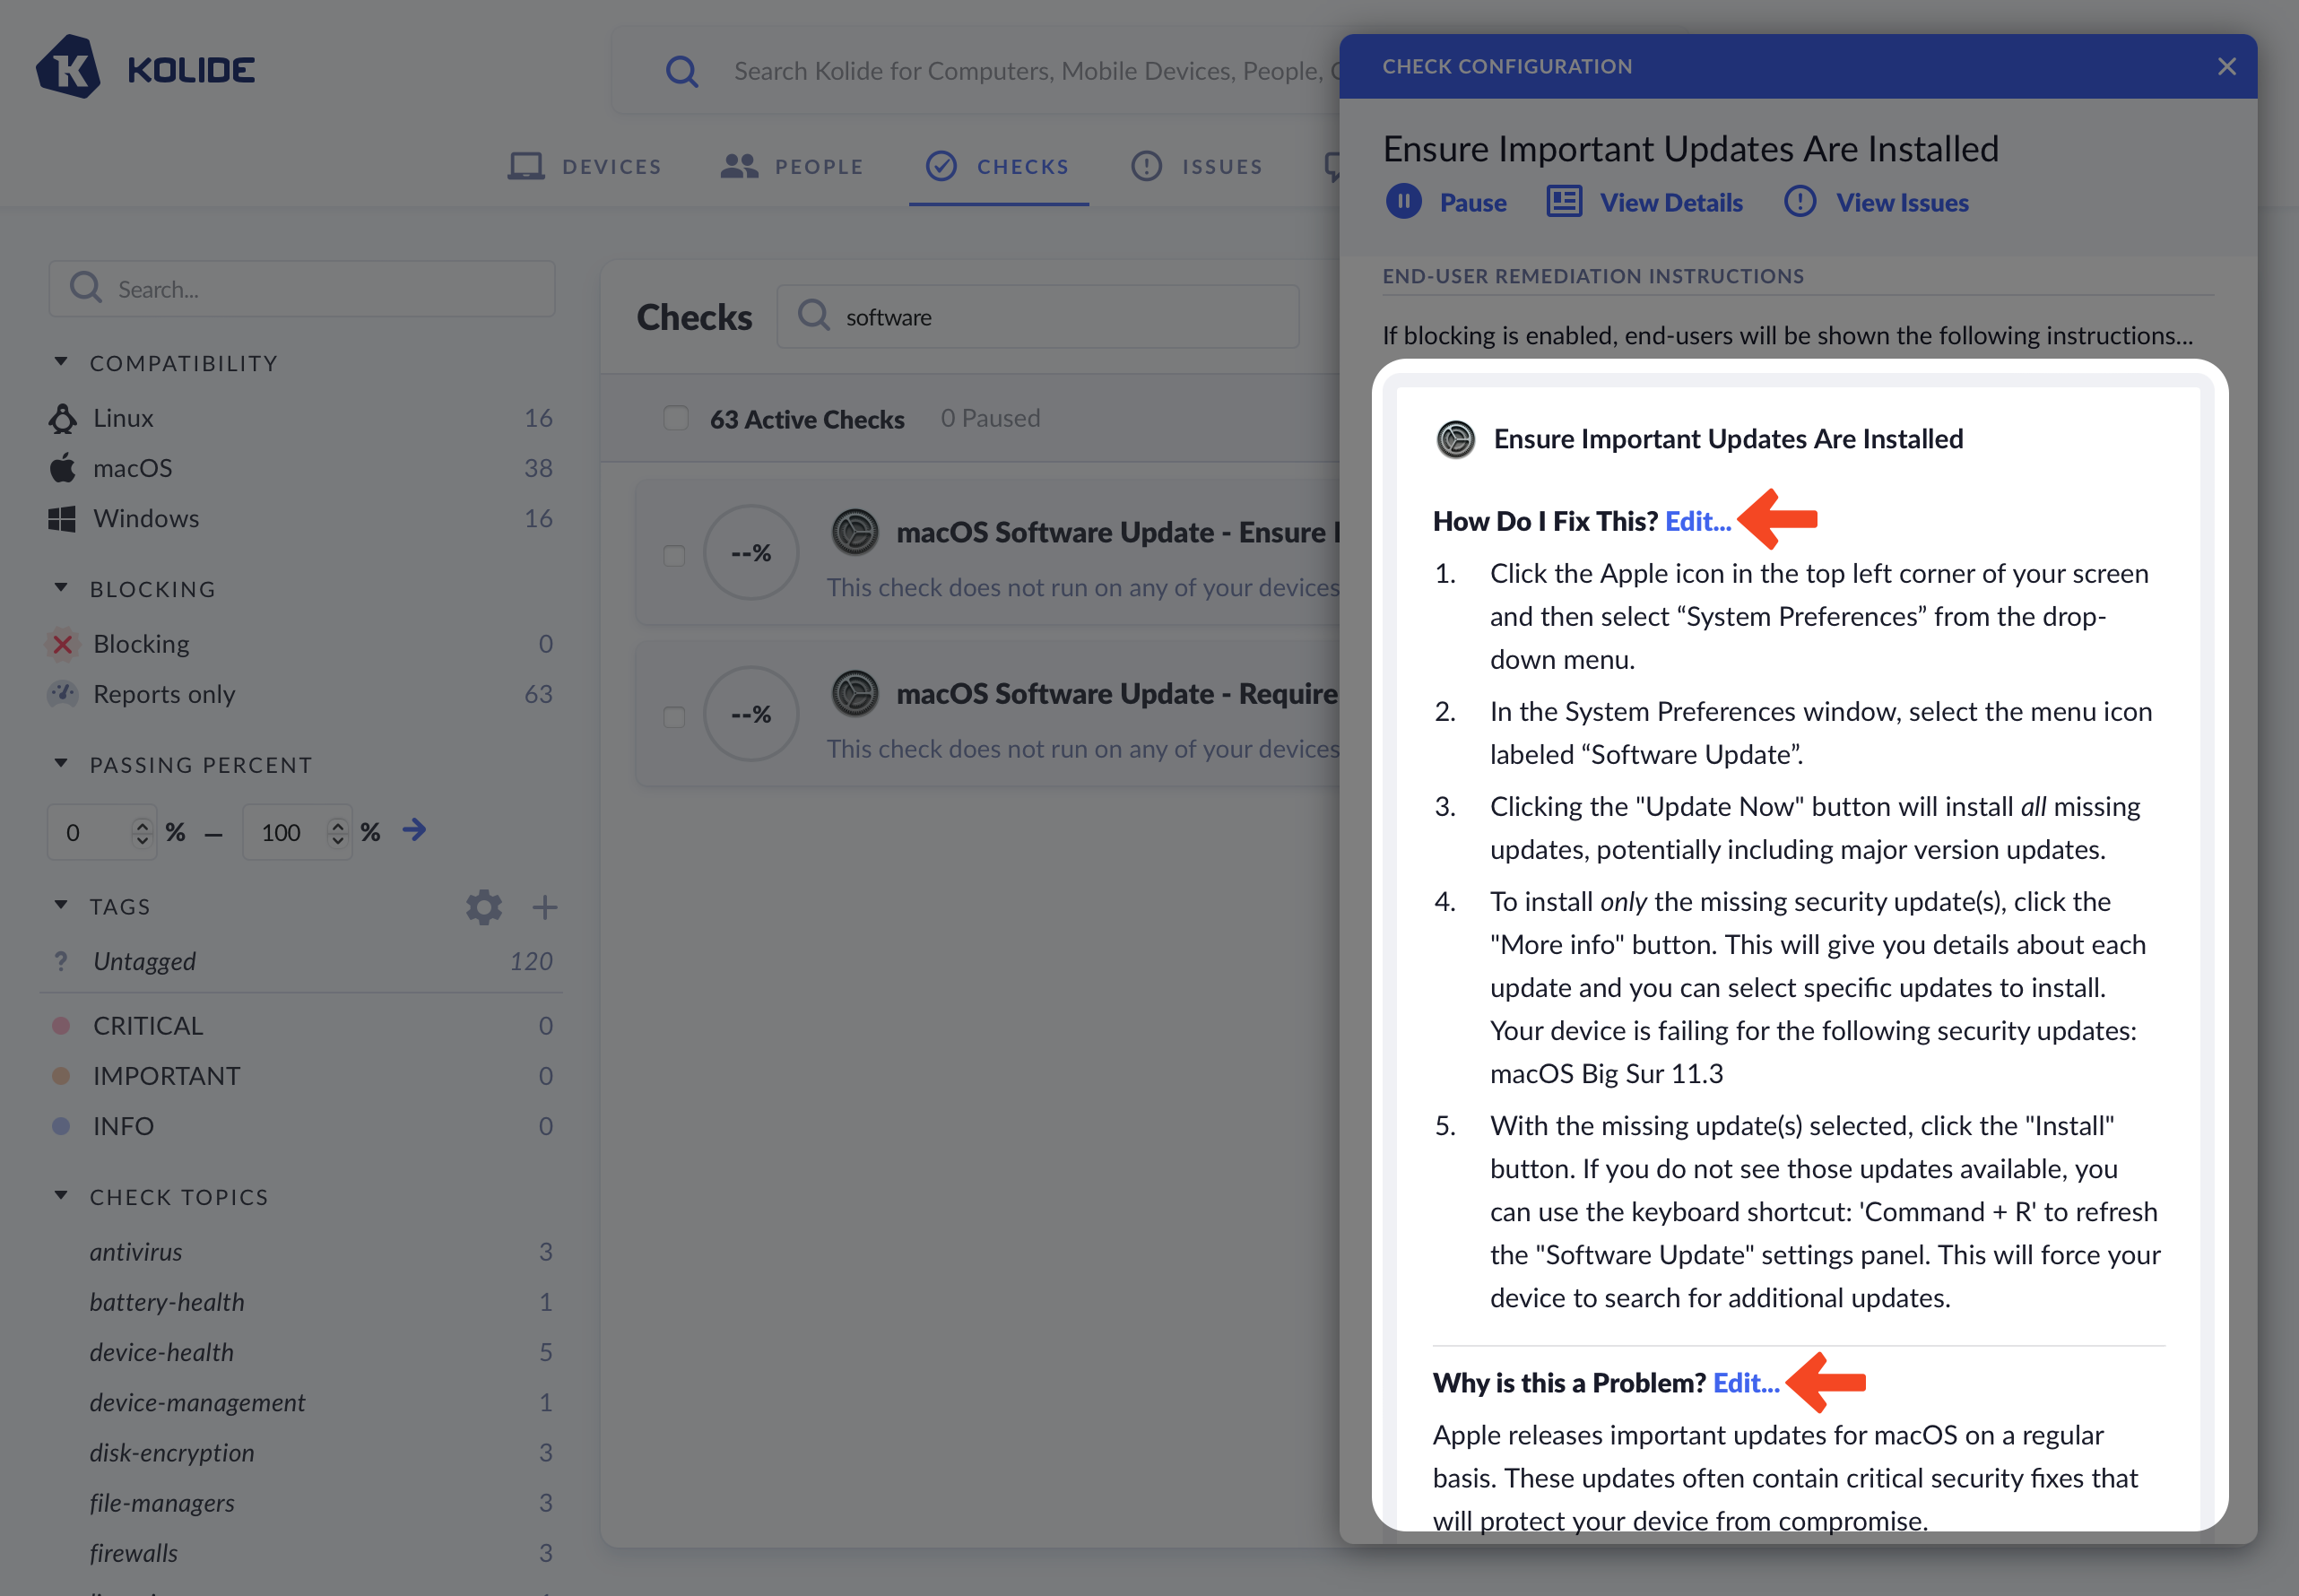
Customizing End-User Fix Instructions
Kolide allows you to customize the text that is shown to the end-user to help them fix an issue on their device. There are two distinct sections you can individually customize: the remediation instructions and the rationale.
When editing a section, you can choose between three options:
- Use Kolide Default Text (default)
- Prepend/Append Custom Text to Kolide’s Defaults
- Compose Custom Text
If you choose to fully customize the text, you will be responsible for keeping the text up-to-date going forward.
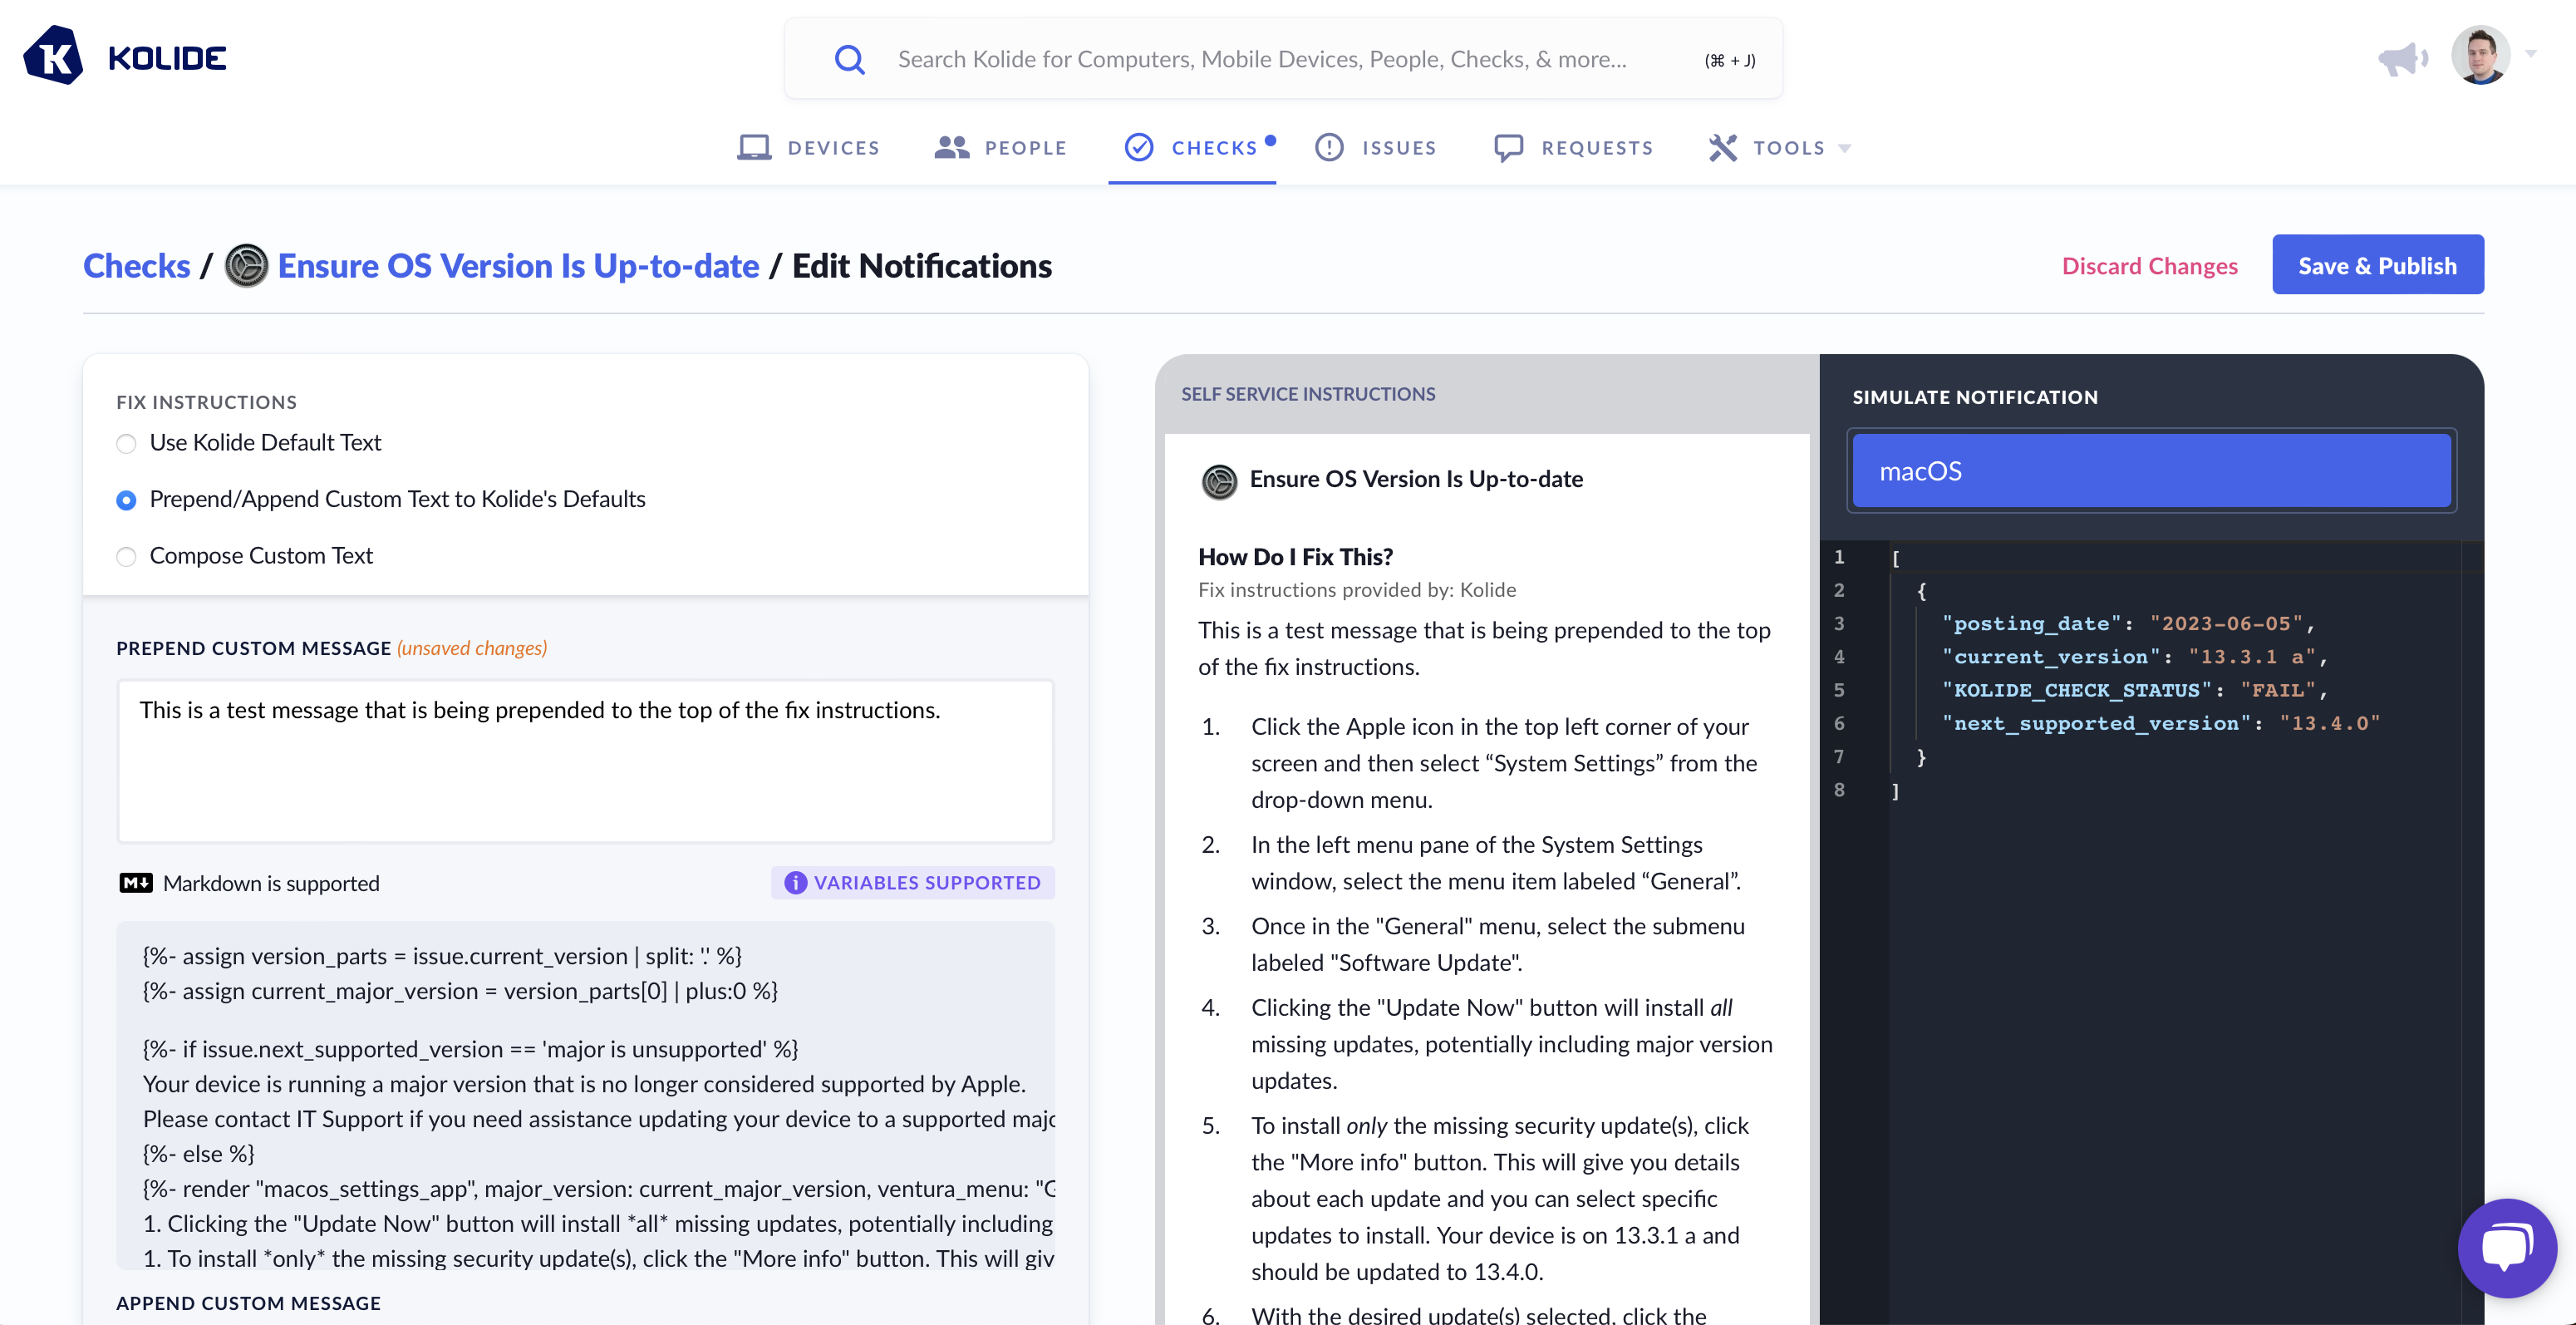
Markdown & Liquid
All Kolide End-User Fix Instructions can be formatted with markdown and can contain dynamic information using Liquid syntax. As an example, here is a template that uses Liquid to dynamically change the instructions based on the type of web browser.
{% if issue.browser == "chrome" %}
1. Ensure you are logged into the user account `{{issue.profile}}`
2. Open Chrome
3. At the top right, click **More : > More Tools > Extensions**
4. Locate Touch VPN and click  **Remove**
{% elsif issue.browser == "safari" %}
1. Open Safari
2. In the toolbar, choose **Safari > Preferences**
3. Select Touch VPN and click  **Uninstall**
{% elsif issue.browser == "edge" %}
1. Ensure you are logged into the user account `{{issue.profile}}`
2. Open Microsoft Edge
3. To the right of the browser bar, select **Extensions > More actions** next to Touch VPN
4. Select **Remove from Microsoft Edge > Remove** from the main menu
{% elsif issue.browser == "firefox" %}
1. Open Firefox
2. Click the menu button
3. Click **Add-ons and themes > Extensions**
4. Find the Touch VPN extension and click on **..** and select **Remove**
{% else %}
1. Open the web browser
2. Locate the extension manager
3. Find the Touch VPN extension and uninstall it from your browser
{% endif %}
1. Recheck your device to confirm you fixed the problem
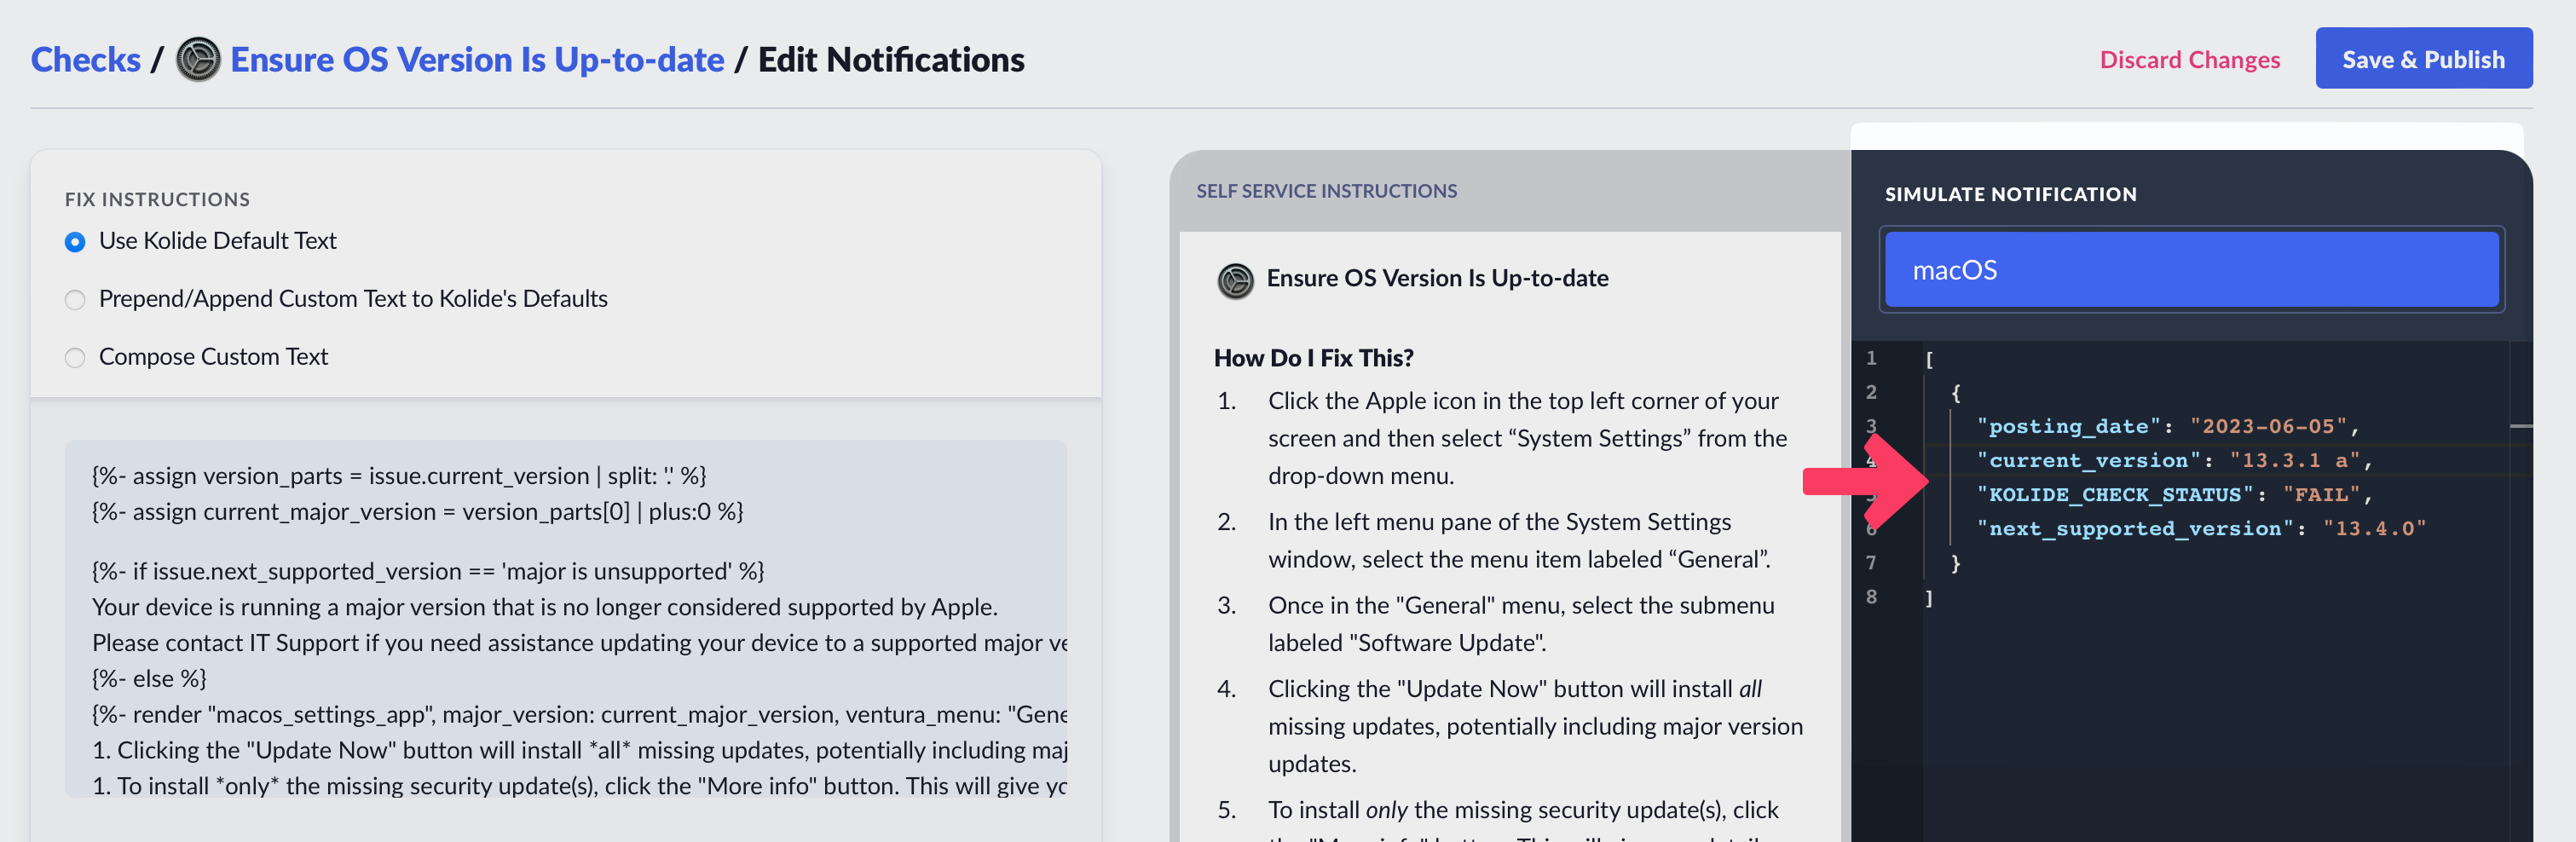
Data Simulator
As shown above, when using Liquid, you can alter the instructions Kolide sends to the end-user based on the data from a failing check. To ensure your template functions correctly, utilize the Simulate Notification sidebar to modify the check data used in rendering the preview.
Writing Custom Checks
Kolide enables you to use the power of osquery to define your own fully custom Checks. To best explain this capability it helps to walk through a complete example.
In this example we will cover a common situation where Apple releases a series of OS updates to quickly mitigate several serious vulnerabilities (in this case CVE-2023-23514 and CVE-2023-23529) in macOS and Safari.
Step 1: Starting the check
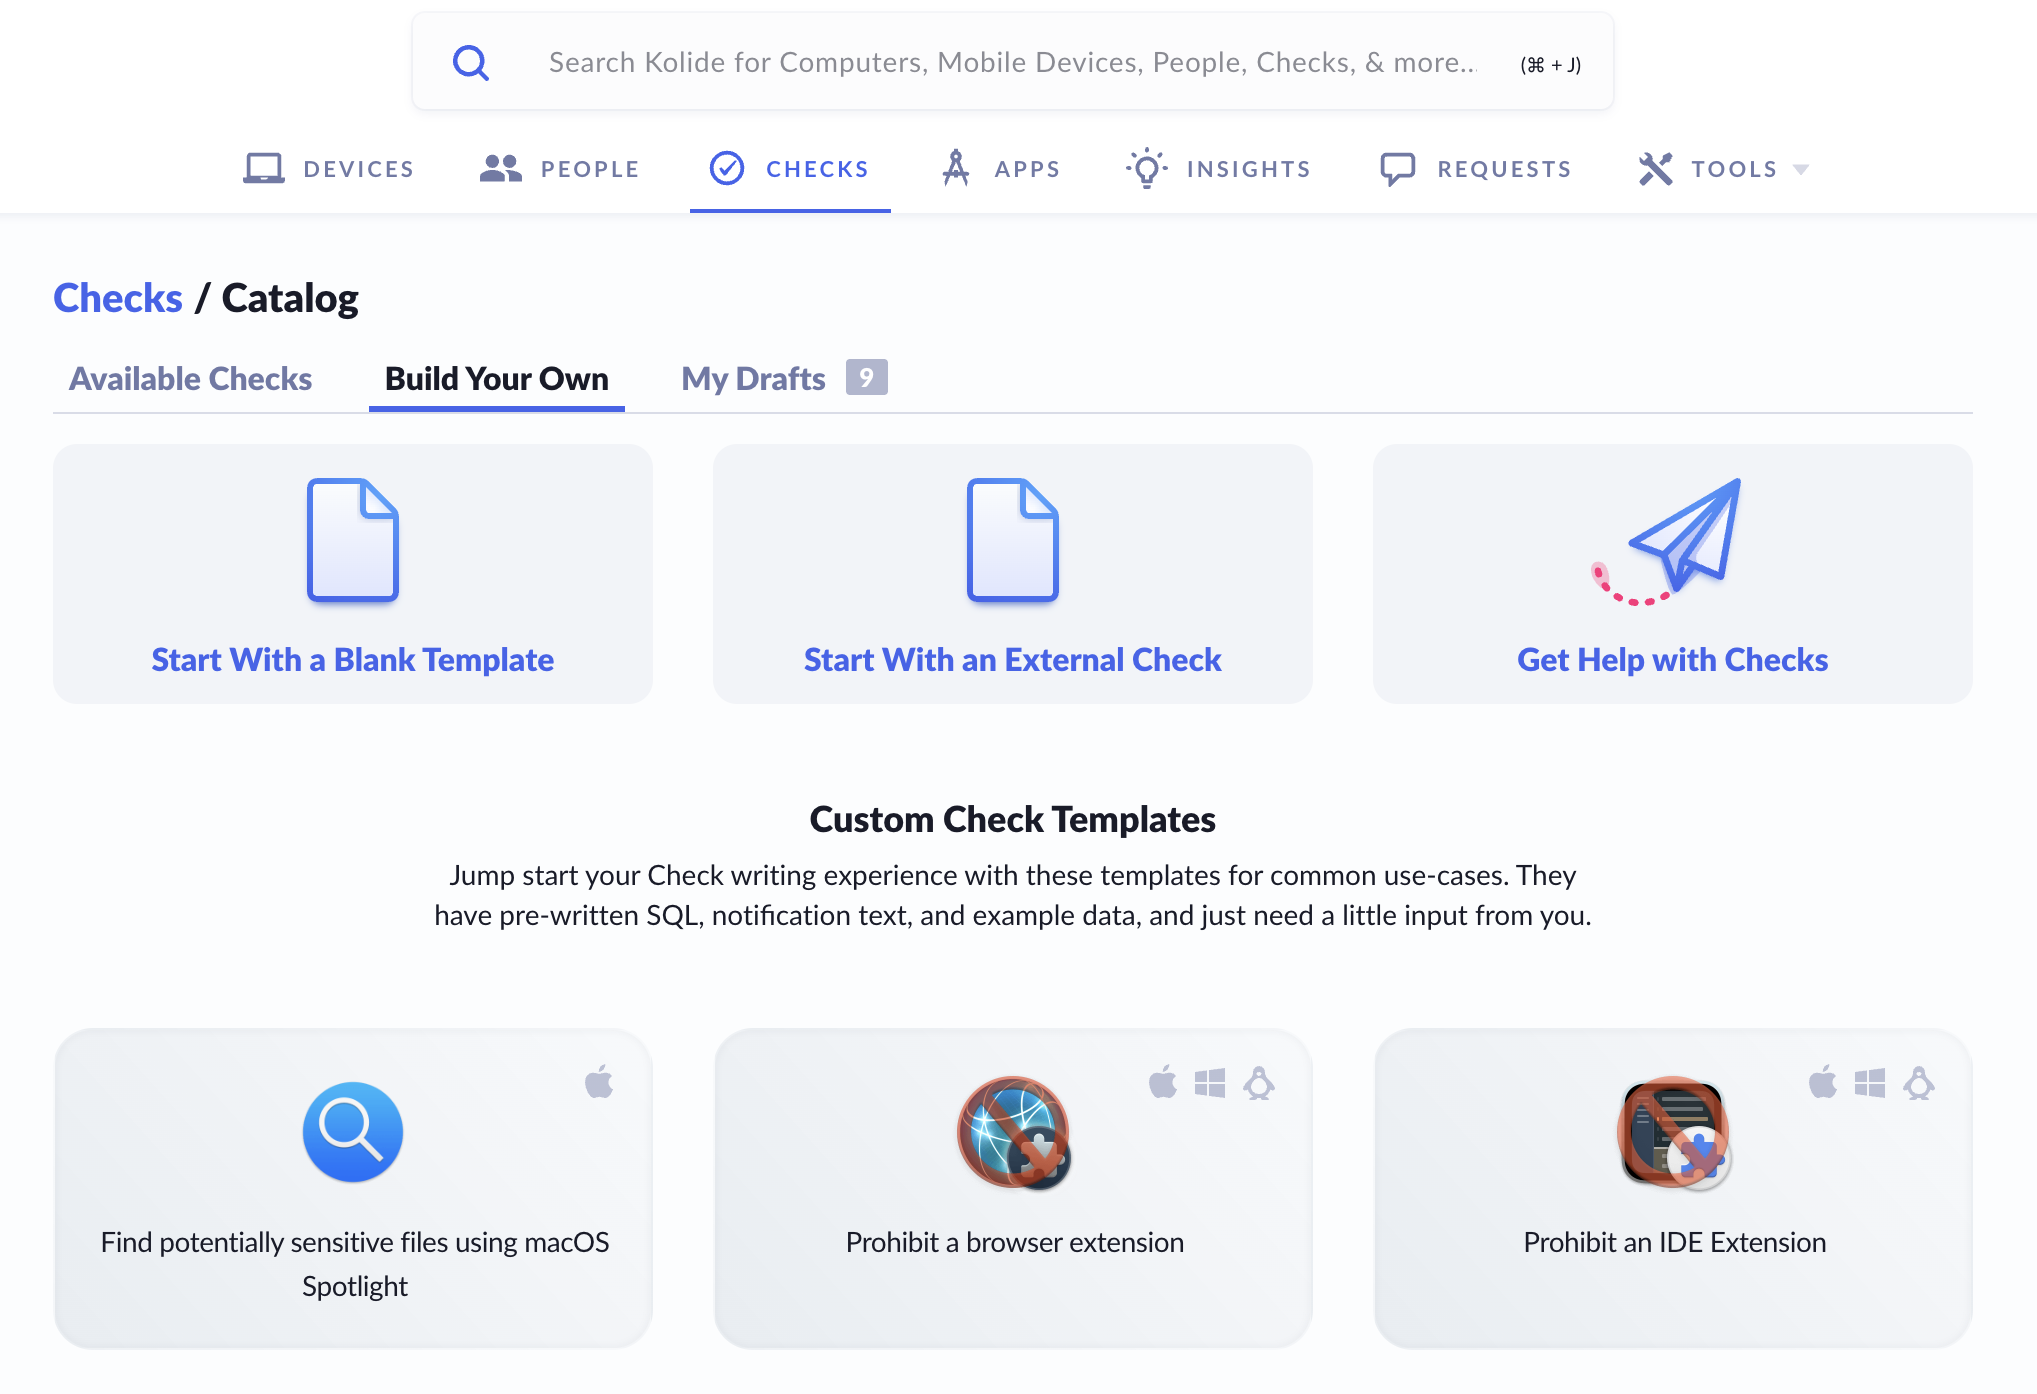
To get started, simply click Checks in the top navigation and then click the Add New Checks button in the upper-right. From there, select the Build Your Own tab, and then finally Start With a Blank Template.
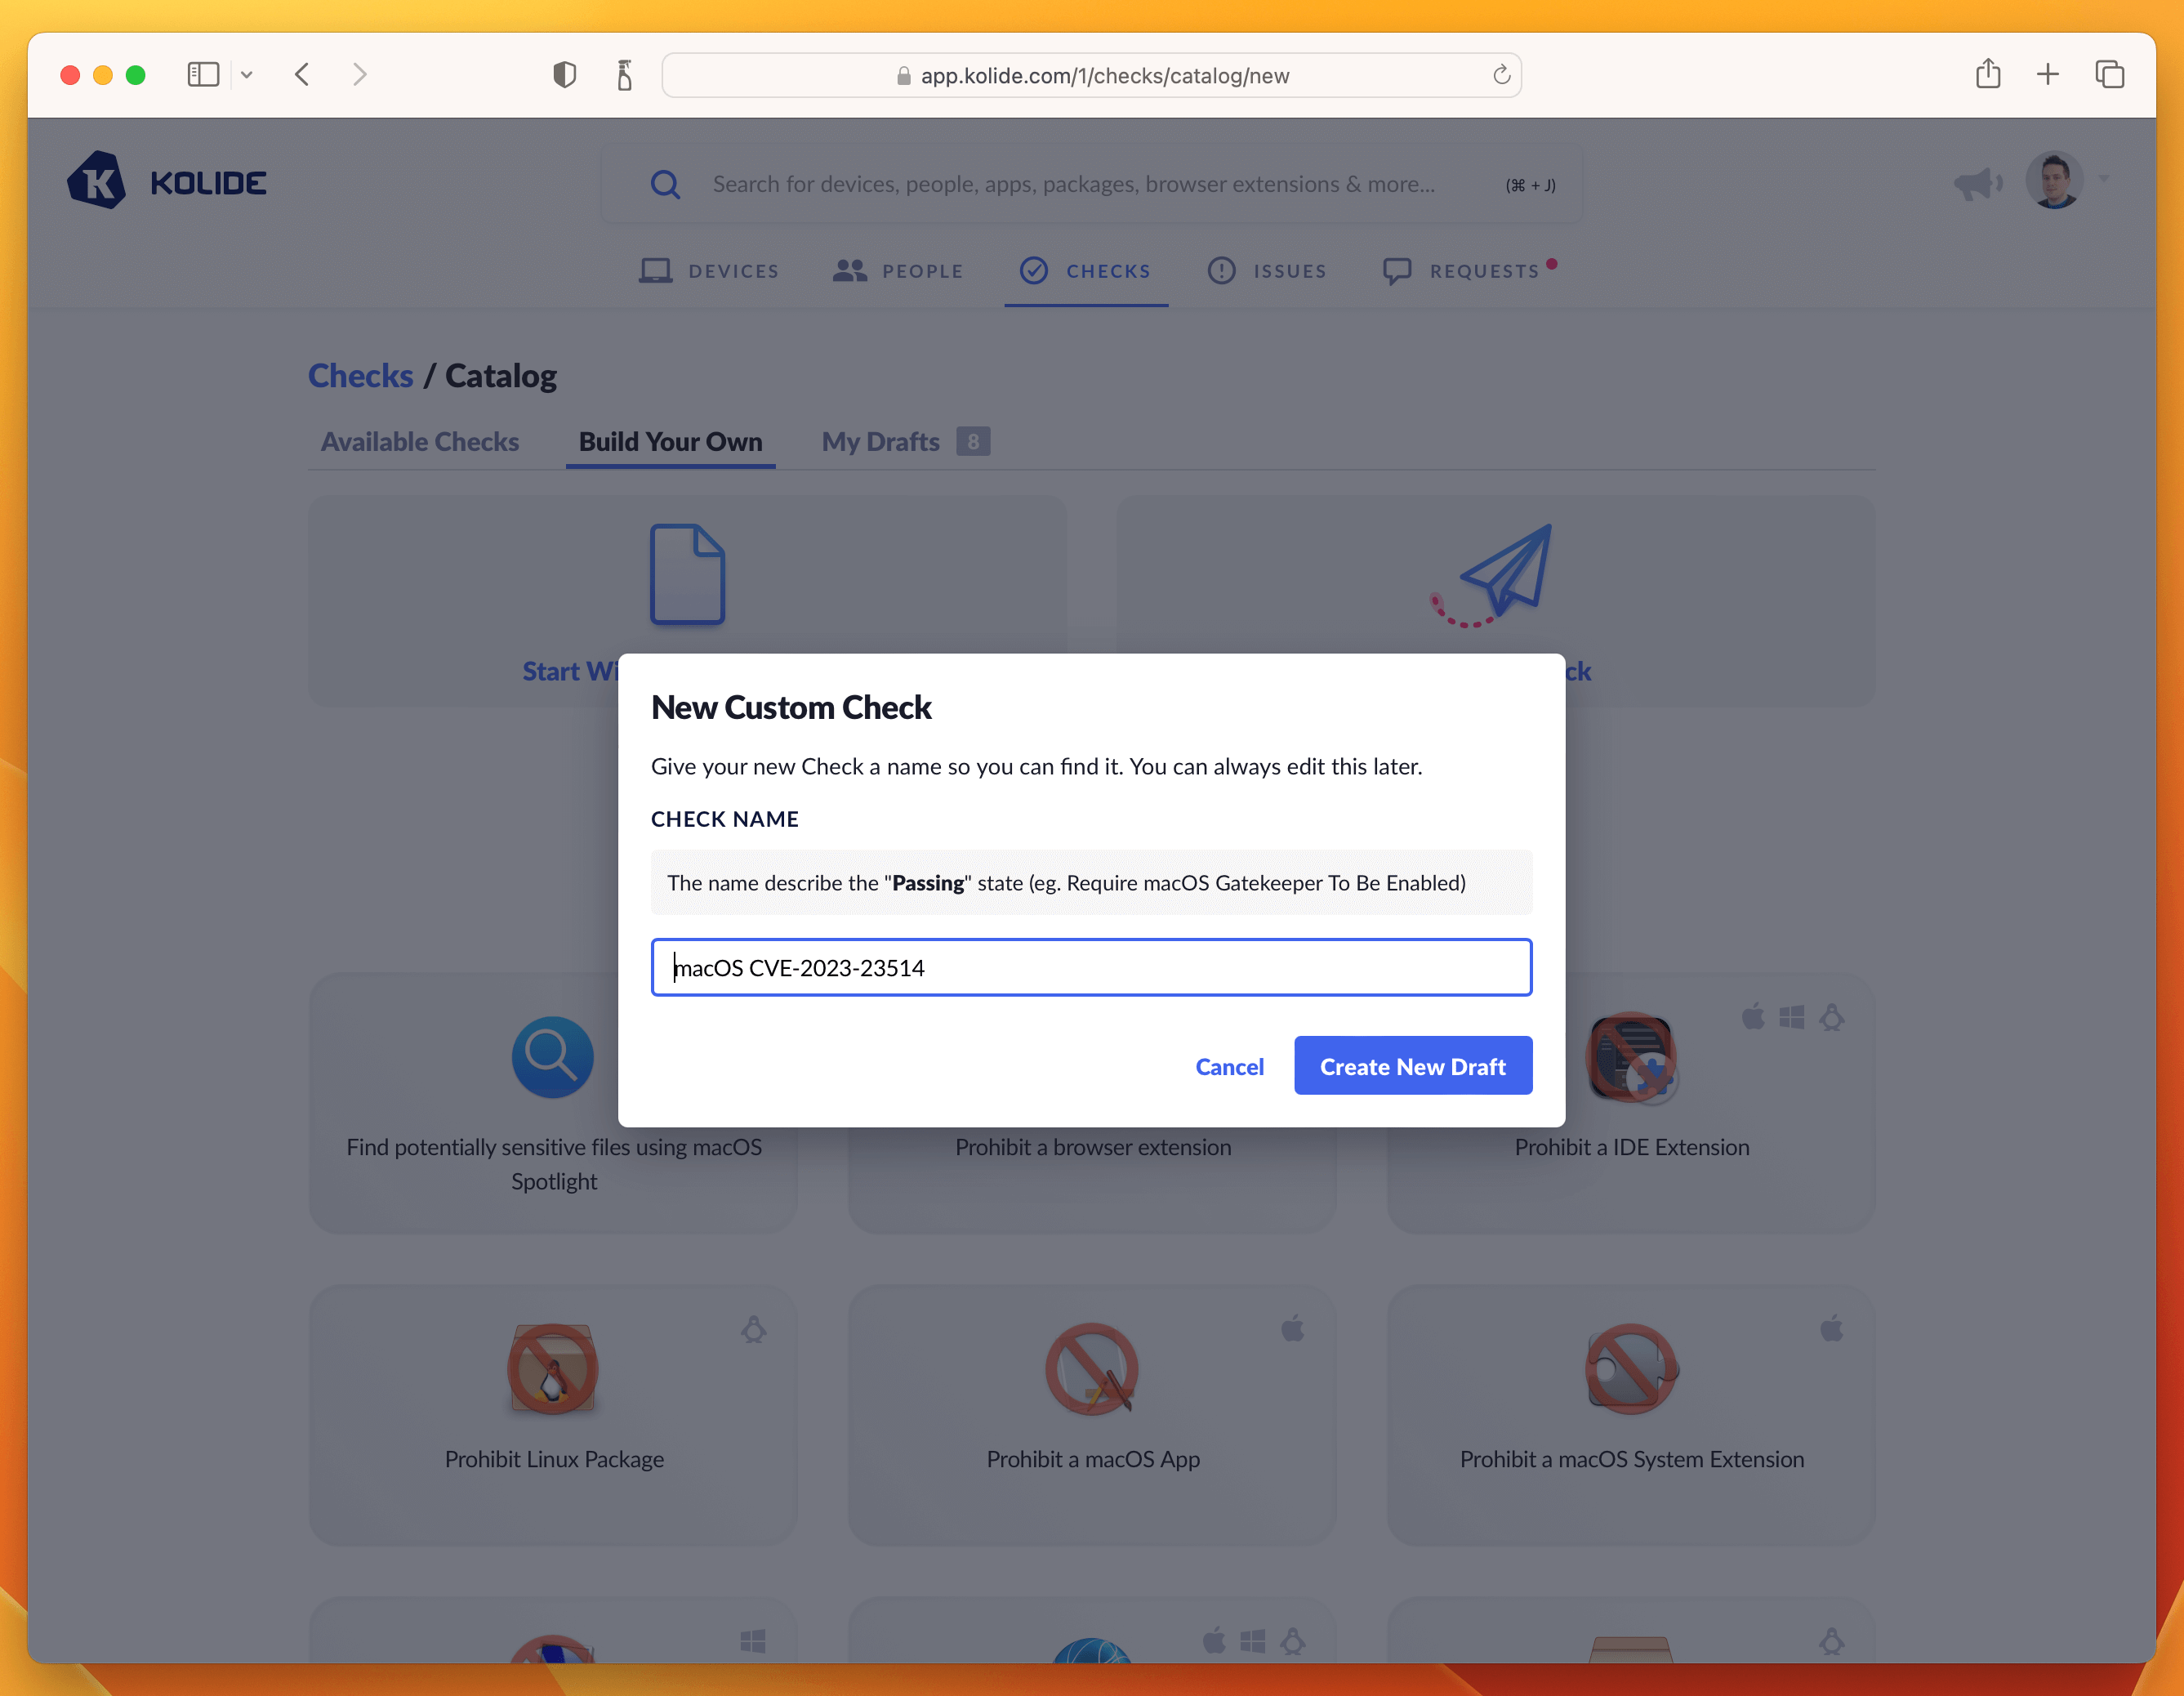
I recommend naming the Check with the CVE number, something like “macOS CVE-2023-23514”
Click Create New Draft and then proceed to the next step.
Step 2: Write the Check SQL
The most important part of any Check are the rules to find failing Devices. In
Kolide we write these rules using Osquery SQL. The SQL always should emit at
least one row that contains a column called KOLIDE_CHECK_STATUS with a value
of PASS or FAIL
For this Check, the following SQL does the trick:
WITH
reference_version AS (
  SELECT '13.2.1' AS minimum_version),
version_split AS (
  SELECT version AS current_version,
-- Split minimum_version strings
    CAST(SPLIT(minimum_version, ".", 0)AS int) AS min_ver_major,
    CAST(SPLIT(minimum_version, ".", 1)AS int) AS min_ver_minor,
    CAST(SPLIT(minimum_version, ".", 2)AS int) AS min_ver_patch,
-- Split installed_version strings
    COALESCE(major, 0) AS current_ver_major,
    COALESCE(minor, 0) AS current_ver_minor,
    COALESCE(patch, 0) AS current_ver_patch
   FROM os_version
   LEFT JOIN reference_version
),
failure_logic AS (
  SELECT *,
    CASE
-- Scope to only 13.x devices
      WHEN  current_ver_major = 13
       AND (
-- Check major versions
           (min_ver_major >  current_ver_major)
-- Check minor versions
        OR (
            min_ver_major >= current_ver_major
        AND min_ver_minor >  current_ver_minor)
-- Check patch versions
        OR (
            min_ver_major >= current_ver_major
        AND min_ver_minor >= current_ver_minor
        AND min_ver_patch >  current_ver_patch)
    )
      THEN 'FAIL'
-- Passing Condition: Pass all 12.x versions or < 13.2.1 versions
      WHEN current_ver_major < 13
        OR (
           min_ver_major <= current_ver_major
       AND min_ver_minor <= current_ver_minor
       AND min_ver_patch <=  current_ver_patch
    )
      THEN 'PASS'
      ELSE 'UNKNOWN'
    END AS KOLIDE_CHECK_STATUS
  FROM version_split
)
SELECT * FROM failure_logic;
Paste the SQL into the editor. Once inserted, do a test-run against a few devices and add an example to the sidebar. This will be useful for the last step when we fill out the Privacy Center information.
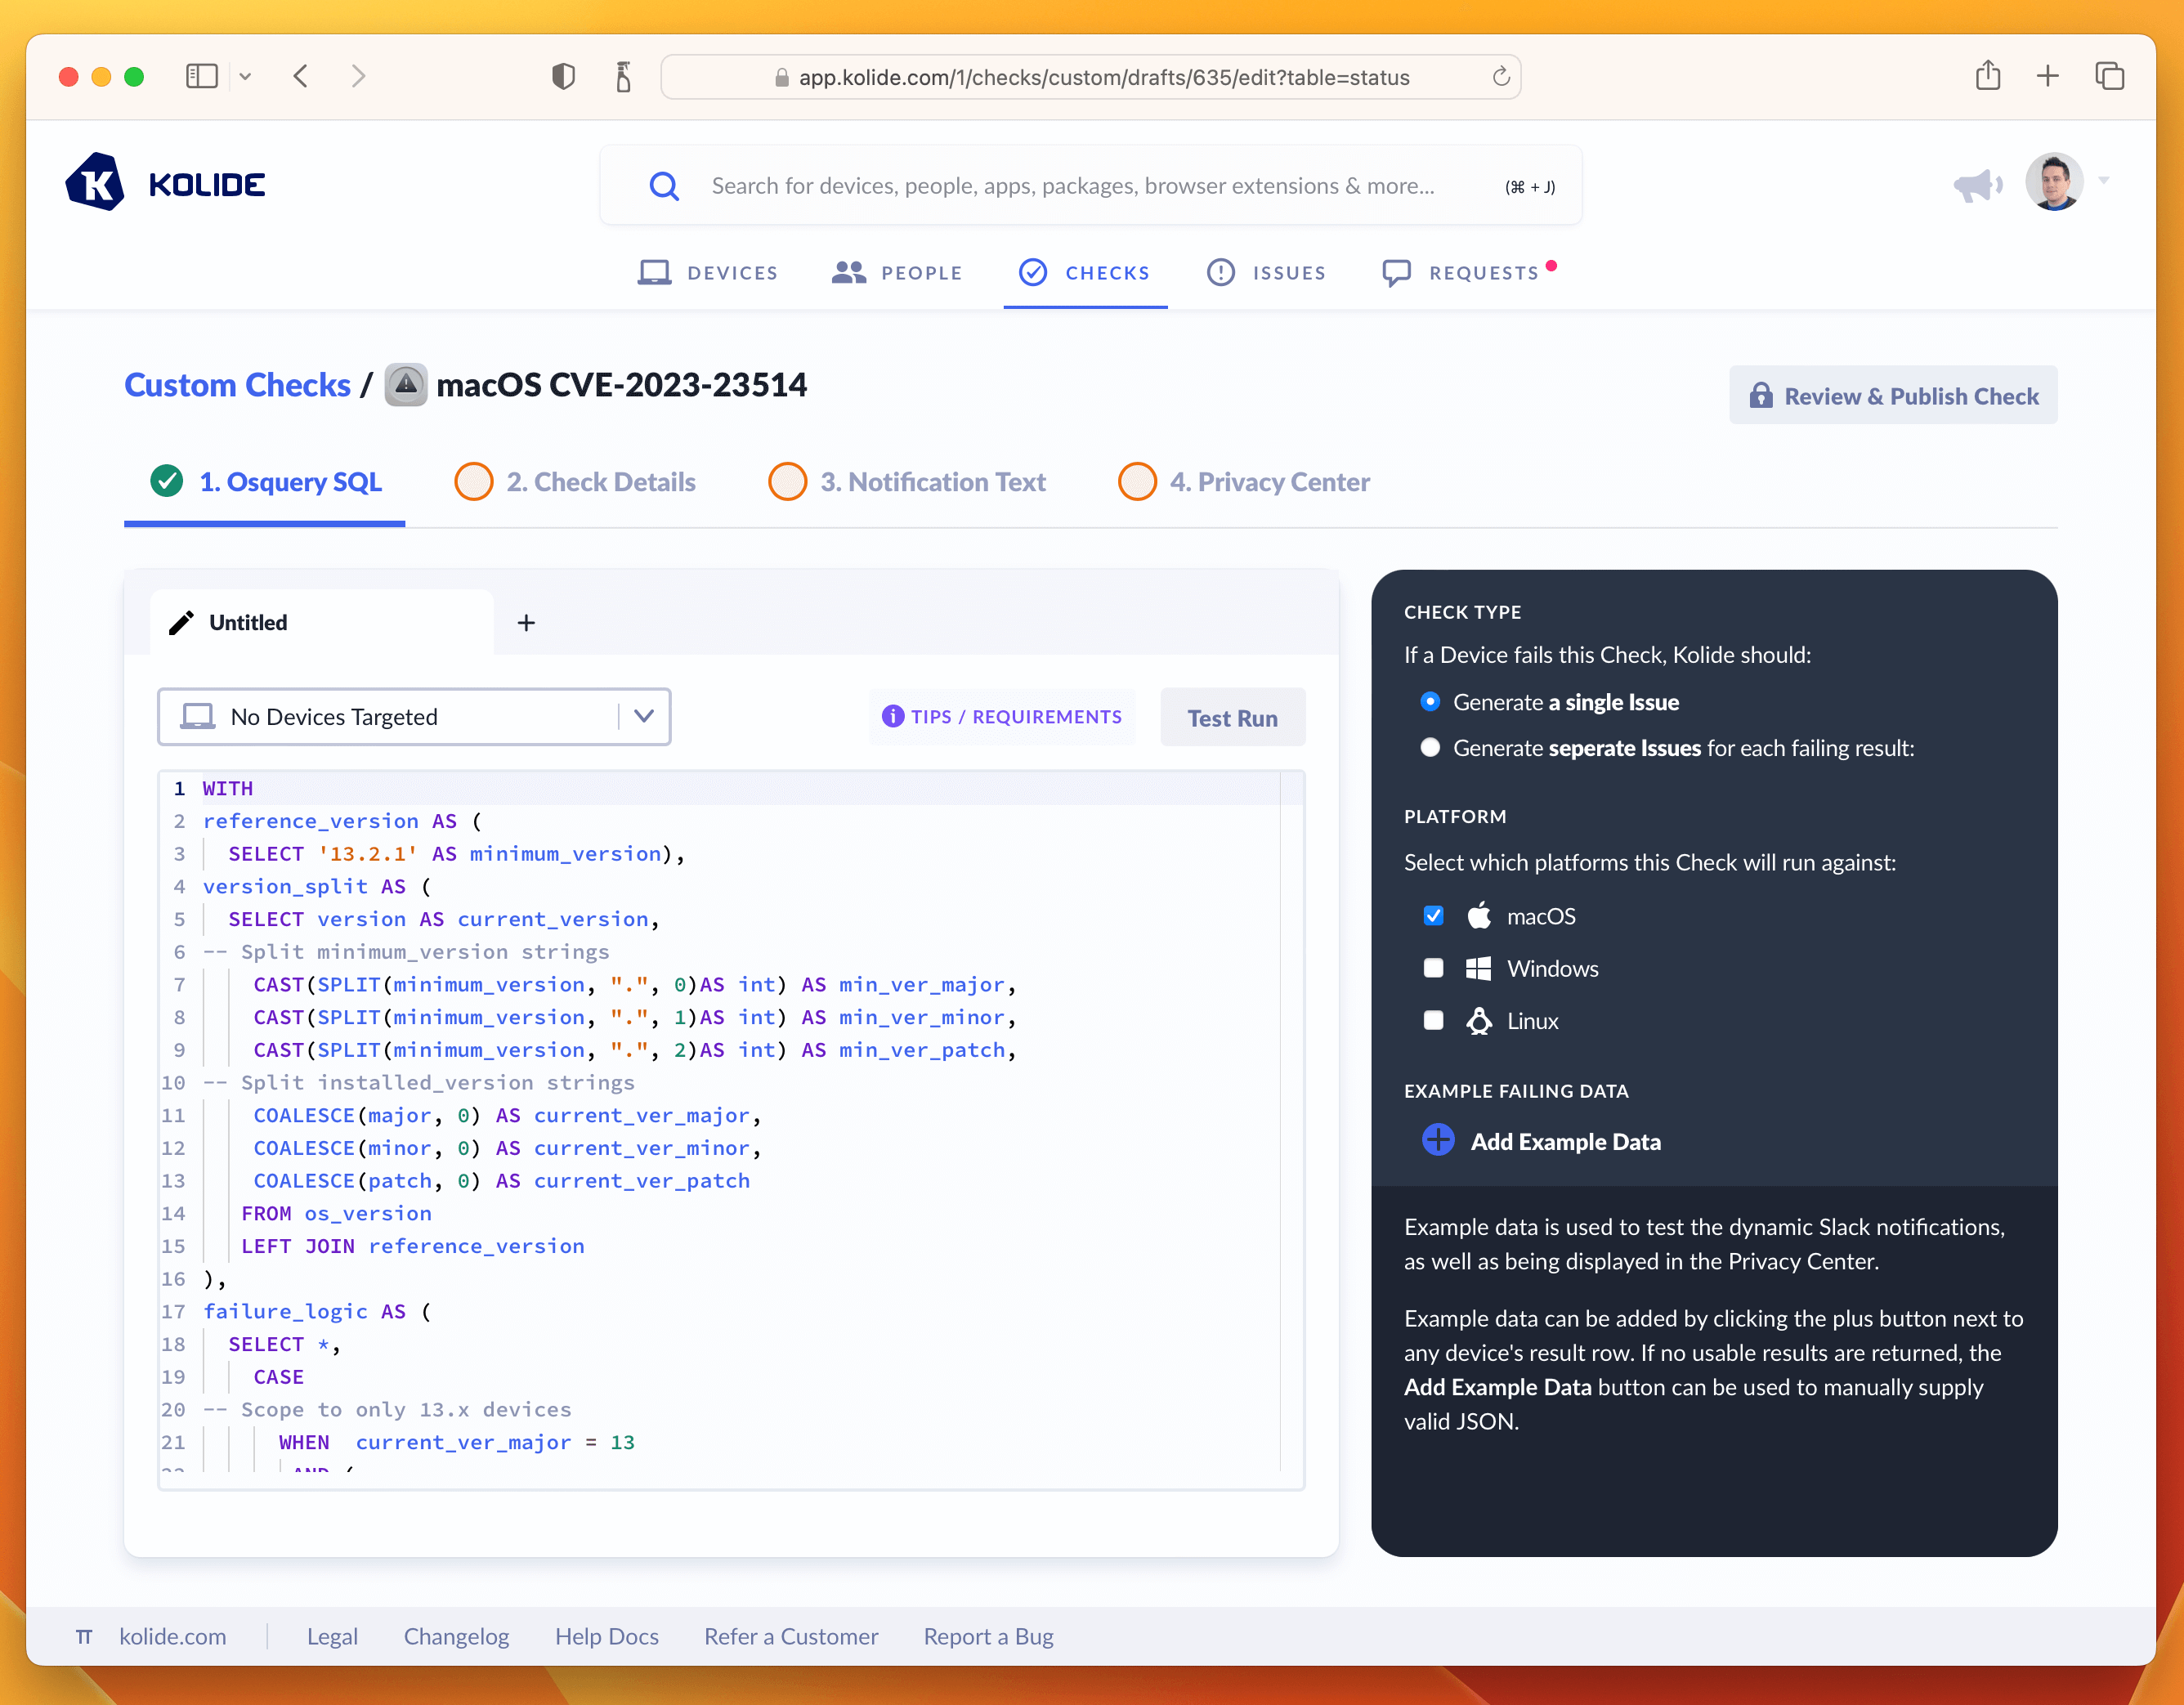
Once you’ve tested the query and added an example failure to the sidebar, you are ready to proceed to the next tab named Check Details.
Step 3: Write Check Details
The Check Details section lets other admins know what problem this Check detects on Devices. It also allows us to define an issue title that will be display to our end-users on the sign in page.
Here is the info I supplied, if you simply want to copy it over into the form.
- Check Name: macOS CVE-2023-23514
- Issue Title: macOS Urgent Patch Required
- Check Description: This Check verifies the Mac is patched against high severity vulnerability CVE-2023-23514 which impacts macOS Ventura systems.
Once entered in, your screen should look like the screenshot below:
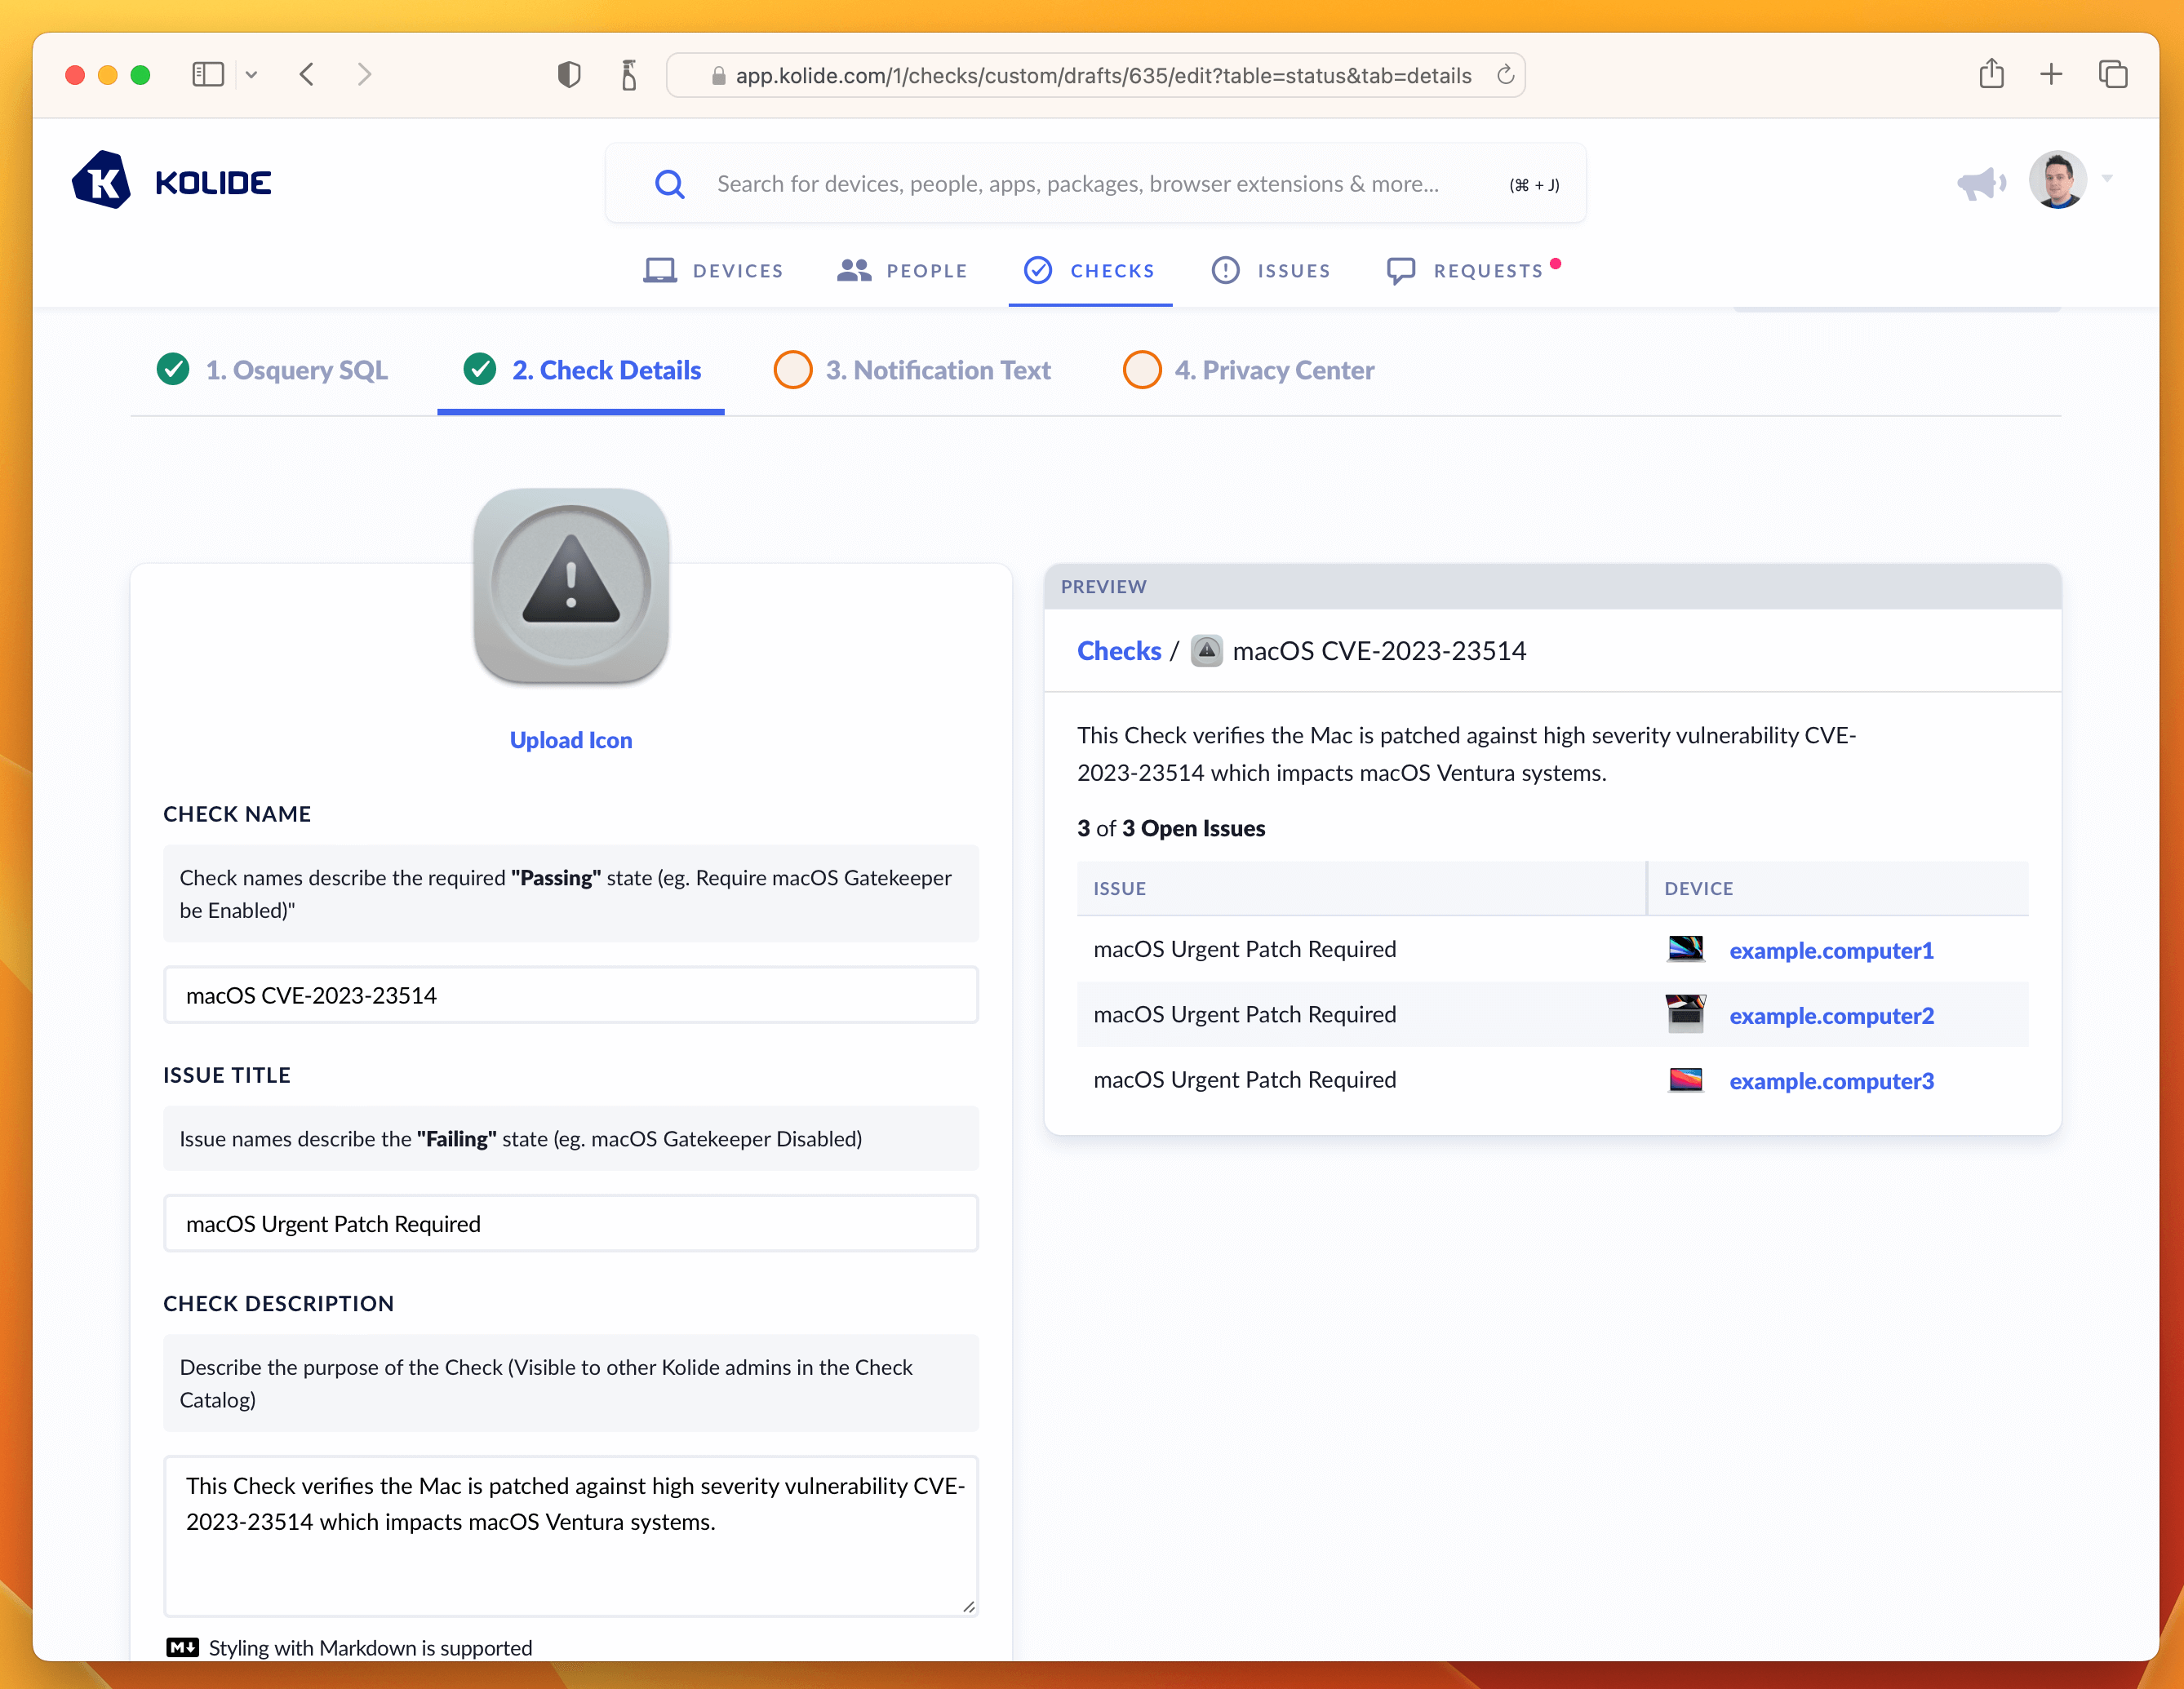
From here, let’s move on to the writing the text our end-users will see when they attempt to remediate the problem. This is done in the Notification Text step.
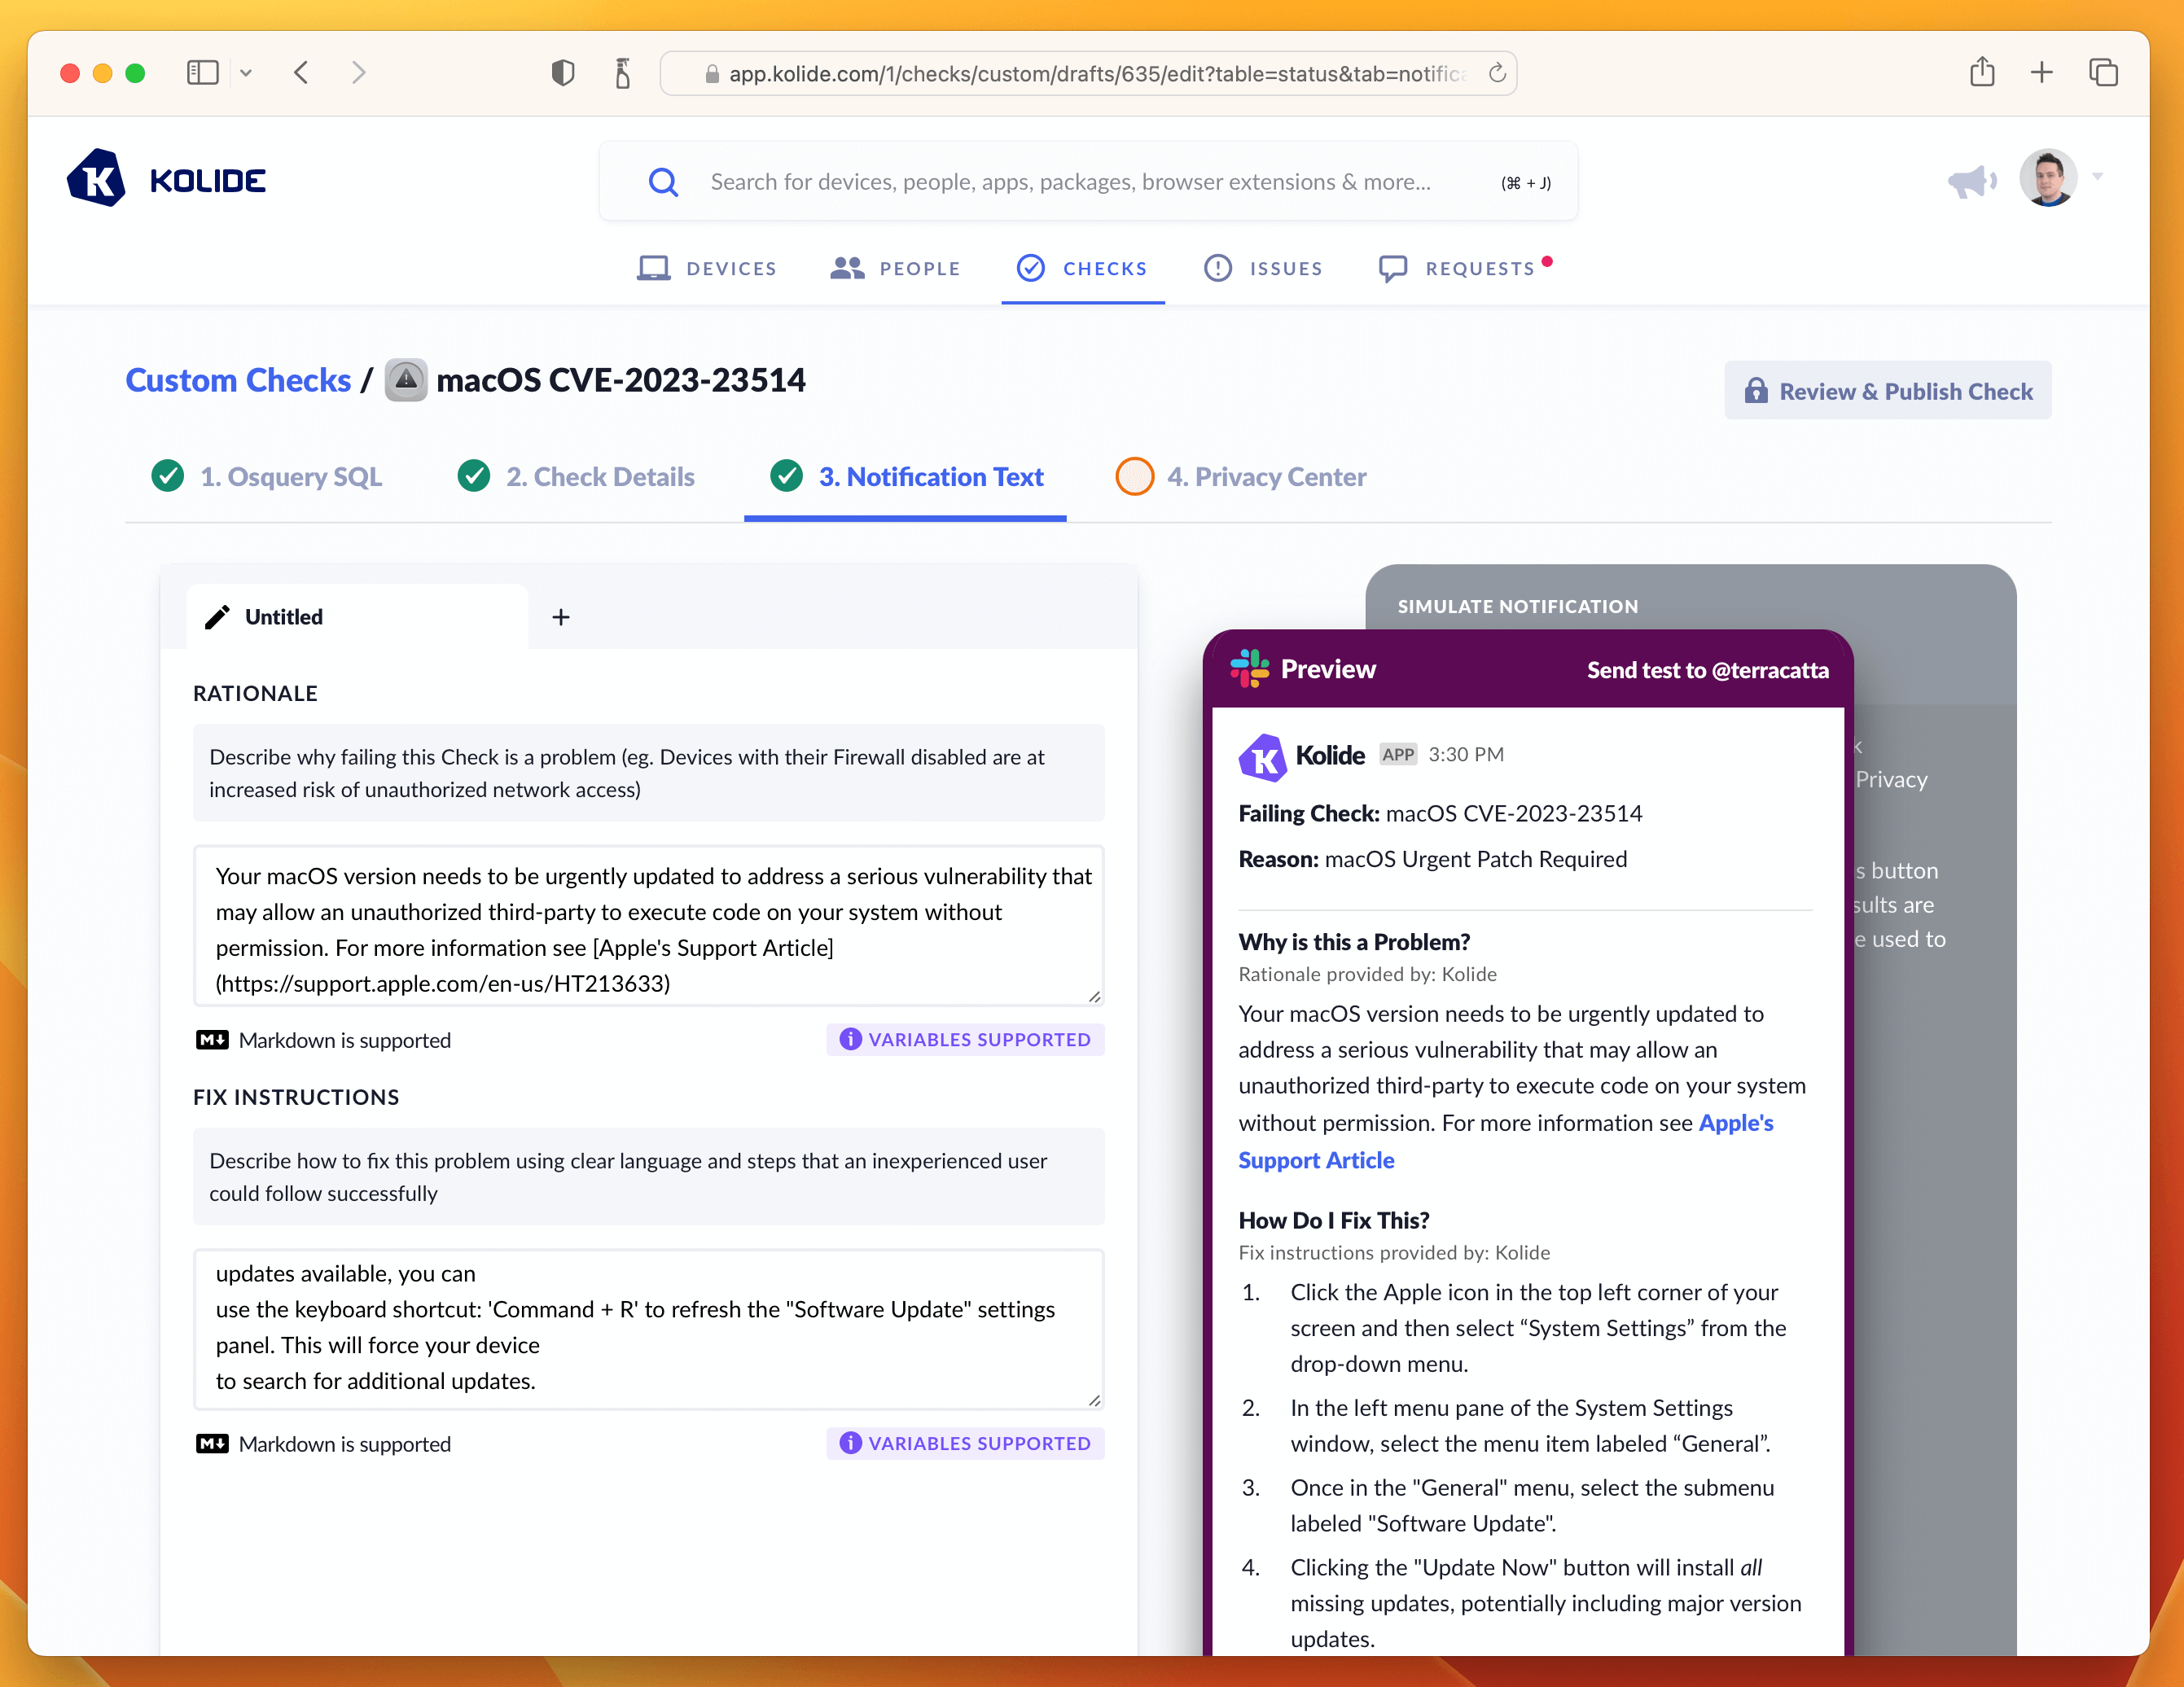
Step 4: Write End-User Remediation Instructions
This critical step ensures end-users have all the information they need to solve this problem on their own.
On this page there are two important fields to fill out, one being the rationale which explains to users why this important to do. Here is the markdown I wrote:
  Your macOS version needs to be urgently updated to address a serious
  vulnerability that may allow an unauthorized third-party to execute code on
  your system without permission. For more information see
  [Apple's Support Article](https://support.apple.com/en-us/HT213633)
The second are the fix instructions the end-user should follow to fix the issue. In our case, since this vulnerability only impacts macOS 13, we want our instructions to detail how to go through that process using the updated System Settings app.
1. Click the Apple icon in the top left corner of your screen and then select "System Settings" from the drop-down menu.

1. In the left menu pane of the System Settings window, select the menu item labeled "General".

1. Once in the "General" menu, select the submenu labeled "Software Update".

1. Clicking the "Update Now" button will install all missing updates, potentially including major version updates.

1. To install only the missing security update(s), click the "More info" button. This will give you details about each update and you can select specific updates to install. Your device is failing for the following security updates:

1. With the missing update(s) selected, click the "Install" button. If you do not see those updates available, you can use the keyboard shortcut: 'Command + R' to refresh the "Software Update" settings panel. This will force your device to search for additional updates.

1. Clicking the "Update Now" button will install *all* missing updates, potentially including major version updates.

1. To install *only* the missing security update(s), click the "More info" button. This will give you details about the available patches. From this list look for the update that says `macOS Ventura 13.1.2` (or higher).

1. With the missing update(s) selected, click the "Install" button.

**Please Note**: If you do not see those updates available, you can use the keyboard shortcut: `Command + R` to refresh the "Software Update" settings panel. This will force your device
to search for additional updates.
With both of these fields filled out, the tab should look something like the screenshot below.
If that’s looking good, then let’s quickly deal with the Privacy Center tab. This Check does not have any impact on Privacy, so we can simply select the example we generated in the Osquery SQL tab and type in a short-message letting end-users know there isn’t any personal data collected for this Check.
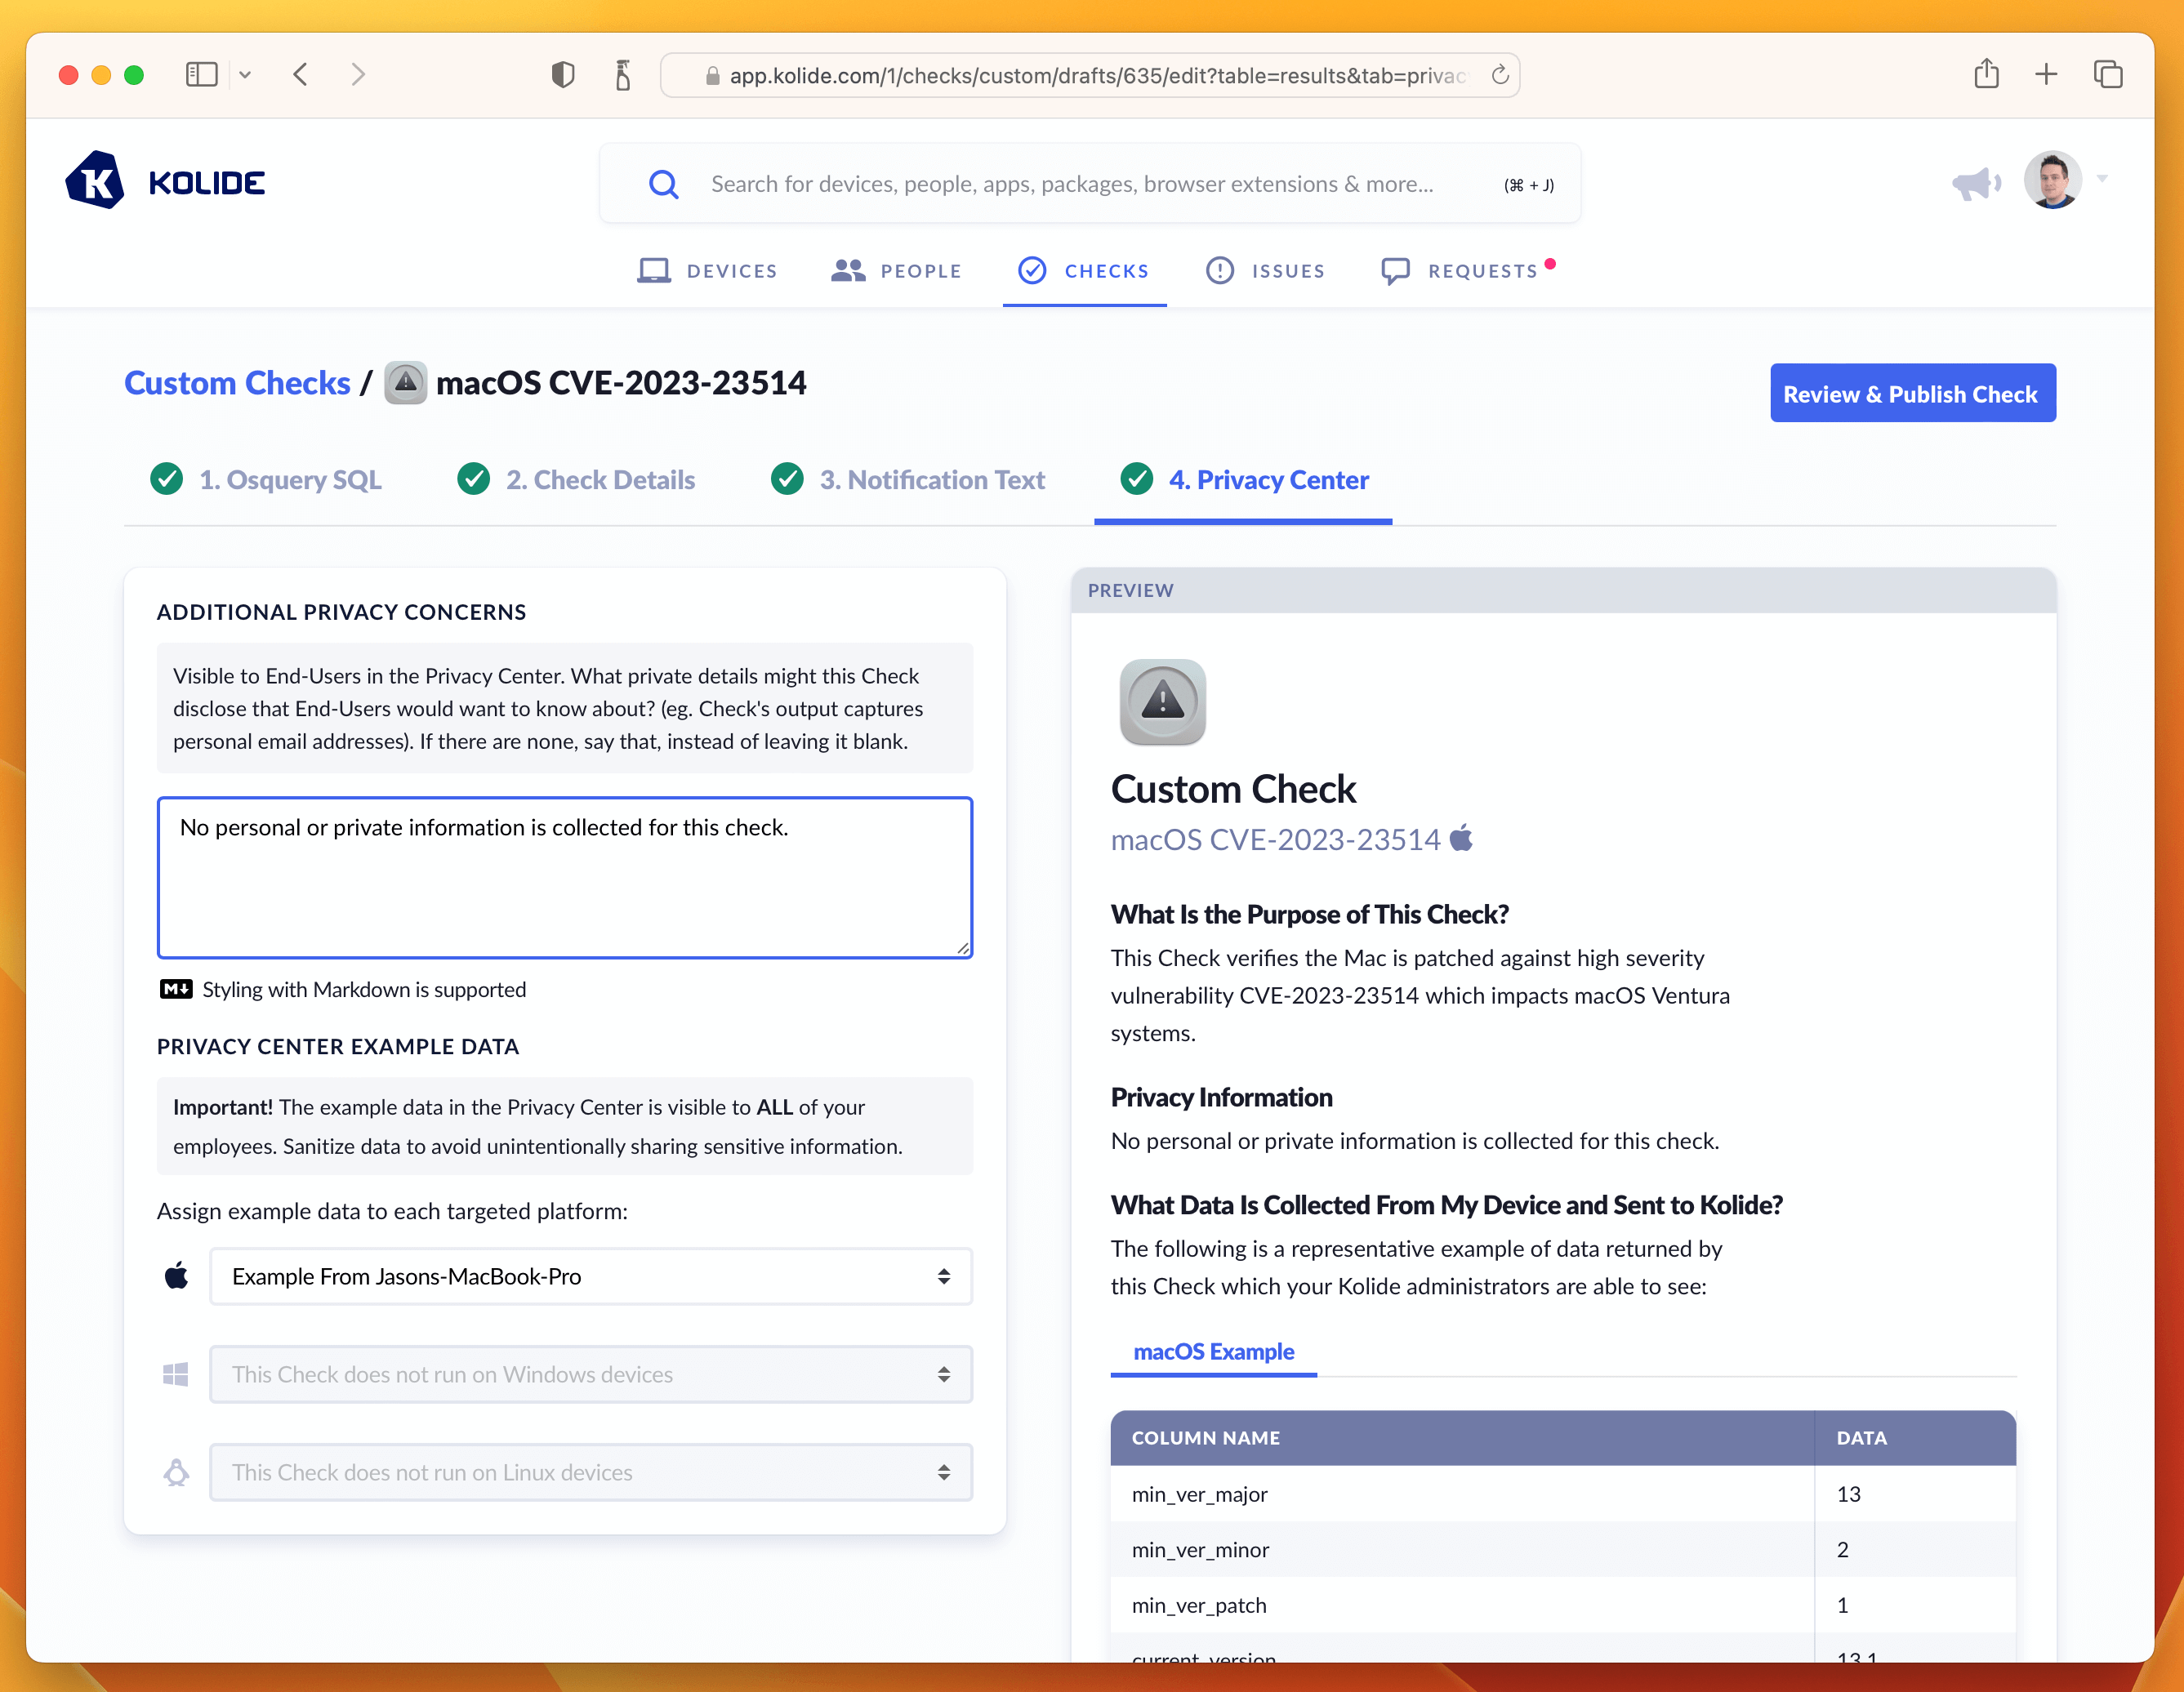
With this last step done, we can now publish the Check.
Step 5: Publishing, Enabling, and Blocking
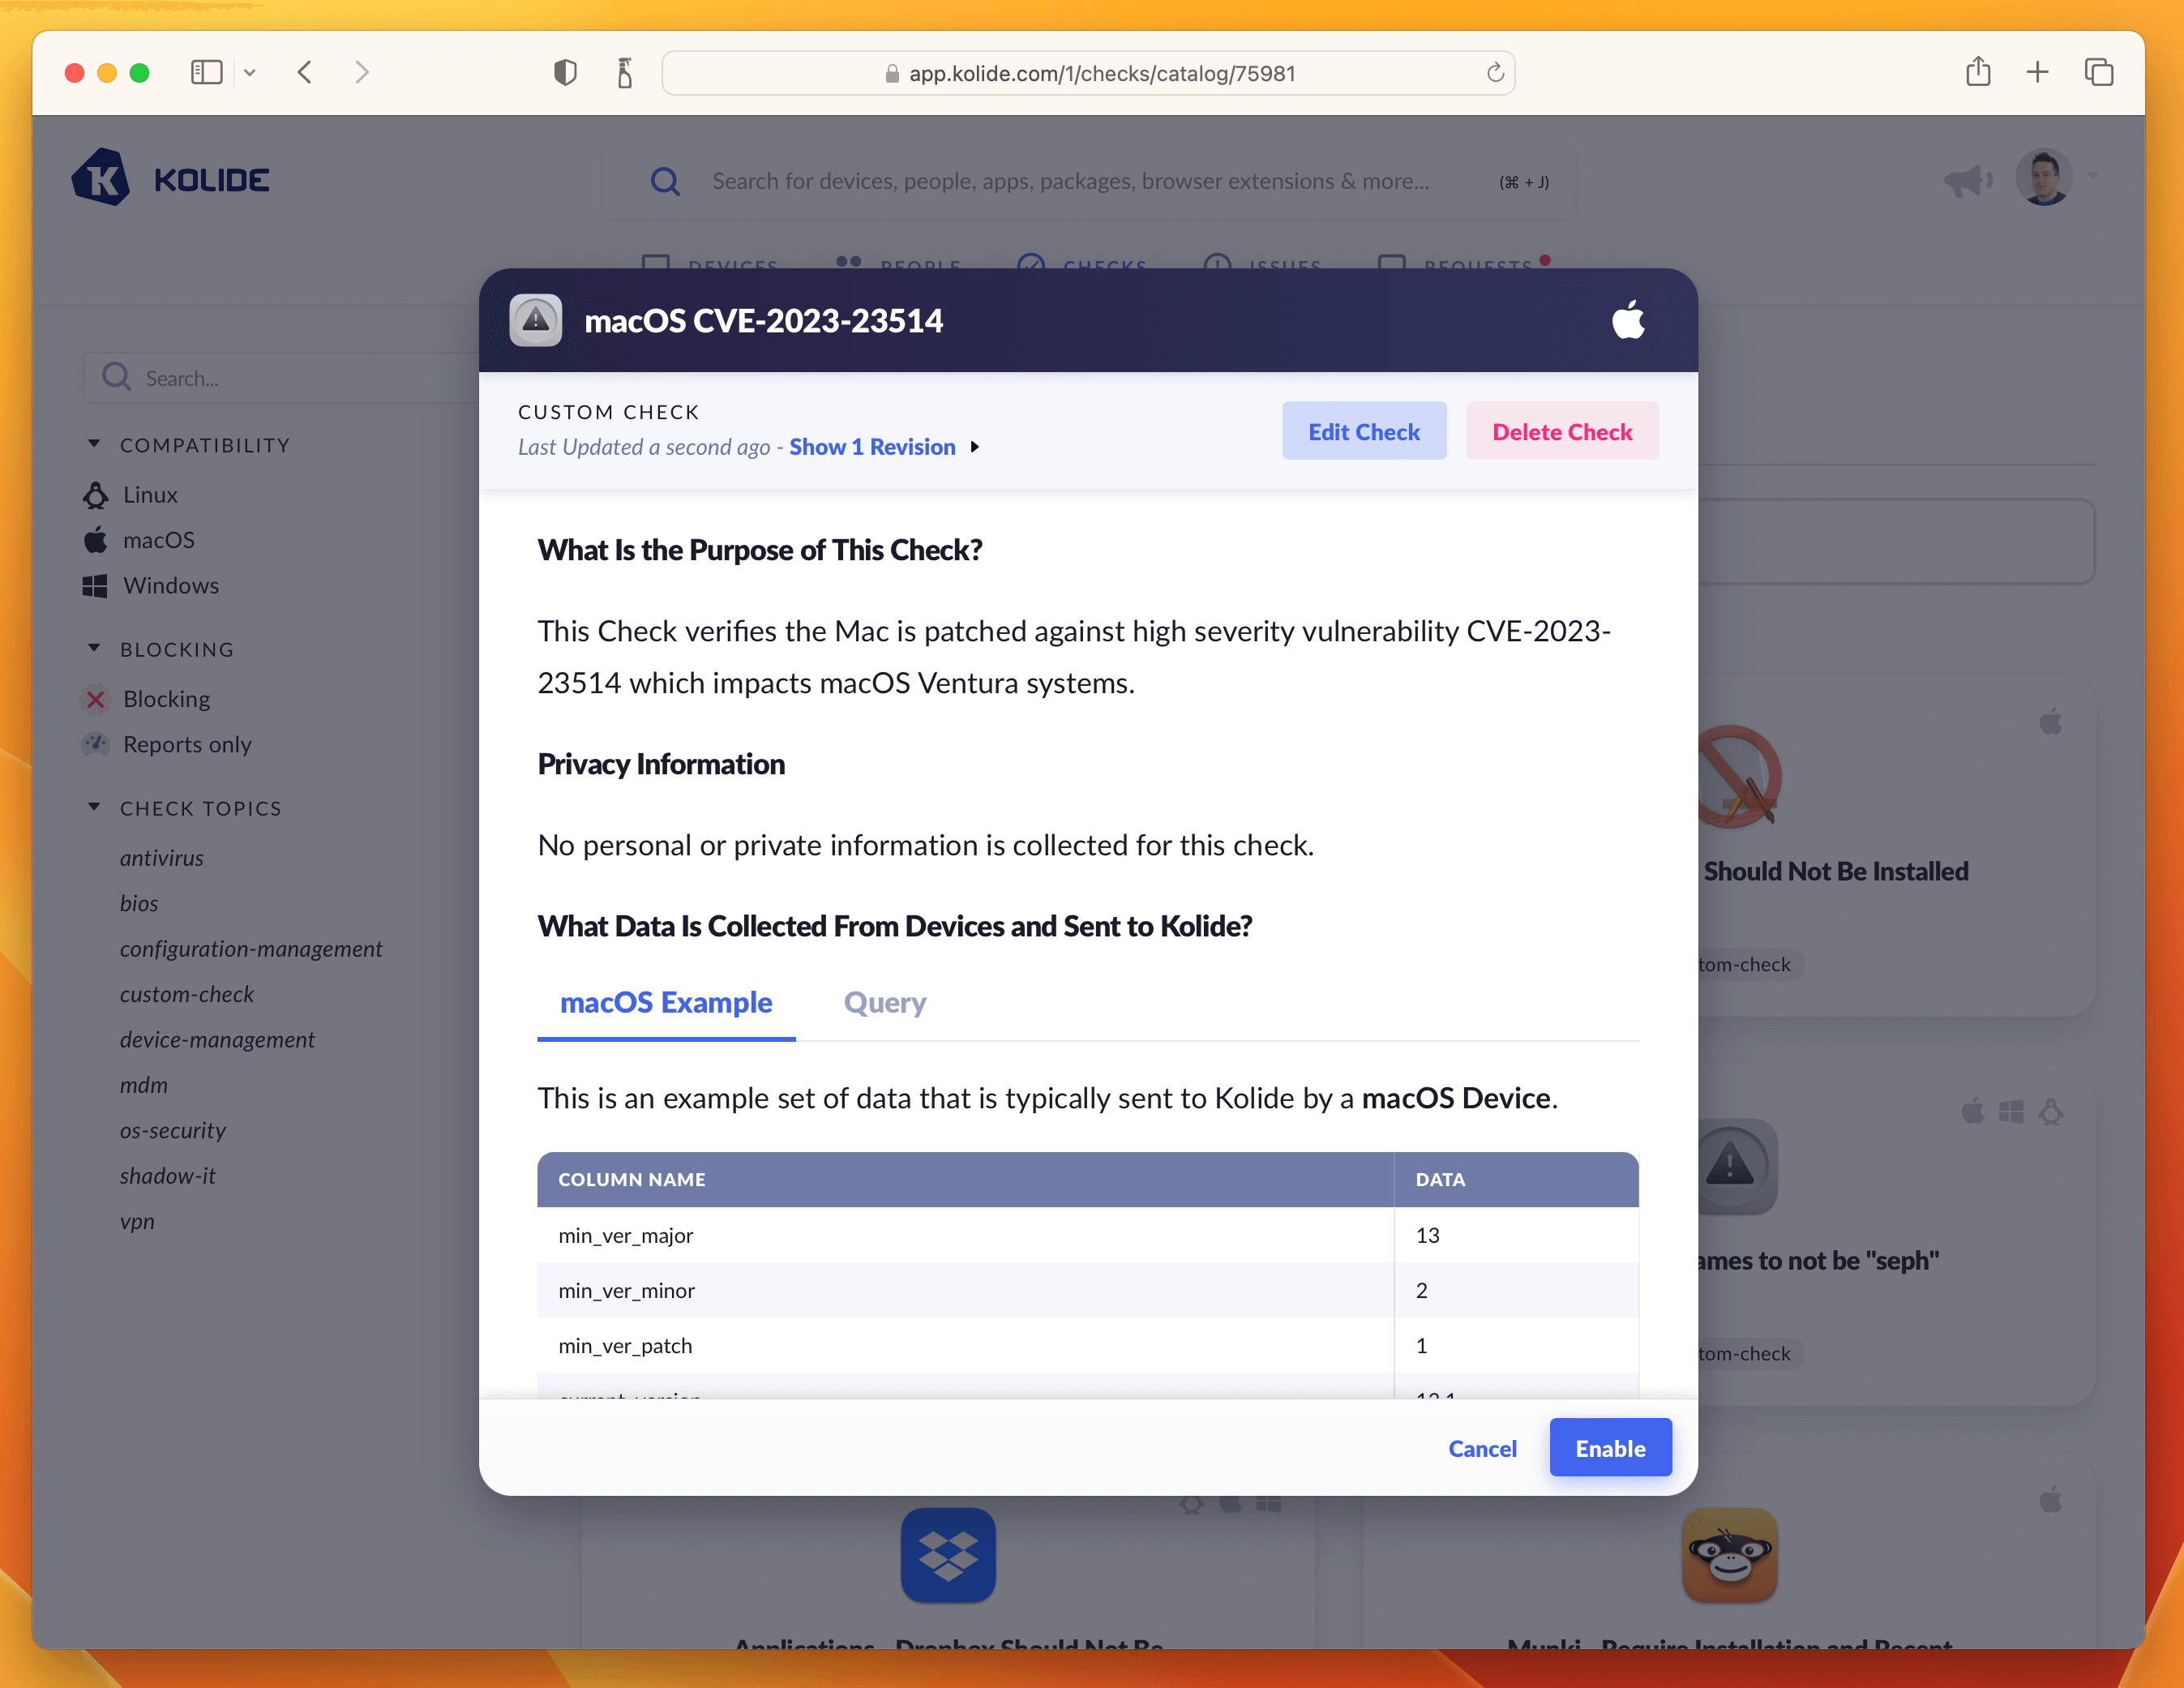
To finish publishing click the blue button in the upper-right corner that says Review & Publish Check. You’ll see a confirmation screen like the one below:

Clicking Publish Check will complete the process. Next, in the pop-up, you can click Enable Check as shown below:
Once enabled, click the View Check Results link that appears and then the action-menu in the upper-right and finally Configure…. This will bring up the sidebar where you can set the blocking status.
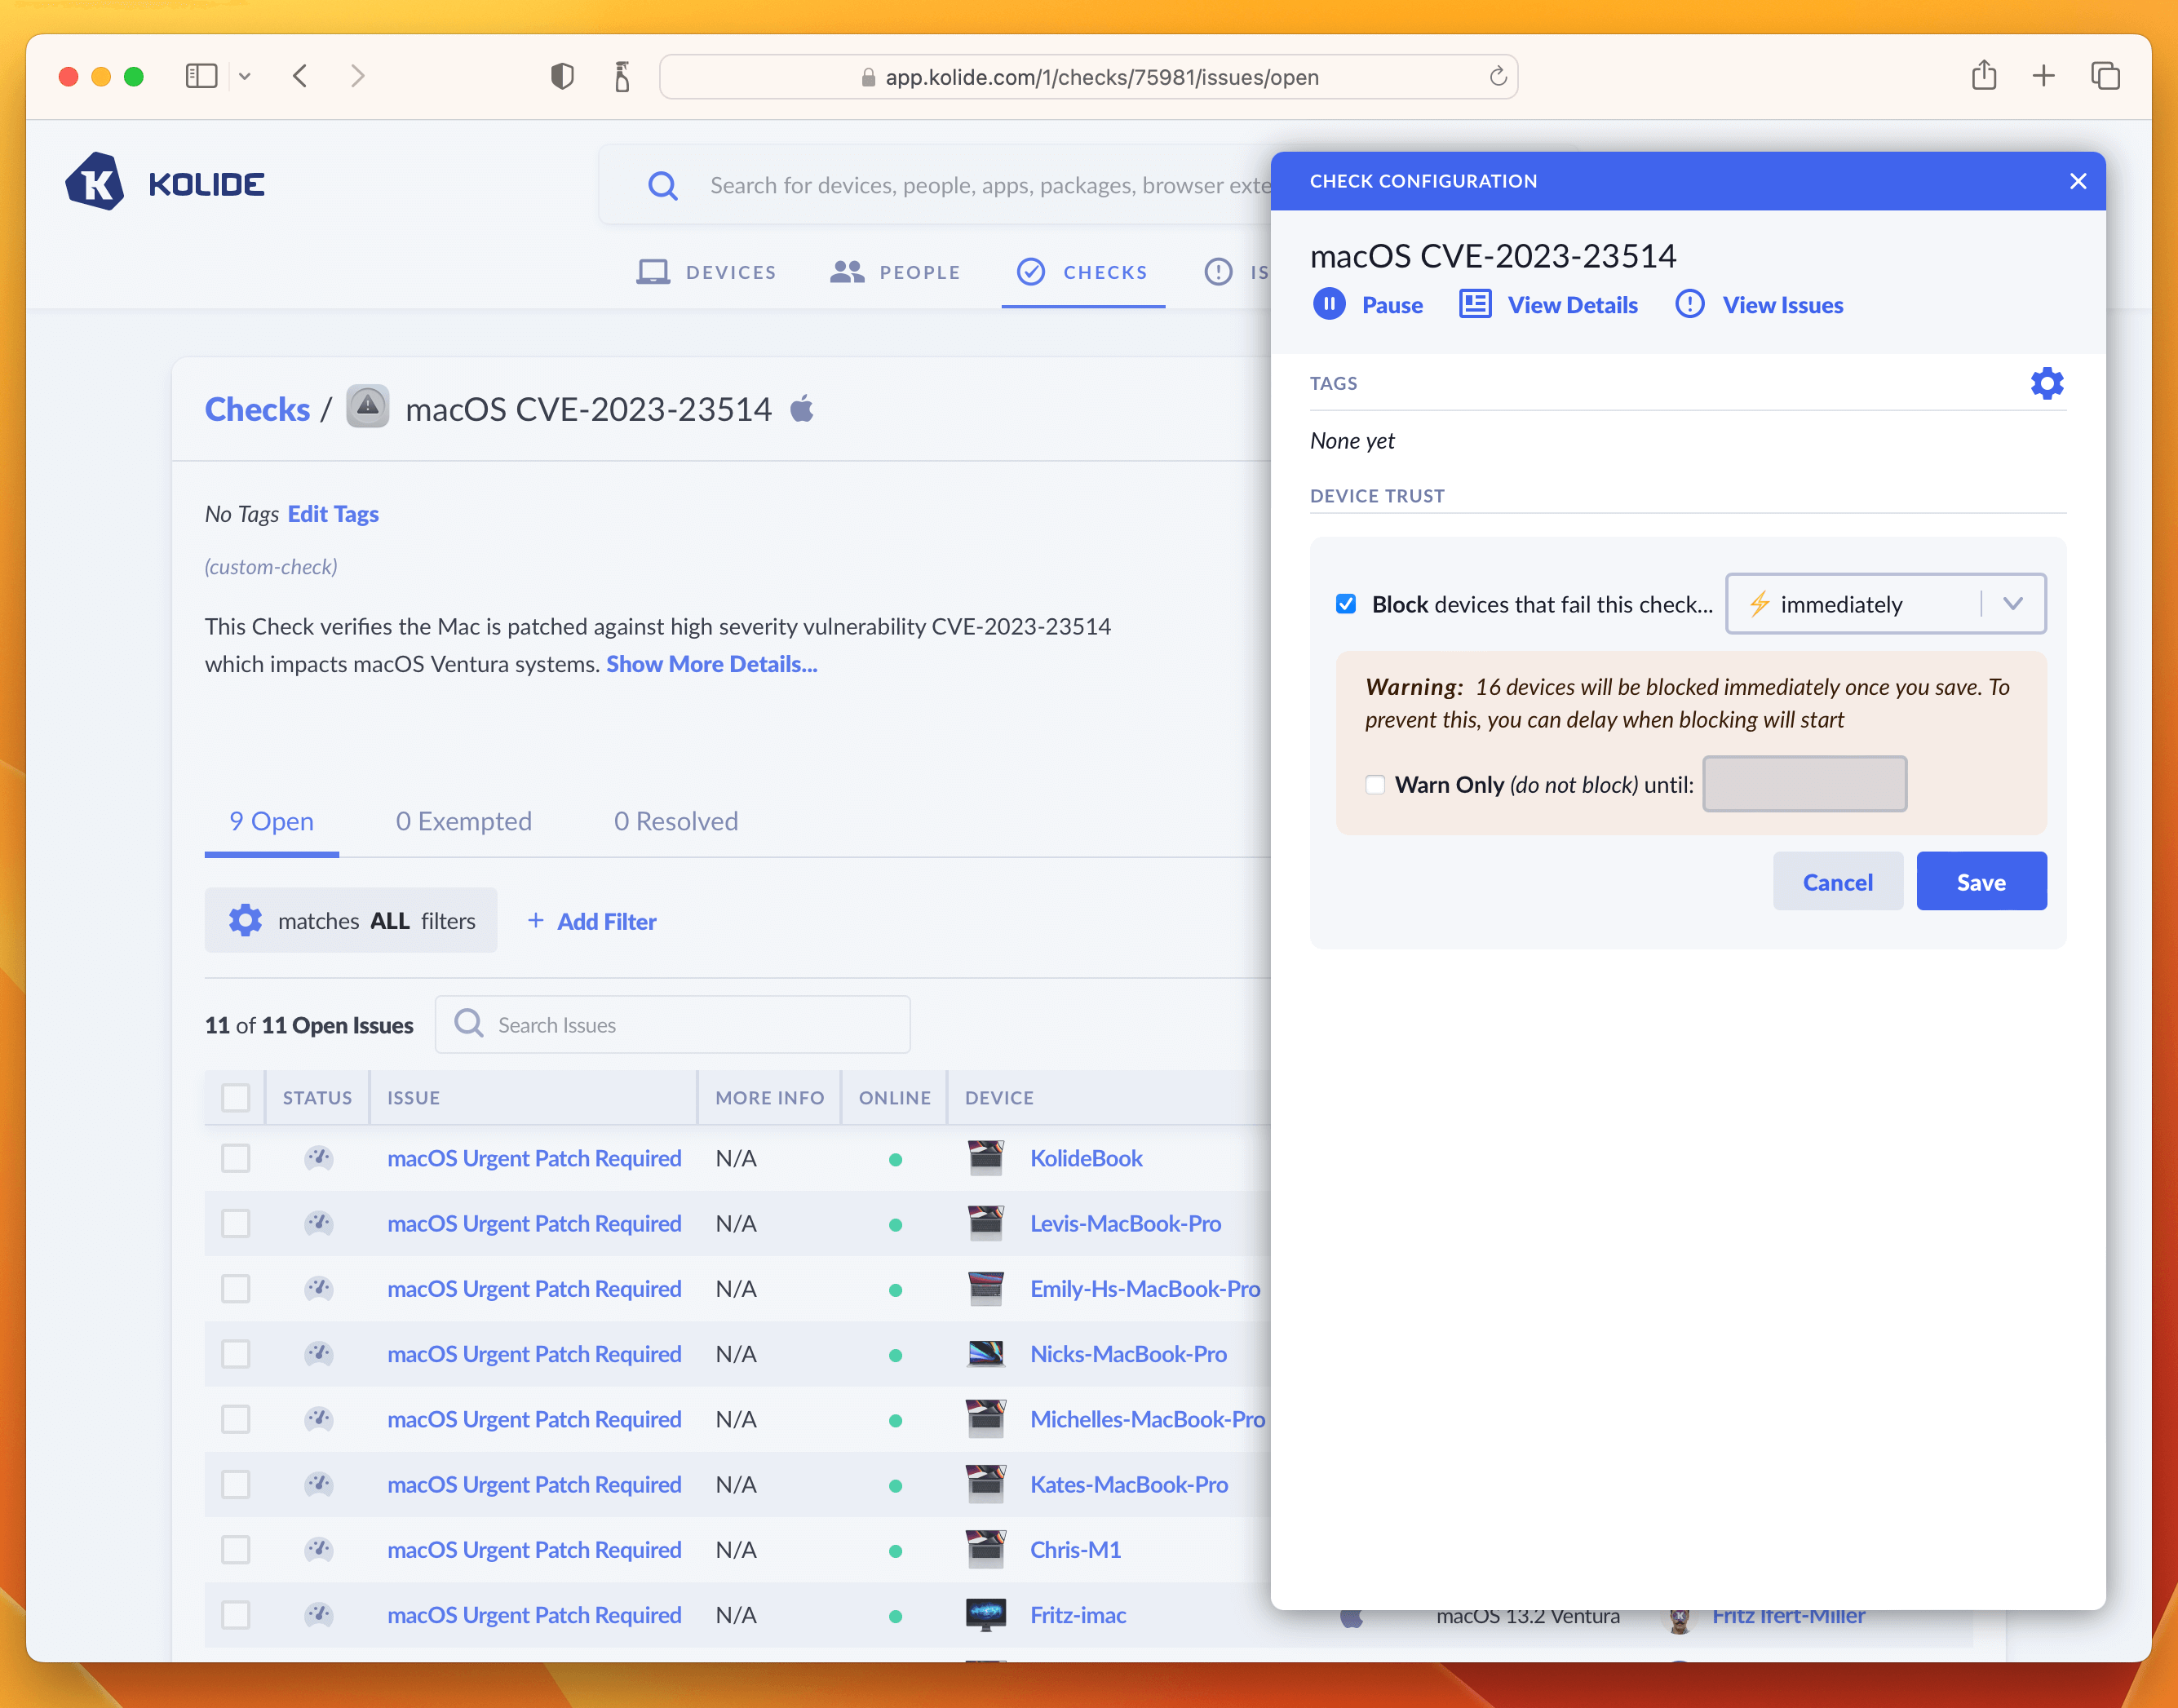
As we said in the intro, this is where you can determine how aggressively you want to mitigate this vulnerability, balancing that around the productivity of end-users. For our own Kolide employees, we thought this vulnerability was serious enough to warrant an immediate block. That said, giving folks an extra day is also a reasonable choice depending on your risk tolerance. If that’s the case, simply click the checkbox where it warns you about blocking devices and decide on a date in the future when you’d like the blocking to start.
Once you have the Check setup, the blocking will look something like this:
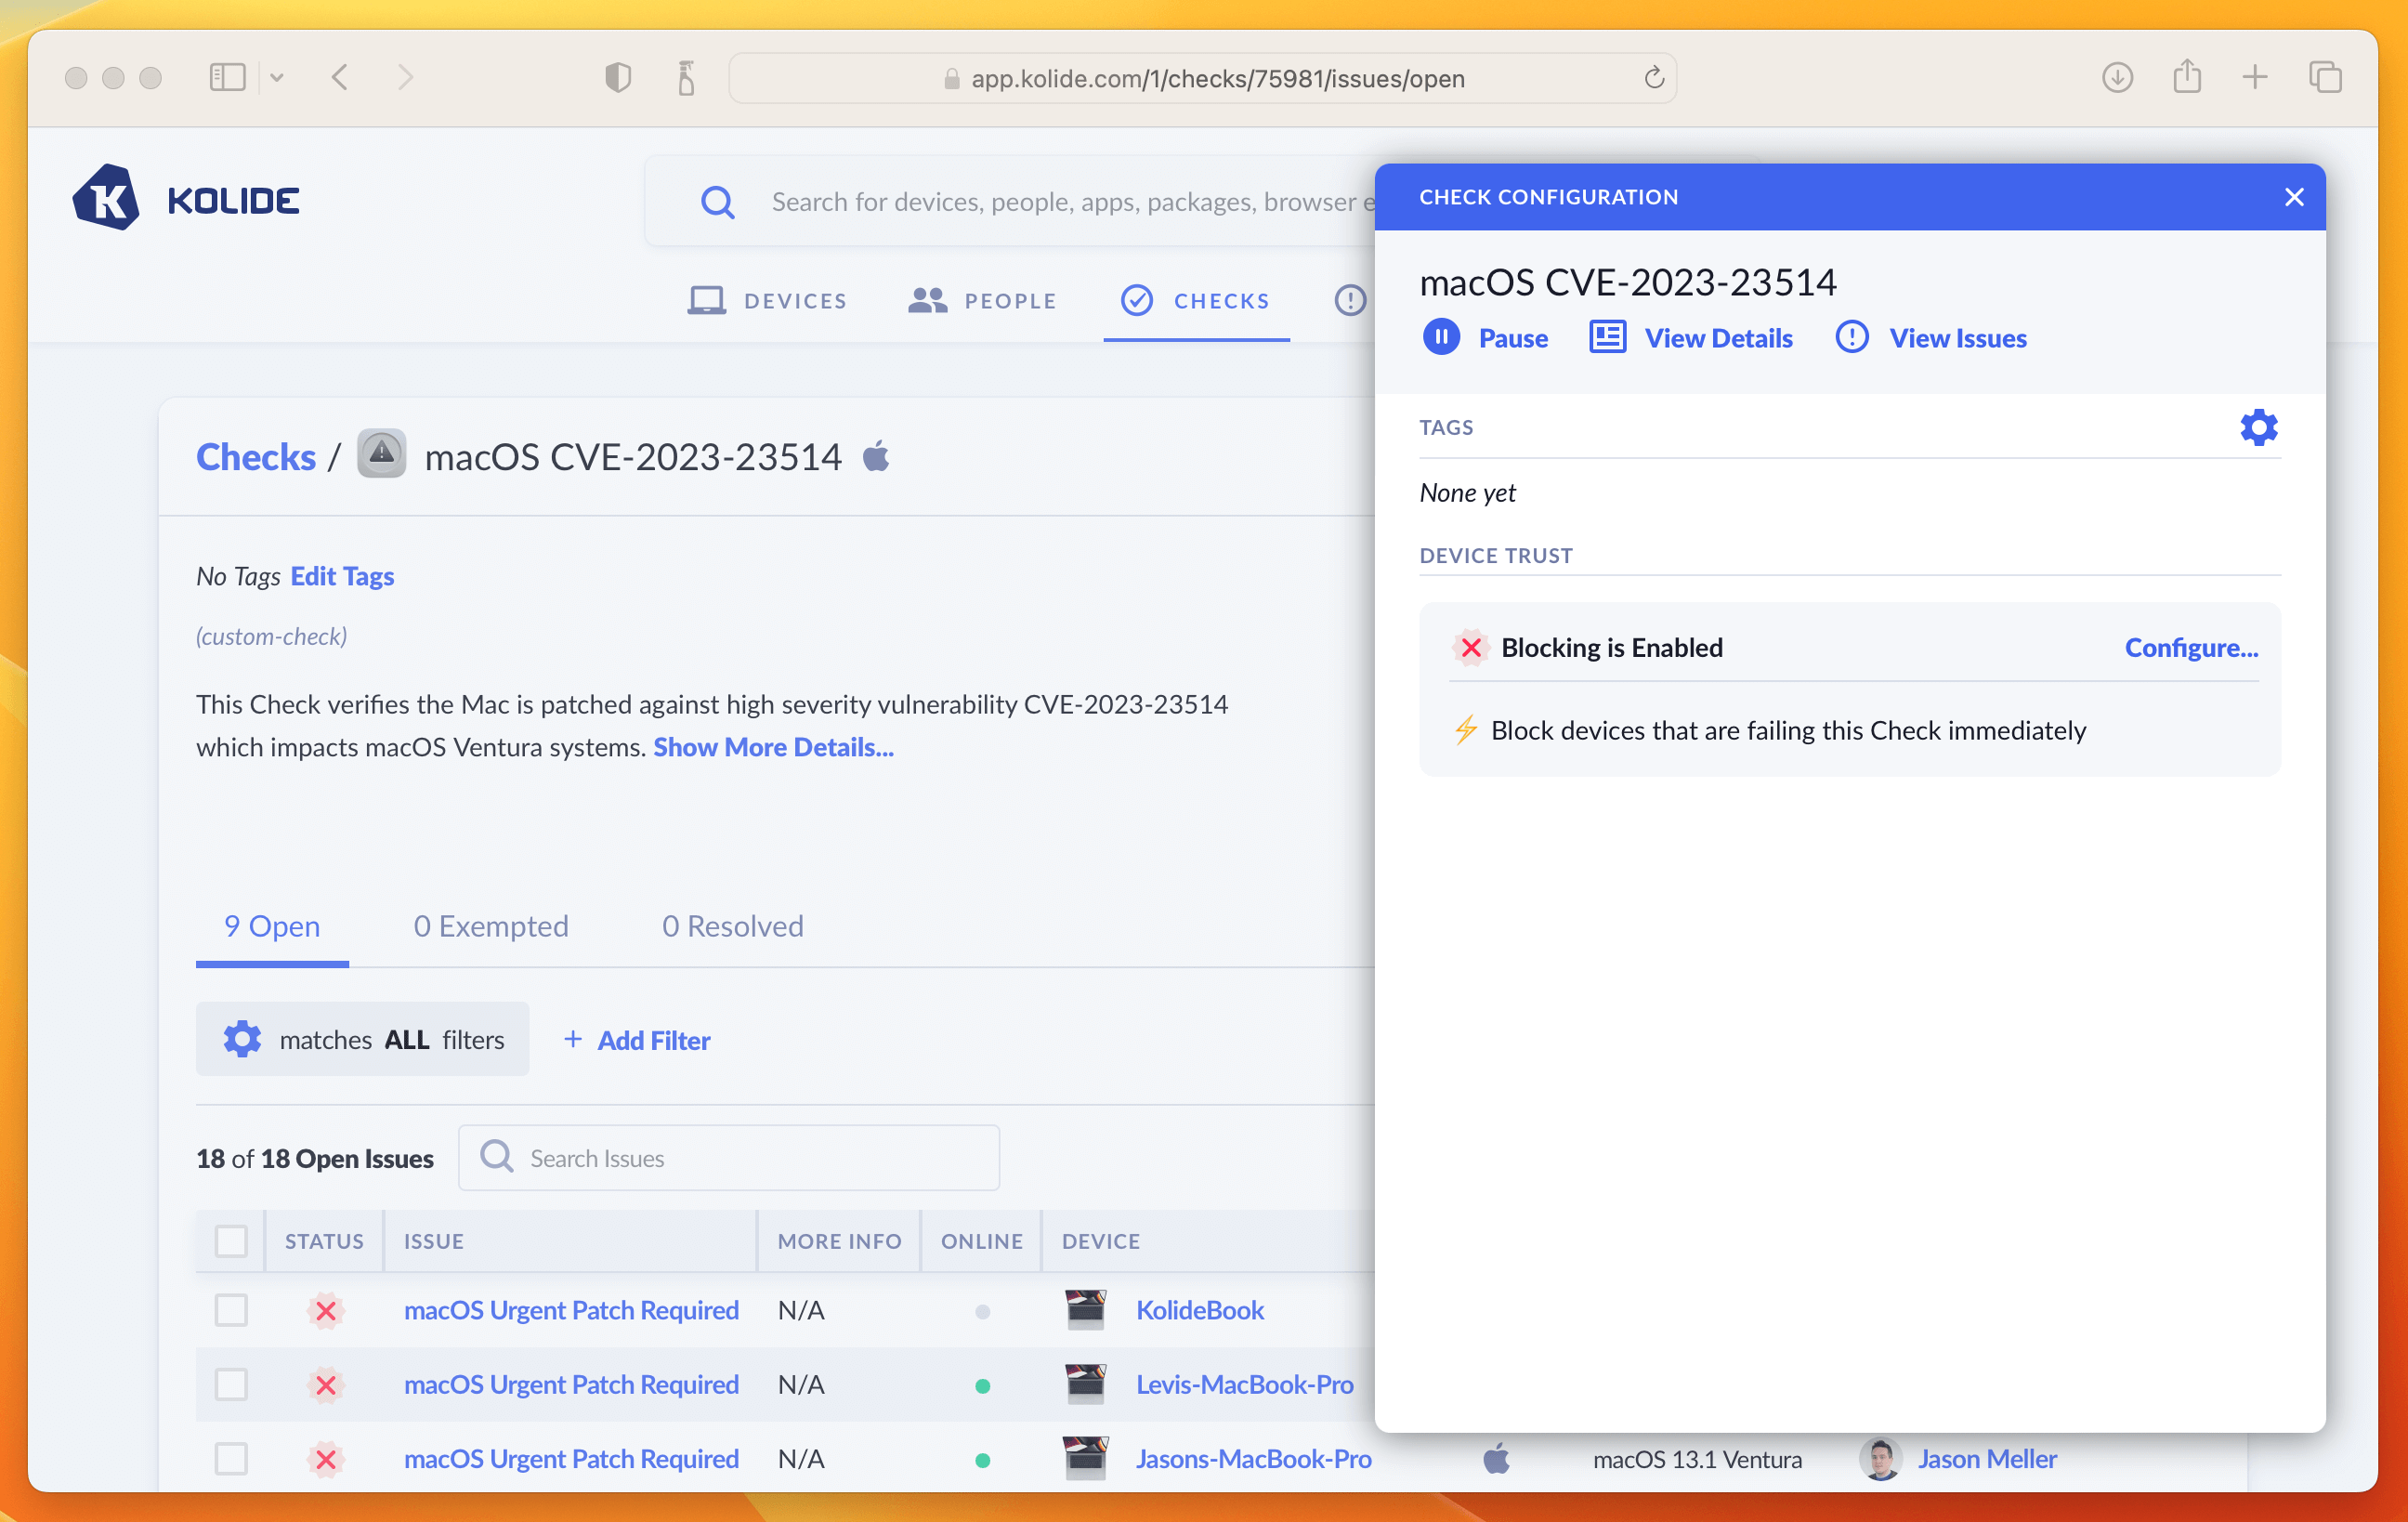
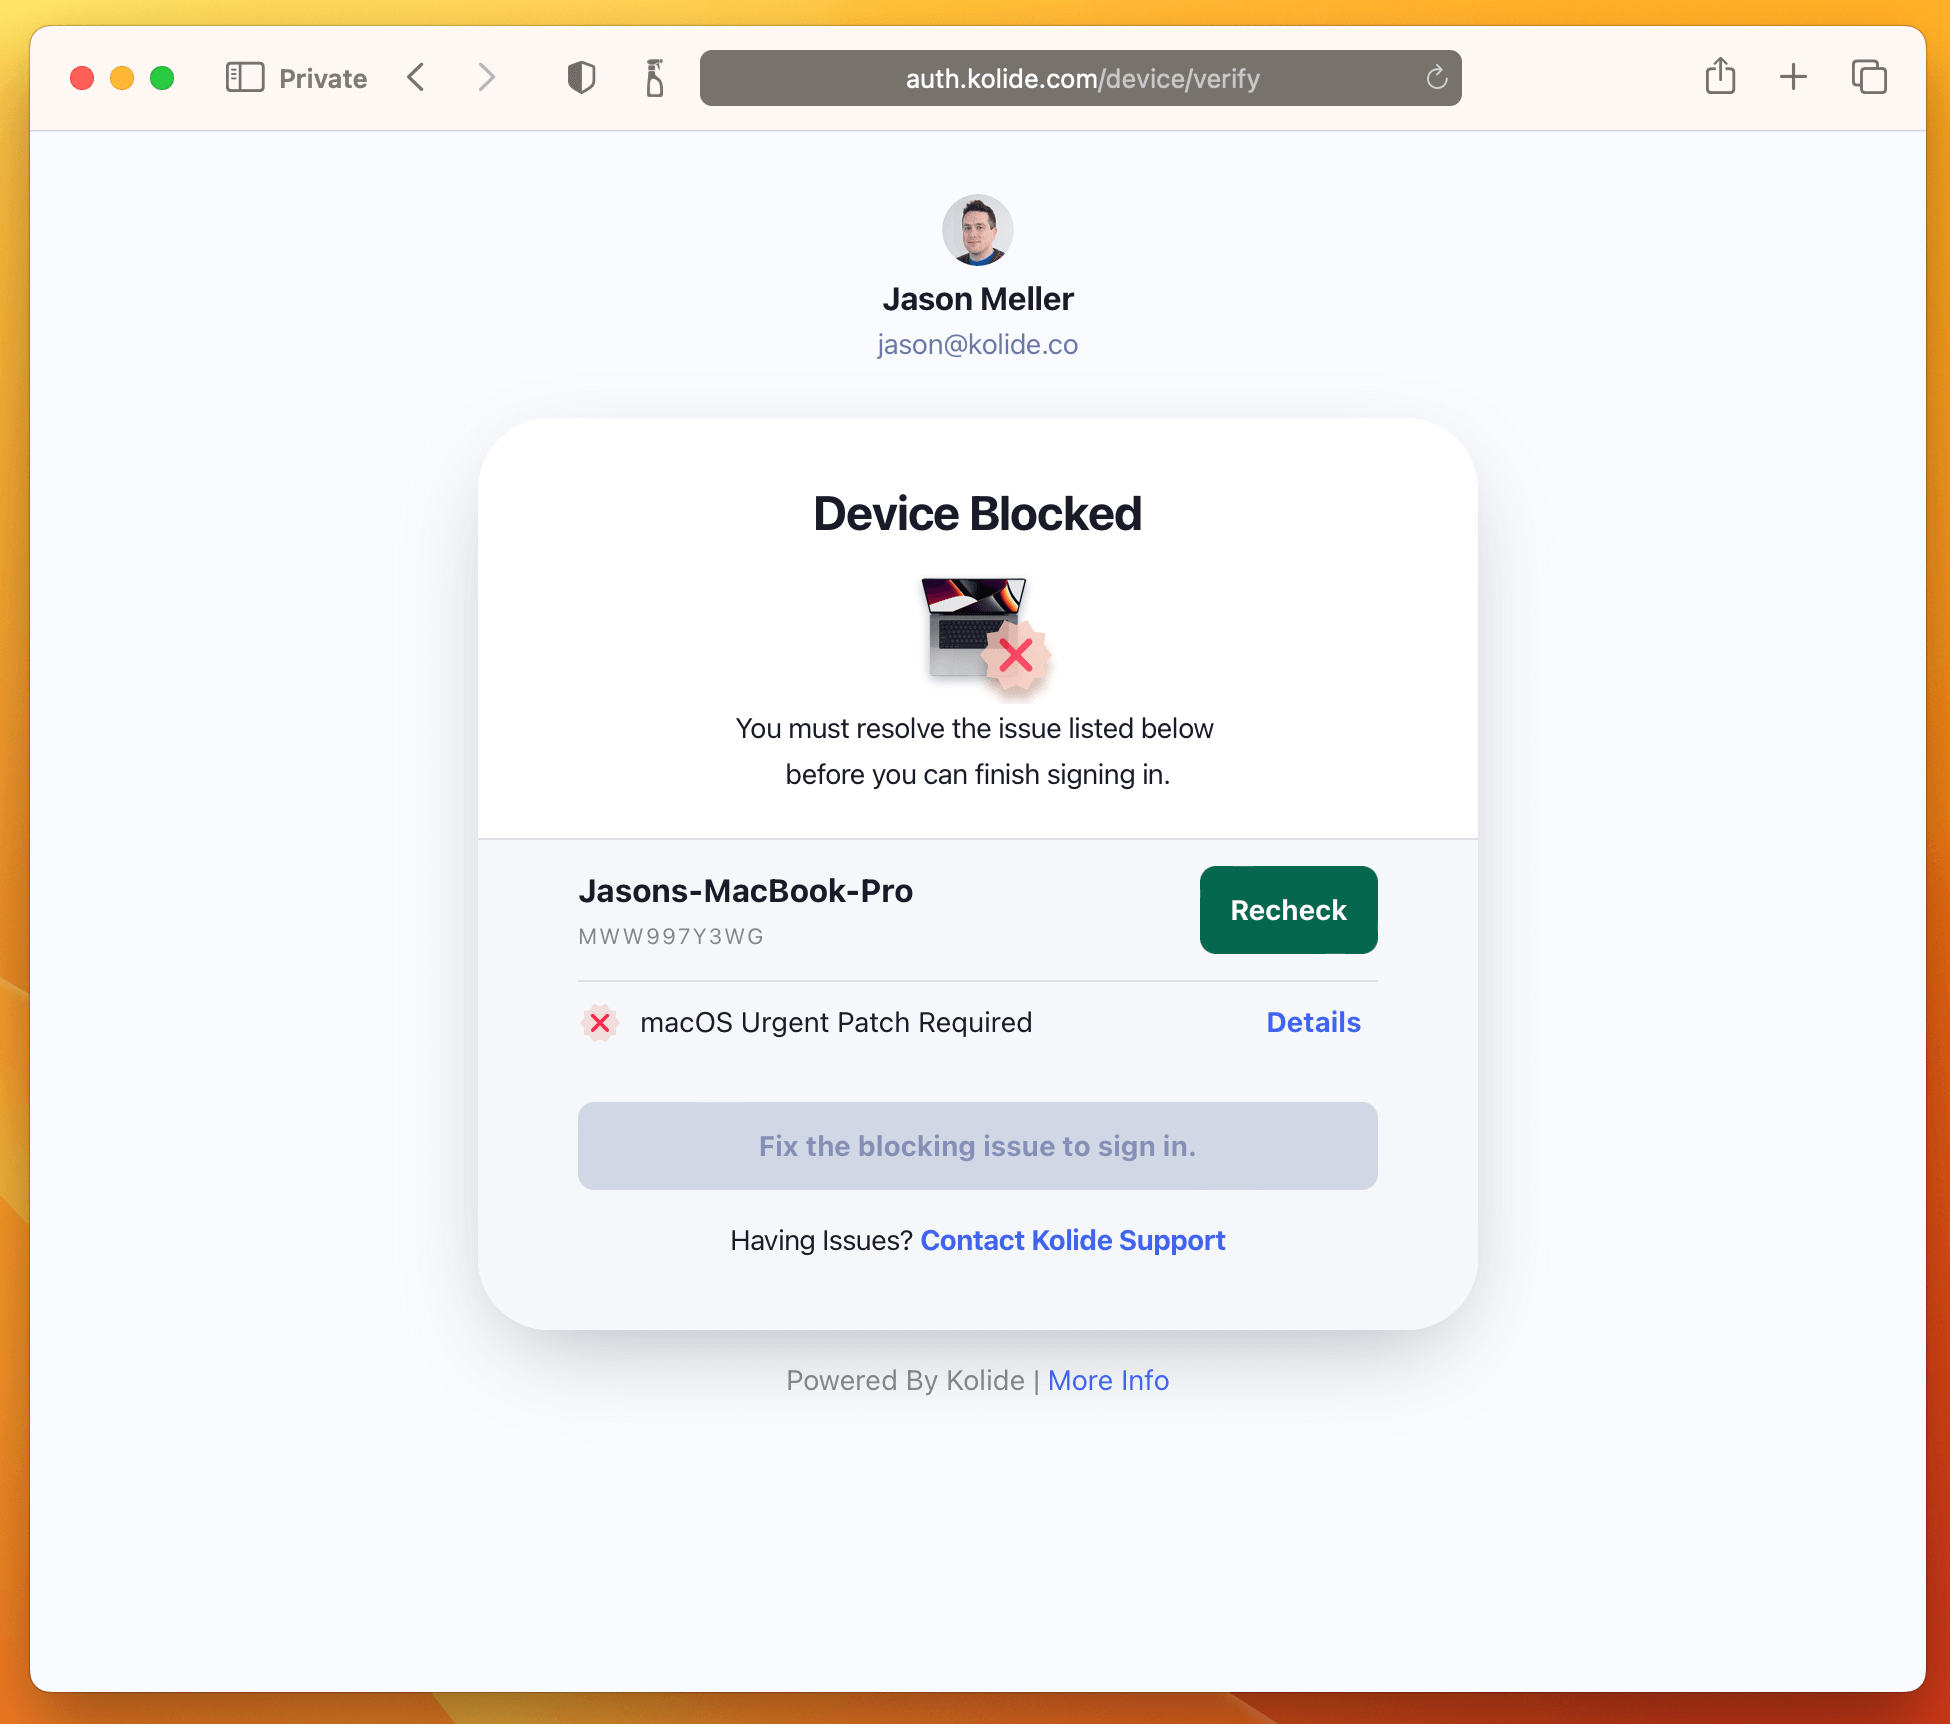
And that’s it! The next time your users sign into any app protected by Kolide they will be greeted with the following:
Writing External Checks
External Checks enable you to use information outside of Kolide to enforce policies for devices or people, like security training completion or HR policy acknowledgments.
Requirements
To use External Checks with Kolide, you need:
- An external system capable of issuing authenticated HTTPS
POSTrequests to the Kolide API. - An API key in Kolide.
- 1Password Device Trust Connect or Unified Access Pro. Contact Kolide support to upgrade.
External Checks Overview
External Checks require your team to configure your external system to communicate with the Kolide API.
- Step 1: An admin creates an External Check in Kolide.
-
Step 2: Kolide generates a
/checks/{check_id}/runsAPI endpoint for that Check. -
Step 3: Your team configures your external system to authenticate with the Kolide API and send
POSTrequests to this endpoint. The external system submits PASS/FAIL results to Kolide. Kolide uses the result and enforces it in access decisions like any other Check. -
Step 4: Kolide can send a webhook event
external_check_refresh.newto perform a re-check.
Step 1: Create the External Check Within the Kolide Admin Console
- Select Checks in the top navigation, then select the Add New Checks button in the upper-right.
- Choose the Build Your Own tab, then select Start With an External Check.
- Enter a name for the Check, then select Create New Draft.
- Choose whether you want this Check to Generate a single issue or Generate separate issues for each failing result.
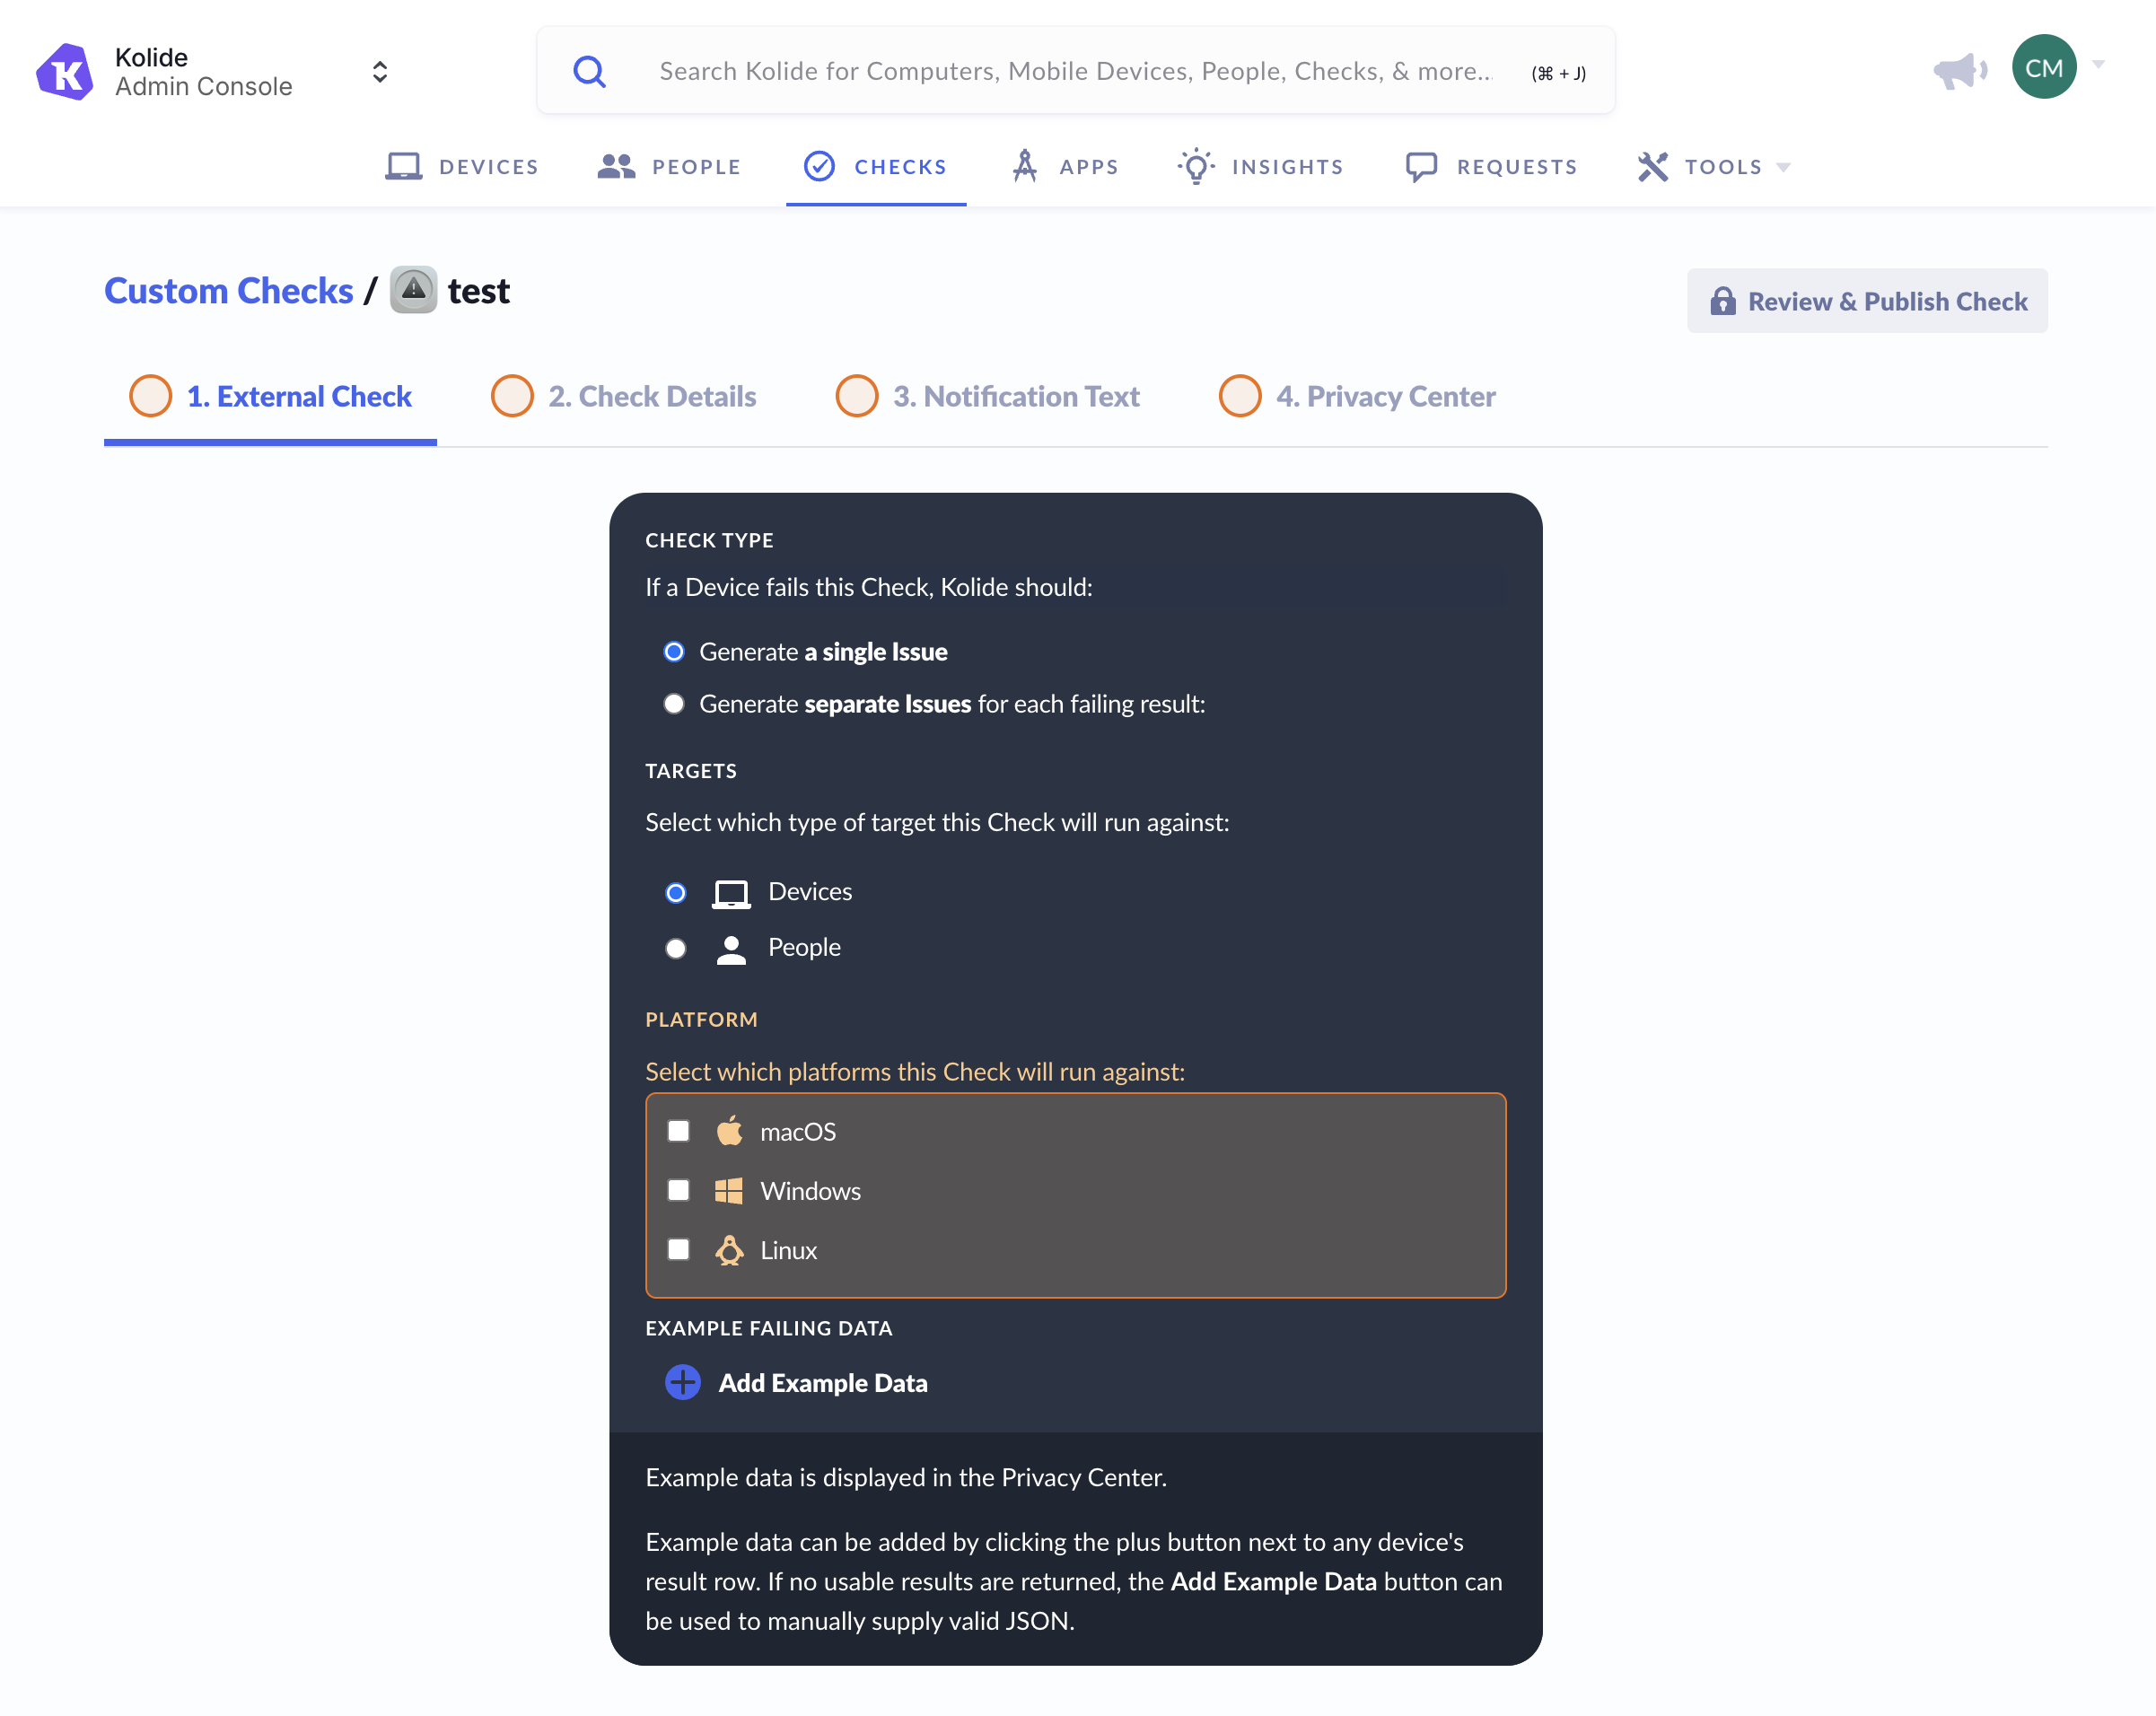
- Select what the Check will run against:
-
Device
- If you select Device, you’ll also need to choose which platforms the Check will run against.
- Person
-
Device
- If you have example data, select Add Example Data and enter it.
- Select the Check Details tab to move to the next step.
Step 2: Configure and Enable the External Check
- Enter the Issue Title and Check Description.
- Select the Notification Text tab to move to the next step.
- Enter fix instructions to describe to the end user how to fix the problem.
- Enter the rationale describing why failing the Check is a problem.
- Select the Privacy Center tab to move to the next step.
- Enter any additional privacy details you’d like the end user to see in the Privacy Center.
- Select Review & Publish Check in the top-right corner.
- Review the details you added to the Check. If you need to make changes, select Back to Editing.
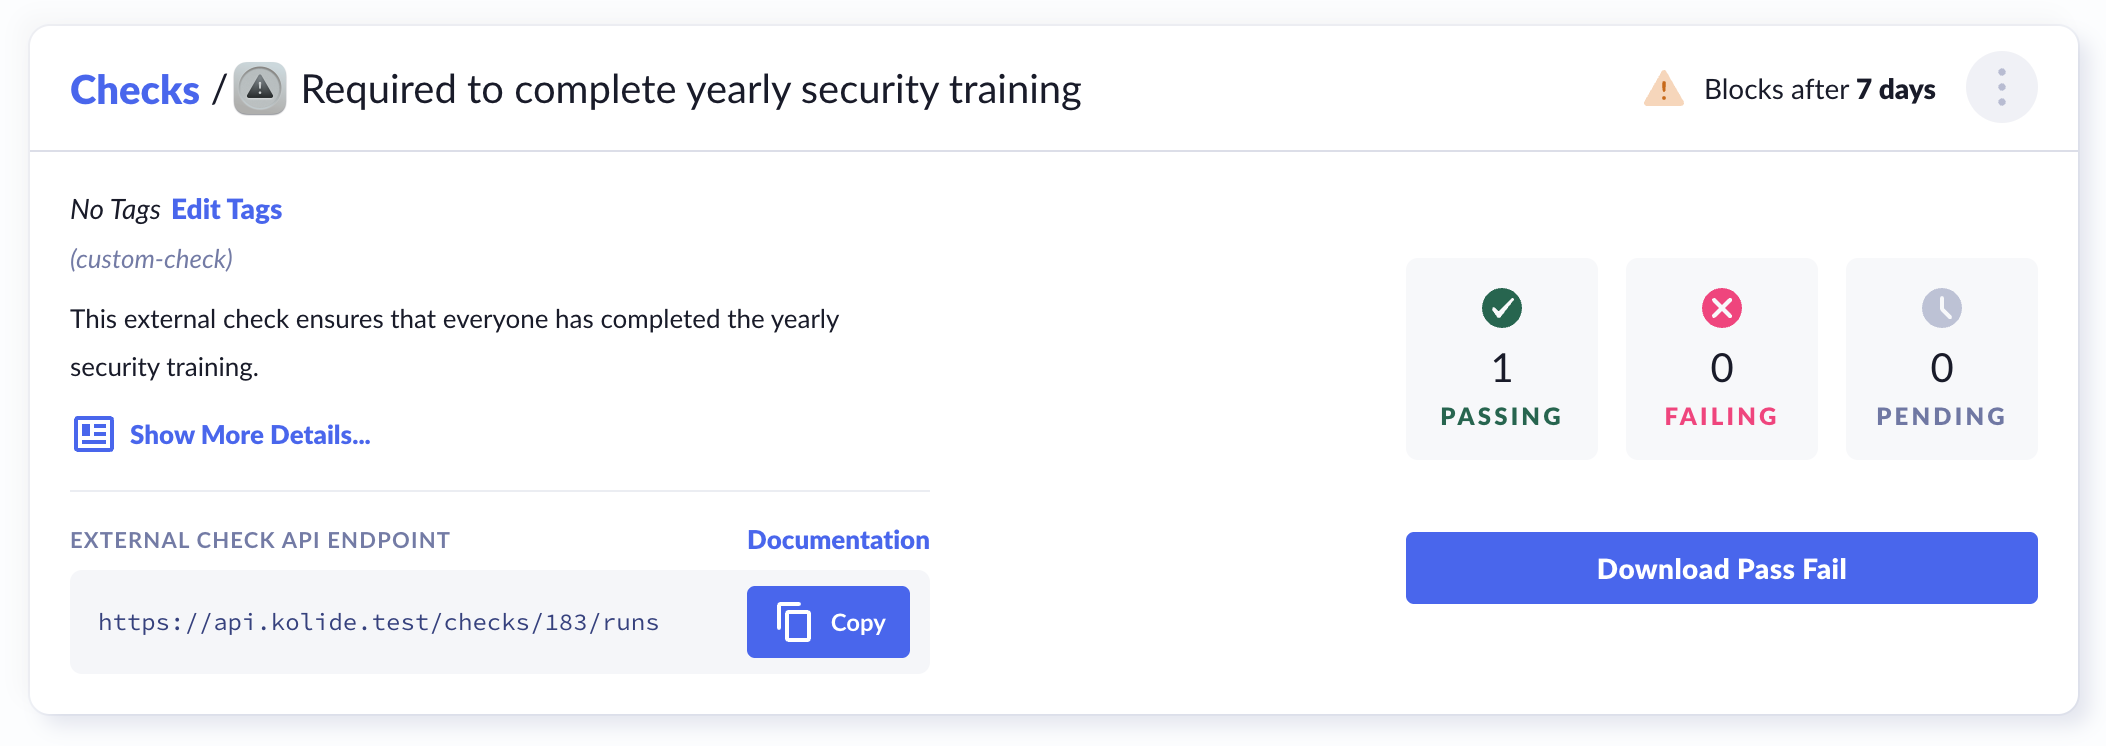
- If the Check is ready, select Publish Check, then select Enable and you’ll see the Check details page for the newly created External Check.
- On the Check details page, find the “External Check API Endpoint”. You’ll use this endpoint in the next step to send
POSTrequests withPASSorFAILresults from your external system. See the full Kolide API documentation.
Step 3: Integrate an External System with Kolide
Configure your external system to send POST requests to this endpoint and submit a PASS or FAIL for each specified device or person.
You control how and when your external system submits results to Kolide. Your team will need to trigger the API request, for example, when a training is completed. Each request must include:
- A
KOLIDE_CHECK_STATUSofPASSorFAIL - An identifier for the specified person or device:
- If the Check specifies a person, you can use
person_id,person_email - If the Check specifies a device, use
device_id
- If the Check specifies a person, you can use
curl --location 'api.kolide.com/checks/{check_id}/runs' \
--header 'X-Kolide-Api-Version: 2026-04-07' \
--header 'Content-Type: application/json' \
--header 'Authorization: Bearer token-here' \
--data '{
    "person_id": 1,
    "check_data": [{
        "KOLIDE_CHECK_STATUS": "FAIL",
        "extra_metadata":"foo"
    }]
}'
Once submitted, the External Check behaves like any other Kolide Check and is used in access decisions.
Step 4: Trigger Rechecks with Events
Configure a webhook in the External Check settings to allow Kolide to request a refresh.
When Kolide determines that a re-check is needed, it sends an external_check_refresh.new event as an HTTPS POST request to your webhook endpoint. The event includes relevant device or person identifiers such as person_id, person_email, or device_id.
{
  "event": "external_check_refresh.new",
  "id": "01EXAMPLEABCDEF1234567....",
  "timestamp": "2026-02-18T15:30:00Z",
  "data": {
    "device_id": 12345,
    "check_id": 678,
    "person_id": 910,
    "person_email": "jane.smith@example.com",
    "check_target_type": "devices"
  }
}
After receiving this event, your external system should re-evaluate the specified person or device and submit an updated result to the External Check endpoint.
Alternatively, your system can respond directly to the webhook request with a 200 OK and include check_data with the Check status and any additional metadata, for example:
{
  "check_data": [
    {
     "KOLIDE_CHECK_STATUS": "PASS",
     "extra_metadata":"data"
    }
  ]
}